Table of Contents
Advertisement
https://wiki.teltonika-networks.com/view/QSG_RUT200
QSG RUT200
Main Page
>
RUT Routers
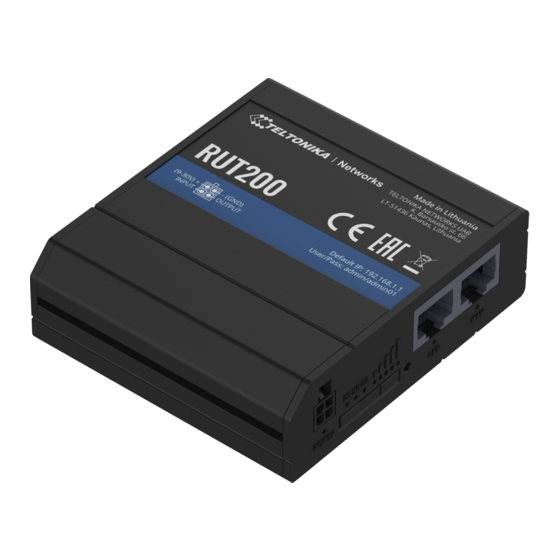
This Wiki page contains the online version of the Quick Start Guide (QSG) for the RUT200 LTE
Router. Here you will find an overview of the various components on the front and back of a
RUT200 device, hardware installation instructions, first login information, device specifications, and
general safety information. It is highly recommended to acquaint yourself with the Quick Start Guide
before using the device. You can also locate a printed version of the Quick Start Guide in the
packaging box of your device.
Contents
•
1 Safety information
-
1.1 General
-
1.2 RF exposure
-
1.3 Operating conditions
-
1.4 Faulty and damaged products
-
1.5 Electrical safety
-
1.6 Product handling
•
2 Front view
•
3 Back view
•
4 Connectors
•
5 Video Quick Start Guide
•
6 Hardware installation
•
7 Configure your computer (Windows)
•
8 Login to device
•
9 SIM card recommendations
Safety information
Before starting operating the device, please review recommendations and precautions to minimize
the possibility of accidents. Safety precautions presented are supplementary and subject to the local
safety regulations. When various operations are executed on the device, the user must fully follow
the safety instructions and recommendations provided with the device.
General
RF technologies
Max RF power
Power adapter
Mobile antenna
>
RUT200
> QSG RUT200
33 dBm@GSM, 24 dBm@WCDMA, 23 dBm@LTE, 20 dBm@WiFi
Bundled accessories specifications*
Input: 0.45A@100-240 VAC, Output: 9 VDC, 1A, 4-pin plug
698~960/1710~2690 MHz, 50 Ω, VSWR<3, gain** 4 dBi, omnidirectional, SMA
Radio specifications
2G, 3G, 4G, WiFi
male connector
Advertisement
Table of Contents

Related Manuals for Teltonika RUT200


Summary of Contents for Teltonika RUT200
- Page 1 RUT200 > QSG RUT200 This Wiki page contains the online version of the Quick Start Guide (QSG) for the RUT200 LTE Router. Here you will find an overview of the various components on the front and back of a RUT200 device, hardware installation instructions, first login information, device specifications, and general safety information.
- Page 2 RF exposure exceeding the applicable limits. External antennas used with RUT200 must be installed to provide a distance of at least 20 cm from any people and must not be co-located or operated in conjunction with any other antenna or transmitter.
-
Page 3: Operating Conditions
23 dBm WiFi 20 dBm Operating conditions Operating temperature: -40° to +75° Celsius Humidity should be in the range of 10% to 90% (non-condensing). Only use the device in dry environments. Out of direct sunlight Away from heat source, corrosive substances, salts, and flammable gases Attention: operation outside the permissible range can considerably shorten the service life of the device. -
Page 4: Front View
for SIM insertion) or its accessories: it does not contain any user-serviceable parts. For safety reasons, the equipment should be opened only by qualified personnel. Make sure to use ESD personal protective equipment while the equipment is serviced. Do not use your device in an enclosed environment where heat dissipation is poor. Prolonged use in such space may cause excessive heat and raise ambient temperature, which will lead to the automatic shutdown of your device or the disconnection of the mobile network connection for your safety. -
Page 5: Hardware Installation
Video Quick Start Guide Need some help setting up your new Teltonika Networks RUT200 Industrial Cellular Router? Watch our quick start guide video and follow the step by step instructions to easily set up your new router for operation. Hardware installation Configure your computer (Windows) 1. -
Page 6: Login To Device
4. Connect to a wireless network by right-clicking on Wireless Network Adapter and selecting Connect. 5. Choose the wireless network RUT200 **** from the list and click Connect. Enter the WiFi password located on the device's label. Login to device... - Page 7 1. To enter the router's Web interface (WebUI), type http://192.168.1.1 into the URL field of your Internet browser. 2. When prompted for authentication enter the username admin and enter the password located on the device information label/engraving.
-
Page 8: Sim Card Recommendations
3. After logging in, you must set a new password for security reasons. You will not be able to interact with the router’s WebUI until the default password is changed. The new password must consist of a minimum of 8 characters. - Page 9 reach locations.
Need help?
Do you have a question about the RUT200 and is the answer not in the manual?
Questions and answers