Chapters
Table of Contents

Related Manuals for Klarstein AIRGLAZE DIGITAL


Summary of Contents for Klarstein AIRGLAZE DIGITAL
- Page 1 AIRGLAZE DIGITAL Ofen & Heißluftfritteuse Oven & Hot Air Fryer Horno y freidora de aire caliente Four & friteuse à air chaud Forno e friggitrice ad aria calda 10045479 www.klarstein.com...
-
Page 3: Table Of Contents
Sehr geehrter Kunde, wir gratulieren Ihnen zum Erwerb Ihres Gerätes. Lesen Sie die folgenden Hinweise sorgfältig durch und befolgen Sie diese, um möglichen Schäden vorzubeugen. Für Schäden, die durch Missachtung der Hinweise und unsachgemäßen Gebrauch entstehen, übernehmen wir keine Haftung. Scannen Sie den folgenden QR-Code, um Zugriff auf die aktuellste Bedienungsanleitung und weitere Informationen rund um das Produkt zu erhalten. -
Page 4: Sicherheitshinweise
SICHERHEITSHINWEISE • Überprüfen Sie vor der ersten Verwendung, ob die Spannung Ihrer Steckdose mit der angegebenen Spannung übereinstimmt. • Tauchen Sie das Netzkabel oder das Gerät selbst nicht in Wasser oder andere Flüssigkeiten, um einen Stromschlag zu vermeiden. • Halten Sie Kinder und Haustiere während des Betriebs vom Gerät fern. •... -
Page 5: Hinweise Zum Sicheren Gebrauch
HINWEISE ZUM SICHEREN GEBRAUCH • Legen Sie die zu frittierenden Zutaten immer in den Korb, damit sie nicht mit den Heizelementen in Berührung kommen. • Decken Sie Luftein- und Luftauslassöffnungen nicht ab, während das Gerät in Betrieb ist. • Füllen Sie kein Öl in die Pfanne, da dies eine Brandgefahr darstellen kann. •... -
Page 6: Vor Der Ersten Benutzung
VOR DER ERSTEN BENUTZUNG • Entfernen Sie jegliches Verpackungsmaterial, Werbeetiketten und Klebeband vom Gerät und entsorgen Sie es. • Entfernen Sie alle Zubehörteile aus der Verpackung und lesen Sie dieses Handbuch sorgfältig durch. Achten Sie besonders auf die Betriebsanweisungen, Warnhinweise und wichtigen Sicherheitsvorkehrungen, um Verletzungen oder Sachschäden zu vermeiden. -
Page 7: Geräteübersicht Und Zubehör
GERÄTEÜBERSICHT UND ZUBEHÖR Ebenen für die Verwendung von Zubehör Ebene 1 Ebene 2 Ebene 3 Ebene 4 (unter der Heizung) Zubehör Multifunktionsblech Das Blech kann in Ebene 1/2/3 als Backblech und in Ebene 4 als Fettauffangschale eingesetzt werden. Grillrost Kann in Ebene 1/2/3 eingesetzt werden. Frittierkorb Kann für trockene Zutaten in Ebene 1/2 eingesetzt werden. -
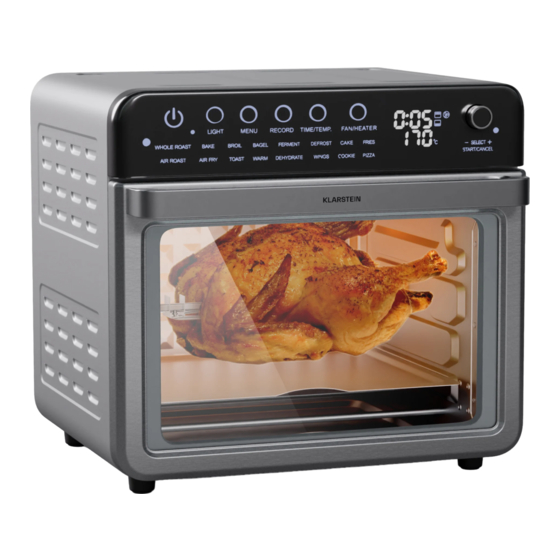
Page 8: So Benutzen Sie Den Drehspieß
SO BENUTZEN SIE DEN DREHSPIESS So bereiten Sie das Hähnchen vor Verwenden Sie kein Hähnchen, das schwerer als 1,5 kg ist. Würzen Sie das Hähnchen und binden Sie das Hähnchen mit Küchengarn wie folgt zusammen: Legen Sie das Hähnchen auf den Rücken, so dass die Beine zu Ihnen zeigen. Schieben Sie ein Stück Küchengarn unter den Rücken des Hähnchens zwischen die Flügel und die Oberschenkel. - Page 9 So befestigen Sie das Hähnchen auf dem Drehspieß Nachdem das Hähnchen gefesselt ist, führen Sie den Drehspieß vorsichtig vom Hals bis zu den Beinen durch das Hähnchen. Schieben Sie die Drehspießgabeln auf beiden Seiten des Drehspießes durch das Hähnchen. Achten Sie darauf, dass das Hähnchen fest sitzt. Ziehen Sie die Drehspießgabeln mit der Schraubenmutter leicht an.
-
Page 10: Anzeigen Und Tastenfunktionen
ANZEIGEN UND TASTENFUNKTIONEN (1) Regler für Select (Auswahl) / Start / Pause / Cancel (Abbruch) • Drehen Sie den Einstellknopf, um eine Funktion auszuwählen oder eine Einstellung zu ändern. • Drücken Sie den Einstellknopf, das Gerät beginnt auf der Basis der gewählten Funktion/Einstellung zu arbeiten. - Page 11 (4) Funktionstasten • Drücken Sie eine dieser Tasten und die gewählte Taste blinkt. • Drücken Sie nach der Einstellung zur Bestätigung den Einstellknopf und das Gerät beginnt zu arbeiten. Wenn die zusätzliche Funktionen verfügbar sind, leuchten die entsprechenden Tasten auf dem Bedienfeld. Wenn nicht, sind alle anderen Tasten inaktiv.
- Page 12 Im Gegensatz zur MENU-Funktion können die Programme mit der RECORD-Funktion geändert und als neues Programm im Gerät gespeichert werden. So erzeugen Sie eine neues Programm: Drücken Sie die RECORD-Taste. Drehen Sie den Einstellknopf, um das leere Programm aufzurufen (Display zeigt 00000 an). Drücken Sie auf die Taste TIME/TEMP.
- Page 13 Drücken Sie diese Taste und drehen Sie den Einstellknopf, um die TIME/ TEMP. gewünschte Einstellung für Zeit und Temperatur auszuwählen. Drücken Sie diese Taste und drehen Sie den Einstellknopf, um die gewünschte Einstellung für Lüfter und Heizung auszuwählen. • Drücken Sie diese Taste, drehen Sie den Einstellknopf und FAN/ stellen Sie die gewünschte Einstellung ein.
- Page 14 Zum Dörren von gesunde Snacks, wie Gemüse, Obst und sogar DEHYDRATE Fleisch. DEFROST Beschleunigen Sie das Auftauen von Tiefkühlkost. WINGS Programm für Chicken Wings. CAKE Programm für Kuchen. COOKIE Programm für Kekse. FRIES Programm für Pommes. PIZZA Programm für Pizza. (6) QR-Code mit Link zur Rezeptwebseite Der QR-Code befindet sich oben auf dem Gerät.
-
Page 15: Reinigung Und Pflege
Zubereitungstipps Bevor die Lebensmittel zum Garen in den Ofen geschoben werden, ist es besser, den Ofen für 5 Minuten auf 170 °C vorzuheizen. • Gefrorenes Fleisch / Fisch: Vor dem Garen vollständig auftauen und die Oberfläche abtupfen, damit sie trocken ist. Gefrorene Pommes / Pizza: Müssen nicht auftauen, sondern können direkt •... -
Page 16: Fehlerbehebung
FEHLERBEHEBUNG Problem Lösungsansatz Der Ofen der Heißluftfritteuse Prüfen Sie, ob Sie eine Funktion ausgewählt oder die Temperatur schaltet sich nicht ein. und den Timer eingestellt haben, und drücken Sie dann auf den Einstellknopf, um das Gerät zu starten. Vergewissern Sie sich, dass das Netzkabel eingesteckt ist, der Strom eingeschaltet ist und die Steckdose funktioniert. - Page 17 Problem Lösungsansatz Hausgemachte Pommes sind Möglicherweise haben Sie nicht die richtige Kartoffelsorte verwendet. ungleichmäßig frittiert. Verwenden Sie frische Kartoffeln, die beim Frittieren fest bleiben. Achten Sie außerdem darauf, dass Sie die geschnittenen Kartoffelstäbchen vor dem Kochen gut abspülen und abtrocknen. Teig/Panade löst sich beim Achten Sie darauf, dass der Teig nicht zu nass ist.
-
Page 18: Spezielle Entsorgungshinweise Für Verbraucher In Deutschland
SPEZIELLE ENTSORGUNGSHINWEISE FÜR VERBRAUCHER IN DEUTSCHLAND Entsorgen Sie Ihre Altgeräte fachgerecht. Dadurch wird gewährleistet, dass die Altgeräte umweltgerecht verwertet und negative Auswirkungen auf die Umwelt und menschliche Gesundheit vermieden werden. Bei der Entsorgung sind folgende Regeln zu beachten: • Jeder Verbraucher ist gesetzlich verpflichtet, Elektro- und Elek- tronikaltgeräte (Altgeräte) sowie Batterien und Akkus getrennt vom Hausmüll zu entsorgen. - Page 19 • Bei einem Vertrieb unter Verwendung von Fernkommunikationsmitteln ist die unentgeltliche Abholung am Ort der Abgabe auf Elektro- und Elektronikgeräte der Kategorien 1, 2 und 4 gemäß § 2 Abs. 1 ElektroG, nämlich „Wärmeüberträger“, „Bildschirmgeräte“ (Oberfläche von mehr als 100 cm²) oder „Großgeräte“...
-
Page 20: Hinweise Zur Entsorgung
HINWEISE ZUR ENTSORGUNG Wenn es in Ihrem Land eine gesetzliche Regelung zur Entsorgung von elektrischen und elektronischen Geräten gibt, weist dieses Symbol auf dem Produkt oder auf der Verpackung darauf hin, dass dieses Produkt nicht im Hausmüll entsorgt werden darf. Stattdessen muss es zu einer Sammelstelle für das Recycling von elektrischen und elektronischen Geräten gebracht werden. - Page 21 Dear customer, Congratulations on your purchase. Please read the following instructions carefully and follow them to prevent potential damage. We accept no liability for damage caused by disregarding the instructions and improper use. Please scan the QR code to access the latest operating instructions and further information about the product.
-
Page 22: Safety Instructions
SAFETY INSTRUCTIONS • Before using for the first time, check that the voltage of your socket corresponds to the voltage specified. • To avoid electric shock, do not immerse the power cord or the device itself in water or other liquids. •... -
Page 23: Instructions For Safe Use
INSTRUCTIONS FOR SAFE USE • Always place the ingredients to be fried in the basket so that they do not come into contact with the heating elements. • Do not cover air inlet and outlet openings while the device is in operation. •... -
Page 24: Before First Use
BEFORE FIRST USE • Remove and discard all packaging material, promotional labels and tape from the device. • Remove all accessories from the packaging and read this manual carefully. Pay particular attention to the operating instructions, warnings, and important safety precautions in order to avoid personal injury or property damage. •... -
Page 25: Device Overview And Accessories
DEVICE OVERVIEW AND ACCESSORIES Levels for using accessories Level 1 Level 2 Level 3 Level 4 (under the heating element) Accessories Multifunctional tray The tray can be used as a baking tray on levels 1/2/3 and as a drip tray on level 4. Grill grate Can be used on levels 1/2/3. -
Page 26: How To Use The Rotisserie
HOW TO USE THE ROTISSERIE How to prepare the chicken Do not use chicken heavier than 1.5 kg. Season the chicken and tie the chicken with kitchen twine as follows: Lay the chicken on its back with the legs facing you. Slip a piece of kitchen twine under the back of the chicken between the wings and the thighs. - Page 27 To attach the chicken to the rotisserie After the chicken is tied, carefully thread the rotisserie through the chicken from the neck to the legs. Slide the rotisserie forks through the chicken on both sides of the rotisserie. Make sure the chicken is firmly seated. Lightly tighten the rotisserie forks with the nut.
-
Page 28: Displays And Button Functions
DISPLAYS AND BUTTON FUNCTIONS (1) Knob for Select / Start / Pause / Cancel • Turn the adjustment knob to select a function or change a setting. • Press the adjustment knob, and the device will start to work based on the selected function/setting. - Page 29 (4) Function buttons • Press one of these buttons and the selected button will flash. • After setting, press the adjustment knob to confirm and the device will start to work. When the additional functions are available, the corresponding buttons on the control panel light up.
- Page 30 In contrast to the MENU function, the programs can be changed with the RECORD function and saved as a new program in the device. To create a new program: Press the RECORD button. Turn the adjustment knob to enter the empty program (display shows 00000). Press the TIME/TEMP button and use the adjustment knob to set the time and temperature.
- Page 31 Press this button and turn the adjustment knob to select the TIME/ TEMP. desired time and temperature setting. Press this button and turn the adjustment knob to select the desired fan and heater setting. • Press this button, turn the adjustment knob and set the desired FAN/ HEATER setting.
- Page 32 For dehydrating healthy snacks such as vegetables, fruit and DEHYDRATE even meat. DEFROST To speed up the defrosting of frozen foods. WINGS Program for chicken wings. CAKE Program for cake. COOKIE Program for biscuits. FRIES Program for chips. PIZZA Program for pizza. (6) QR code with link to recipe website The QR code is located at the top of the device.
-
Page 33: Cleaning And Care
Preparation tips Before putting food in the oven to cook, it is best to preheat the oven to 170 °C for 5 minutes. • Frozen meat/fish: Before cooking, thaw completely and pat the surface to dry. Frozen chips/pizza: Don't need to be thawed, can be prepared directly in the •... -
Page 34: Troubleshooting
TROUBLESHOOTING Problem Solution The air fryer oven does not Check that you have selected a function or set the temperature and turn on. timer, then press the adjustment knob to start the device. Make sure the power cord is plugged in, the power is on, and the mains outlet is working. - Page 35 Problem Solution Homemade chips are fried You may not have used the correct type of potato. Use fresh potatoes unevenly. that stay firm when fried. Also, be sure to rinse and dry the sliced potato sticks well before cooking. Batter/breading peels off Make sure the dough is not too wet.
-
Page 36: Disposal Considerations
DISPOSAL CONSIDERATIONS If there is a legal regulation in your country regarding the disposal of electrical and electronic equipment, this symbol on the product or on the packaging indicates that this product must not be disposed of with household waste. Instead, it must be taken to a collection point for the recycling of electrical and electronic equipment. - Page 37 Estimado cliente: Le felicitamos por la adquisición de este producto. Lea atentamente el siguiente manual y siga cuidadosamente las instrucciones de uso con el fin de evitar posibles daños. La empresa no se responsabiliza de los daños ocasionados por un uso indebido del producto o por haber desatendido las indicaciones de seguridad.
-
Page 38: Indicaciones De Seguridad
INDICACIONES DE SEGURIDAD • Antes de utilizar el aparato, compruebe que la tensión de la toma de corriente coincida con la indicada en la placa técnica del aparato. • No sumerja el aparato, el cable de alimentación ni el enchufe en agua ni en ningún otro líquido para evitar descargas eléctricas. -
Page 39: Indicaciones Sobre El Uso Correcto
INDICACIONES SOBRE EL USO CORRECTO • Coloque siempre los ingredientes a freír en la cesta de forma que no entren en contacto con las resistencias. • No tape las aberturas de entrada y salida de aire mientras el aparato esté en funcionamiento. -
Page 40: Antes Del Primer Uso
ANTES DEL PRIMER USO • Retire todo el material de embalaje, las etiquetas promocionales y la cinta adhesiva del aparato y deséchelos. • Retire cualquier accesorio del embalaje y lea detenidamente el presente manual de instrucciones. Preste especial atención a las indicaciones de uso, las advertencias y las medidas de seguridad importantes para evitar lesiones o daños materiales. -
Page 41: Vista General Del Aparato Y Accesorios
VISTA GENERAL DEL APARATO Y ACCESORIOS Niveles y accesorios Nivel 1 Nivel 2 Nivel 3 Nivel 4 (calor bajo) Accesorios Bandeja multifuncional La bandeja sirve para hornear en los niveles 1, 2 y 3, mientras que en el nivel 4 sirve para recoger grasas. Parrilla Para los niveles 1, 2 y 3. -
Page 42: Uso Del Espetón
USO DEL ESPETÓN Preparación del pollo No utilice pollos de más de 1,5 kg. Sazone el pollo y átelo con hilo de cocina como se indica a continuación: Coloque el pollo boca arriba de modo que las patas queden mirando hacia usted. - Page 43 Fijación del pollo en el espetón Una vez atado el pollo, inserte con cuidado el espetón en el pollo desde el cuello hasta las patas. Empuje las horquillas del espetón por ambos lados del espetón hacia el pollo. Asegúrese de que el pollo está bien asentado. Apriete ligeramente las horquillas giratorias con la tuerca.
-
Page 44: Indicadores Y Funciones Clave
INDICADORES Y FUNCIONES CLAVE (1) Regulador Select (selección)/Start/Pause/Cancel (detención) • Gire el botón de configuración para seleccionar una función o reconfigurar los ajustes. • Pulse el botón de configuración para poner en marcha el aparato con la función y las configuraciones programadas. •... - Page 45 (4) Botones de control • Pulse alguno de estos botones y verá como parpadea. • Púlselo tras completar la configuración para poner en marcha la freidora. De haber funciones adicionales disponibles, verá iluminados los botones correspondientes en el panel. De no haberlas, todas las teclas estarán inactivas.
- Page 46 A diferencia de en la función MENU, puede cambiar los programas de la función RECORD, así como guardar nuevos programas en el aparato. Así puede crear un programa nuevo: Pulse el botón RECORD. Gire el botón de configuración para que aparezca un programa vacío (en la pantalla verá 00000). Pulse el botón TIME/TEMP para configurar con el botón de configuración tanto el tiempo como la temperatura.
- Page 47 Pulse este botón y gire el de configuración para seleccionar el TIME/ TEMP. tiempo y la temperatura deseados. Pulse este botón y gire el de configuración para seleccionar la ventilación y el calor deseados. • Pulse este botón y gire el de configuración para configurarlo a FAN/ su gusto.
- Page 48 Para deshidratar tentempiés sanos, como verduras, frutas o, DEHYDRATE incluso, pescado. DEFROST Acelere el proceso de descongelación. WINGS Programa para alitas de pollo. CAKE Programa para tartas. COOKIE Programa para galletas. FRIES Programa para patatas fritas. PIZZA Programa para pizzas. (6) Código QR con enlace a la web de recetas.
-
Page 49: Limpieza Y Cuidado
Consejos de preparación Antes de colocar los alimentos en el aparato para calentarlos, se recomienda precalentarlo durante 5 minutos a 170 °C. • Carne o pescado congelados: descongelar por completo y secar la superficie antes de la cocción. Pizza / Patatas fritas congeladas: no hace falta descongelarlos, se preparan •... -
Page 50: Reparación De Anomalías
REPARACIÓN DE ANOMALÍAS Anomalía Posible solución El calefactor de la freidora no Compruebe si ha seleccionado una función o si están configurados se enciende. tanto la temperatura como el temporizador antes de pulsar el botón de configuración para poner en marcha el aparato. Asegúrese de que esté... - Page 51 Anomalía Posible solución Las patatas caseras no se Lo más probable es que no haya utilizado el tipo de patata adecuado. fríen de forma homogénea. Utilice patatas frescas que no se deshagan al freírlas. Asimismo, procure lavar y secar adecuadamente las patatas cortadas antes de freírlas.
-
Page 52: Indicaciones Sobre La Retirada Del Aparato
INDICACIONES SOBRE LA RETIRADA DEL APARATO Si en su país existe una disposición legal relativa a la eliminación de aparatos eléctricos y electrónicos, este símbolo estampado en el producto o en el embalaje advierte de que no debe eliminarse como residuo doméstico. - Page 53 Cher client, chère cliente, Toutes nos félicitations pour l’acquisition de ce nouvel appareil. Lisez attentivement les consignes suivantes et suivez-les pour éviter d'éventuels dommages. Nous ne saurions être tenus pour responsables des dommages dus au non-respect des consignes et à la mauvaise utilisation de l’appareil.
-
Page 54: Consignes De Sécurité
CONSIGNES DE SÉCURITÉ • Avant la première utilisation, vérifiez que la tension de votre prise correspond à la tension spécifiée. • Pour éviter toute décharge électrique, ne plongez pas le cordon d'alimentation ou l'appareil dans l'eau ou dans tout autre liquide. •... -
Page 55: Consignes Pour Une Utilisation En Toute Sécurité
CONSIGNES POUR UNE UTILISATION EN TOUTE SÉCURITÉ. • Placez toujours les ingrédients à frire dans le panier afin qu'ils n'entrent pas en contact avec les éléments chauffants. • Ne couvrez pas les ouvertures d'entrée et de sortie d'air lorsque l'appareil est en marche. -
Page 56: Avant La Première Utilisation
AVANT LA PREMIÈRE UTILISATION • Retirez tout le matériel d'emballage, les étiquettes publicitaires et le ruban adhésif de l'appareil et jetez-les. • Retirez tous les accessoires de l'emballage et lisez attentivement ce manuel. Portez une attention particulière aux instructions d'utilisation, aux avertissements et aux précautions de sécurité... -
Page 57: Aperçu De L'appareil Et Accessoires
APERÇU DE L'APPAREIL ET ACCESSOIRES Niveaux d'utilisation des accessoires Niveau 1 Niveau 2 Niveau 3 Niveau 4 (sous l'élément chauffant) Accessoires Plaque multifonction La plaque peut servir de plaque de cuisson au niveau 1/2/3 et comme lèchefrite au niveau 4. grille de cuisson Utilisable aux niveaux 1/2/3. -
Page 58: Comment Utiliser Le Tournebroche
COMMENT UTILISER LE TOURNEBROCHE Comment préparer le poulet Ne pas utiliser de poulet de plus de 1,5 kg. Assaisonner le poulet et l'attacher avec de la ficelle de cuisine comme suit : Couchez le poulet sur le dos avec les pattes vers vous. Glisser un morceau de ficelle de cuisine sous le dos du poulet entre les ailes et les cuisses. - Page 59 Comment attacher le poulet sur le tournebroche Une fois le poulet attaché, insérez délicatement la broche de rôtisserie dans le poulet du cou aux cuisses. Poussez les fourchettes de tournebroche à travers le poulet de chaque côté. Assurez-vous que le poulet est serré. Serrez légèrement les fourchettes du tournebroche avec l'écrou à...
-
Page 60: Affichages Et Fonctions Des Touches
AFFICHAGES ET FONCTIONS DES TOUCHES (1)Bouton de réglage Sélectionner / Démarrer / Pause / Cancel (Annuler) • Tournez le bouton de réglage pour sélectionner une fonction ou modifier un paramètre. • Appuyez sur le bouton de réglage, l'appareil commence à fonctionner suivant la fonction/du réglage sélectionné. - Page 61 (4) Touches de fonction • Appuyez sur l'une de ces touches et la touche sélectionnée clignotera. • Après le réglage, appuyez sur le bouton de réglage pour confirmer et l'appareil commencera à fonctionner. Lorsque les fonctions supplémentaires sont disponibles, les touches correspondantes du panneau de commande s'allument.
- Page 62 Contrairement à la fonction MENU, les programmes peuvent être modifiés avec la fonction RECORD et enregistrés en tant que nouveau programme dans l'appareil. Pour créer un nouveau programme : Appuyez sur la touche RECORD. Tourner le bouton de réglage pour entrer dans le programme vide (l'écran affiche 00000). Appuyez sur le bouton TIME/TEMP.
- Page 63 Appuyez sur ce bouton et tournez le bouton de réglage pour TIME/ TEMP sélectionner la durée et la température souhaitées. Appuyez sur ce bouton et tournez le bouton de réglage pour sélectionner le réglage du ventilateur et du chauffage. • Appuyez sur ce bouton, tournez le bouton de réglage et FAN/ effectuez le réglage souhaité.
- Page 64 Pour déshydrater des collations saines telles que des légumes, DEHYDRATE des fruits et même de la viande. DEFROST Accélérez la décongélation des aliments surgelés. WINGS Programme pour les ailes de poulet. CAKE Programme de gâteau. COOKIE Programme pour les biscuits. FRIES Programme pour les frites PIZZA...
-
Page 65: Nettoyage Et Entretien
Conseils de préparation Avant d'enfourner les aliments à cuire, il est préférable de préchauffer le four à 170 °C pendant 5 minutes. • Viande/poisson congelés : avant la cuisson, décongelez complètement et tapotez la surface pour la sécher. Frites/pizzas surgelées : n'ont pas besoin d'être décongelées, peuvent être •... -
Page 66: Résolution Des Problèmes
RÉSOLUTION DES PROBLÈMES Problème Solution Le four de la friteuse à air Vérifiez si vous avez sélectionné une fonction ou réglé la température chaud ne s'allume pas. et la minuterie, puis appuyez sur le bouton de réglage pour démarrer l'appareil . Assurez-vous que le cordon d'alimentation est branché, que l'appareil est sous tension et que la prise fonctionne. - Page 67 Problème Solution Les frites maison sont cuites Vous n'avez pas utilisé la bonne variété de pommes de terre. Utilisez de manière inégale. des pommes de terre fraîches et veillez à ce qu'elles restent fermes pendant la friture. Assurez-vous également de bien rincer et sécher les frites de pommes de terre en tranches avant la cuisson.
-
Page 68: Informations Sur Le Recyclage
INFORMATIONS SUR LE RECYCLAGE Si l'élimination des appareils électriques et électroniques est réglementée dans votre pays, ce symbole sur le produit ou sur l'emballage PIÈCEique qu'il ne doit pas être mis au rebut avec les ordures ménagères. Vous devez l'acheminer vers un point de collecte pour le recyclage des appareils électriques et électOIniques. - Page 69 Gentile cliente, La ringraziamo per l'acquisto del dispositivo. La preghiamo di leggere attentamente le seguenti indicazioni e di seguirle per evitare eventuali danni. Non ci assumiamo alcuna responsabilità per danni scaturiti da una mancata osservanza delle avvertenze di sicurezza e da un uso improprio del dispositivo.
-
Page 70: Avvertenze Di Sicurezza
AVVERTENZE DI SICUREZZA • Prima di procedere all'utilizzo, verificare che la tensione della presa elettrica corrisponda a quella indicata sulla targhetta del dispositivo. • Non immergere il cavo di alimentazione o il dispositivo in acqua o altri liquidi per evitare scosse elettriche. •... -
Page 71: Indicazioni Per Un Utilizzo Sicuro
INDICAZIONI PER UN UTILIZZO SICURO • Posizionare sempre gli ingredienti da friggere nel cestello, in modo da evitare il contatto con gli elementi riscaldanti. • Non coprire le aperture di uscita e ingresso dell'aria quando il dispositivo è in funzione. •... -
Page 72: Operazioni Preliminari
OPERAZIONI PRELIMINARI • Rimuovere tutto il materiale di imballaggio, le etichette e il nastro adesivo dal dispositivo e smaltirli. • Togliere dall'imballaggio tutti gli accessori e leggere attentamente questo manuale. Prestare particolare attenzione alle istruzioni per l'utilizzo, alle avvertenze e alle procedure di sicurezza fondamentali, in modo da evitare lesioni o danni materiali. -
Page 73: Descrizione Del Dispositivo E Accessori
DESCRIZIONE DEL DISPOSITIVO E ACCESSORI Livelli per l'utilizzo degli accessori Livello 1 Livello 2 Livello 3 Livello 4 (sotto l'elemento riscaldante) Accessori Teglia multifunzione La teglia può essere utilizzata per la cottura sui livelli 1/2/3 e come vaschetta di gocciolamento sul livello 4. Griglia di cottura Può... -
Page 74: Utilizzare Lo Spiedo Girarrosto
UTILIZZARE LO SPIEDO GIRARROSTO Come preparare il pollo Il peso massimo del pollo deve essere di 1,5 kg. Insaporire il pollo con sale e spezie e legarlo con uno spago da cucina seguendo queste indicazioni: Poggiare il pollo sul dorso, in modo che le cosce siano rivolte verso l'alto. Far passare un pezzo di spago sotto il dorso del pollo, tra le ali e le cosce. - Page 75 Fissare il pollo allo spiedo Dopo aver legato il pollo, far passare lo spiedo attraverso il pollo, dal collo fino alle cosce. Fissare il pollo da entrambi i lati dello spiedo con le apposite forche. Assicurarsi che il pollo sia ben fissato. Stringere leggermente le forche con i dadi.
-
Page 76: Indicazioni E Funzioni Dei Tasti
INDICAZIONI E FUNZIONI DEI TASTI (1) Manopola per Select (selezione)/Start/Pausa/Cancel (cancellare) • Ruotare la manopola per selezionare una funzione o modificare un'impostazione. • Premere la manopola e il dispositivo si avvia con la funzione/impostazione selezionata. • Premere la manopola una seconda volta e il dispositivo va in pausa. Premere nuovamente la manopola e il dispositivo riprende il funzionamento. - Page 77 (4) Tasti funzione • Premere uno di questi tasti e il tasto selezionato lampeggia. • Premere la manopola per confermare l'impostazione e il dispositivo entra in funzione. Se sono disponibili le funzioni aggiuntive, i relativi tasti si illuminano sul pannello di controllo. Se non è così, tutti gli altri tasti sono inattivi. Premere il tasto.
- Page 78 A differenza della funzione MENU, con la funzione RECORD è possibile modificare i programmi e salvarli nel dispositivo come programmi nuovi. Creare un nuovo programma: Premere il tasto RECORD. Ruotare la manopola di impostazione per accedere al programma vuoto (il display mostra 00000). Premere TIME/TEMP.
- Page 79 Premere questo tasto e ruotare la manopola di impostazione per TIME/ TEMP. regolare durata e temperatura. Premere questo tasto e ruotare la manopola di impostazione per regolare la ventola e il riscaldamento. • Premere questo tasto e ruotare la manopola per selezionare l'impostazione desiderata.
- Page 80 Per essiccare snack salutari, come verdure, frutta e addirittura DEHYDRATE carne. DEFROST Per scongelare gli alimenti più rapidamente. WINGS Programma per le alette di pollo. CAKE Programma per le torte. COOKIE Programma per i biscotti. FRIES Programma per le patatine fritte. PIZZA Programma per la pizza.
-
Page 81: Pulizia E Manutenzione
Consigli per la preparazione Prima di mettere gli alimenti nel dispositivo per la cottura, si consiglia di preriscaldarlo per 5 minuti a 170 °C. • Carne/pesce congelati: scongelare completamente i prodotti prima della cottura e asciugare la superficie con un panno di carta. Pizza/patatine congelate: non è... -
Page 82: Risoluzione Dei Problemi
RISOLUZIONE DEI PROBLEMI Problema Soluzione Il dispositivo non si accende. Controllare se è stata selezionata una funzione o se temperatura e timer sono impostati e premere la manopola di impostazione per avviare il dispositivo. Assicurarsi che il cavo di alimentazione sia collegato, che la corrente sia accesa e che la presa elettrica funzioni. - Page 83 Problema Soluzione Le patatine fatte in casa non Le patate utilizzate potrebbero non essere della tipologia giusta. sono fritte omogeneamente. Usare patate fresche e assicurarsi che mantengano una consistenza soda durante la cottura. Assicurarsi anche di sciacquare e asciugare i bastoncini di patate prima della cottura.
-
Page 84: Avviso Di Smaltimento
AVVISO DI SMALTIMENTO Se nel vostro Paese sono vigenti regolamenti legislativi relativi allo smaltimento di dispositivi elettrici ed elettronici, questo simbolo sul prodotto o sull'imballaggio indica che non è consentito smaltire questo prodotto insieme ai rifiuti domestici. Il dispositivo deve invece essere portato in un centro di raccolta per il riciclaggio di dispositivi elettrici ed elettronici.
Need help?
Do you have a question about the AIRGLAZE DIGITAL and is the answer not in the manual?
Questions and answers