Advertisement
Quick Links
Please visit our website for the most current instructions, assembly tips, to report damage
or request parts. www.walkeredison.com
Copyright © 2018, by Walker Edison Furniture Co., LLC, All rights reserved.
Copyright © 2018, by Walker Edison Furniture Co., LLC, All rights reserved.
Item: CMAB8B
Assembly Instructions
Revised
08/23
-V1
P.1
Advertisement

Subscribe to Our Youtube Channel
Related Manuals for Walker Edison Cama CMAB8B


Summary of Contents for Walker Edison Cama CMAB8B
- Page 1 Please visit our website for the most current instructions, assembly tips, to report damage or request parts. www.walkeredison.com Revised 08/23 Copyright © 2018, by Walker Edison Furniture Co., LLC, All rights reserved. Copyright © 2018, by Walker Edison Furniture Co., LLC, All rights reserved.
- Page 2 A Phillips head screwdriver and slotted head screwdriver is required for the assembly of this Product.
-
Page 3: Parts List
Parts List 02 pcs 06 pcs Headboard and Footboard Center Foot 02 pcs Center Slat Headboard Middle Slat 01 pcs 09 pcs 01 pcs Slat 2 Hole Headboard Left Post Headboard Right Post 01 pcs 01 pcs Left Post Of The Footboard Right Post Of The Footboard 01 pcs 02 pcs... -
Page 4: Hardware List
Hardware List 18 pcs Bolt ø7,0"*40mm 14 pcs Bolt ø7,0"*80mm 04 pcs Bolt ø1/4"*90mm Hex key 01 pc 04 pcs 34 pcs ø4.0*30mm Screw 02 pcs Space Block 81mm 16 pcs ø4.0*16mm Screw Support 04 pcs 10 pcs ø10*40mm Dowel Slotted head screwdriver required Philips head screwdriver required for assembly (not included) - Page 5 Step 1 Insert the dowel K into parts 1, 3, 4 and 7 ø10*40mm Step 2 ø7,0"*80mm Attach parts 1 and 2 to parts 3 and 4 with screw B, using hex key D...
- Page 6 Step 3 ø7,0"*80mm Attach parts 1 to parts 5 and 6 with screw B, using hex key D. Step 4 ø4.0*16mm Apply support J on part 1 and fix with screw I, using the Phillips head screwdriver.
- Page 7 Step 5 ø1/4"*90mm Attach part 7 with the post 4, fix with screw C and nut E using a Hex Key D. If necessary, use a flathead screwdriver. "If necessary, use a slotted head screwdriver» Step 6 ø7,0"*80mm Attach part 7 with the Headboard Right Post 4, fix with the screw B using the hex key D.
- Page 8 Step 7 ø1/4"*90mm Attach part 7 with the Right Post 6, fix with the screw C and nut E, using the hex key D. If necessary, use a slotted head screwdriver. Step 8 ø7,0"*80mm Attach part 7 with the Right Post 6, fix with screw B, using the hex key D...
- Page 9 Step 9 ø1/4"*90mm Attach part 7 with the Headboard Left Post 3, fix with screw C and nut E, using the hex key D. "If necessary, use a slotted head screwdriver» Step 10 ø1/4"*90mm Attach part 7 with the Left Post 5, fix with screw C and nut E, using the "If necessary, use a slotted head screwdriver»...
- Page 10 Step 11 ø7,0"*80mm Attach part 7 with the Headboard Left Post 3 and the Left Post 5, fix with screw B, using the hex key D Step 12 ø7,0"*40mm Attach part 8 on the Headboard Left Post 3 and the Headboard Right Post 4, fix with screw A, using the hex key D P.10...
- Page 11 Step 13 ø7,0"*40mm Attach parts 10 to part 11 with screw A using hex key D Step 14 Attach part 11 to supports with screw I, using a ø4.0*16mm Phillips head screwdriver. P.11...
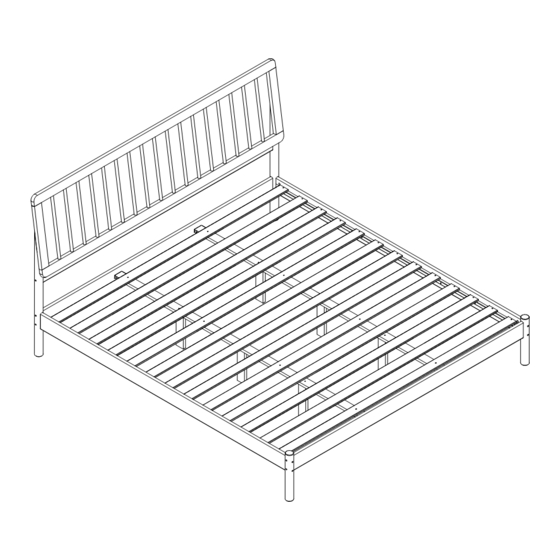
- Page 12 Step 15 Align part 7 with 9, and use hardware G to space the next ø4.0*30mm parts 9 and 12. Join pieces 7, 9, 11, and 12 with screw F using a Phillips 81mm head screwdriver. Step 16 Assembly Complete! P.12...
Need help?
Do you have a question about the Cama CMAB8B and is the answer not in the manual?
Questions and answers