Breville Prima Latte III; VCF146X; VCF147X - Espresso and Cappuccino Machine Manual
- Quick start manual (18 pages) ,
- Instructions for use manual (60 pages)
Advertisement
- 1 INTRODUCTION
- 2 DESCRIPTION OF THE APPLIANCE
- 3 BEFORE USING YOUR APPLIANCE FOR THE FIRST TIME
- 4 SELECTING THE RIGHT COFFEE
- 5 OPERATING INSTRUCTIONS
- 6 SELECT THE FUNCTION
-
7
CLEANING
- 7.1 CLEANING THE MILK RESERVOIR AND FROTHING TUBE
- 7.2 DEEP CLEANING THE FILTERS
- 7.3 CLEANING THE FILTERS
- 7.4 CLEANING THE BREW HEAD, THE PORTA-FILTER AND FILTERS
- 7.5 CLEANING THE WATER RESERVOIR
- 7.6 CLEANING THE UNIT
- 7.7 DESCALING
- 7.8 SUGGESTED CLEANING INTERVALS
- 7.9 CLEANING NOTIFICATION
- 7.10 CLEANING PROCEDURE
- 7.11 MAINTENANCE
- 8 PROBLEMS, CAUSES AND SOLUTIONS
- 9 PRODUCT SAFETY
- 10 Documents / Resources
INTRODUCTION
Congratulations! You have selected the new and innovative Breville Prima Latte III. This unique appliance has been designed to help you prepare delicious espressos, cappuccinos and lattes quickly, conveniently, and automatically with the touch of a button.
ESPRESSO
A unique method of coffee brewing in which hot water is forced through finely ground coffee. Popular in Europe, it is a far richer and more full-bodied brew than regular drip coffee. Because of its richness, espresso is usually served in 45 to 60 ml (1.5 to 2 oz.) portions, in demitasse cups.
CAPPUCCINO
A drink made with about 1/3 espresso, 1/3 steamed milk, and 1/3 frothed milk.
LATTE
A drink made with about 1/4 espresso and 3/4 steamed milk.
Please read ALL of the instructions, cautions, notes and warnings included in this instruction manual carefully before you begin to use this appliance. When this unit is used, some parts and accessories get hot and need to cool down. Proper care and maintenance will ensure the long life of the Breville Prima Latte III and its troublefree operation. Save these instructions and refer to them often for cleaning and care tips.
Your Breville Prima Latte III can be used with ground coffee as well as E.S.E. pods (45 mm), making it exceptionally practical and versatile to prepare single shots of espresso, cappuccino and latte.
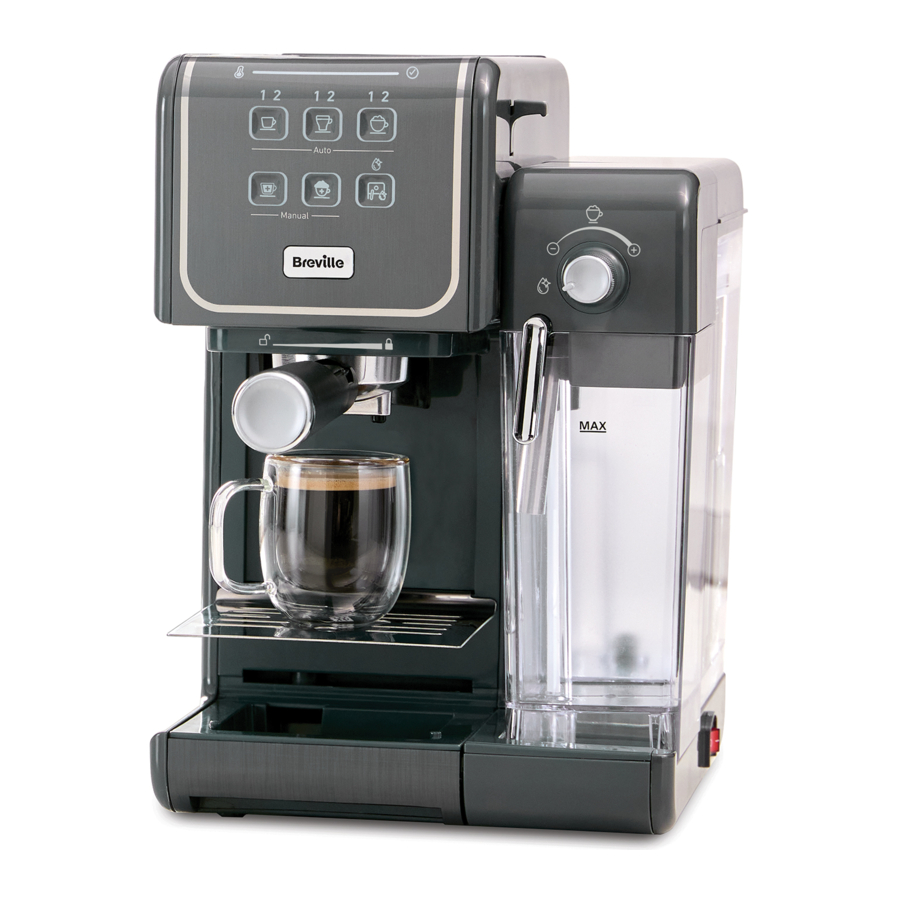
DESCRIPTION OF THE APPLIANCE

- Brew Head
- Porta-Filter:
- Porta-Filter for Ground Coffee and E.S.E. pods (45mm)
- Height Adjusting Slot for Small Cups
- Removable Drip Grid
- Removable Drip Tray
- Drip Tray Overflow Floater
- Filters For:
- Single Shot of Espresso and E.S.E. pods (45mm)
- Double Shot of Espresso
- Detachable Bottom Covers of Filters
- Measuring Scoop/Tamper
- Control Panel
- Progress Bar
- Single (1) & Double (2) Espresso Button
- Small (1) & Large Latte Button Button
- Small (1) & Large (2) Cappuccino Button
- Manual Espresso Brew Button
- Manual Milk Frothing Button
- Clean Button
- Removable/Clear Milk Reservoir
- Milk Reservoir Lid
- Milk Reservoir Release Button
- Milk Froth Level Control Knob
- Milk Frothing Tube Guide Lever
- Frothed Milk Dispensing Tube
- On/Off Switch "I/O"
- Removable Water Tank
- Water Tank Lid
- Milk Hose
Due to our policy of continuous improvement, the actual product may differ slightly from the one illustrated in these instructions.
BEFORE USING YOUR APPLIANCE FOR THE FIRST TIME
CLEANING THE UNIT PRIOR TO FIRST USE
Please refer to the "Description of the Appliance" section to familiarise yourself with the product and identify all parts.
- Please make sure the unit is off "O" by pressing the on/off "I/O" switch located on the right side of the unit. Make sure it is unplugged from the electrical outlet.
- Remove stickers and labels from the unit.
- REMOVE RED PLUG FROM THE BOTTOM OF THE WATER RESERVOIR.
- First remove and then wash the water reservoir, the milk reservoir, the portafilter, the two filters and measuring scoop/tamper in a mixture of mild detergent and water. Rinse each thoroughly and place them back into the unit.
- Refer to the instructions on "PLACING THE PORTA-FILTER" section before placing or removing the porta-filter and any filter from the unit.
- To clean the inside of the appliance, follow the steps listed on the "PREPARING CAPPUCCINO" section using water in both reservoirs and no ground coffee in the filter. Do not immerse the main body of the appliance or power cord and plug in water or attempt to reach any of its internal parts.
PRIME THE UNIT
To prime unit, run the steam cycle by following the steps below:
- Fill water reservoir up to the "MAX" line and make sure to place the water reservoir tightly back in the unit with its lid closed.
- Fill the milk reservoir with water up to the MAX level and slide the milk reservoir back in its place. You should feel the milk reservoir lock in place.
- Select one of the filters (single or double espresso) and place it in the porta-filter for ground coffee. Place the porta-filter in the unit ensuring it is properly locked and place a large cup under it. Also, make sure the tip of the frothed milk dispensing tube is pointing inside the cup.
- Plug the appliance into the appropriate outlet.
- Turn the power button on "I".
- The control panel progress bar will illuminate (Espresso heater and Steam heater "
![]() ") showing the progress. Once the progress bar is a fully illuminated and solid light, press the manual espresso button "
") showing the progress. Once the progress bar is a fully illuminated and solid light, press the manual espresso button " ![]() ". The water will flow, allow to fill a cup, then stop by pressing the button again. The progress bar illumination will cycle whilst operating.
". The water will flow, allow to fill a cup, then stop by pressing the button again. The progress bar illumination will cycle whilst operating. - Dispose of the water in the cup and place it back in the unit.
- Press the manual froth button "
![]() ". The water will flow, allow to fill a cup, then stop by pressing the button again. The progress bar illumination will cycle whilst operating.
". The water will flow, allow to fill a cup, then stop by pressing the button again. The progress bar illumination will cycle whilst operating. - The control panel progress bar will illuminate (Espresso heater and Steam heater "
![]() ") will turn into a solid light. Now your unit has been primed and is ready to be used.
") will turn into a solid light. Now your unit has been primed and is ready to be used.
HOW TO SELECT THE RIGHT CUP
Please make sure to select your cup according to the following chart:
| BEVERAGE | SUGGESTED CUP | |
Espresso | Single (1) Double (2) | 40ml 80ml |
Cappuccino | Small (1) Large (2) | 230ml 460ml |
Latte | Small (1) Large (2) | 400ml 550ml |
NOTE: The total amount of the beverage can vary depending on the type of milk and level of froth used.
SELECTING THE RIGHT COFFEE
THE COFFEE
The coffee should be freshly ground and dark roasted. You may want to try a French or Italian roast ground for espresso. Pre-ground coffee will only retain its flavour for 7 – 8 days, provided it is stored in an airtight container and in a cool, dark area. Do not store in a refrigerator or freezer. Whole beans are recommended to be ground just before use. Coffee beans stored in an airtight container will preserve flavour for up to 4 weeks.
THE GRIND
This is a vital step in the espresso making process if you are grinding your own coffee. It may require practice. The coffee must be of a fine grind.
- The correct grind should look like table salt.
- If the grind is too fine, the water will not flow through the coffee even under high pressure. These grinds look like powder and feel like flour when rubbed between fingers.
- If the grind is too coarse, the water flows through the coffee too fast, preventing a full-flavored extraction. Be sure to use a quality grinder for uniform consistency.
OPERATING INSTRUCTIONS
FILLING THE WATER RESERVOIR
- Fill the water reservoir with water. You may use either a pitcher to fill it up or remove it from the unit and then fill it up under the tap. Fill the reservoir with the desired amount of water below the "MAX" level on the reservoir. Never use warm or hot water to fill the water reservoir.
![]()
- Close the water reservoir lid. If you removed it from the unit to fill up with water, please make sure to place it back tightly in its place.

FILLING THE MILK RESERVOIR
If you plan to prepare a cappuccino or latte, remove the milk reservoir from the unit by lifting up on the milk reservoir release button, simultaneously sliding milk reservoir out. Then, pour the desired quantity of cold milk you estimate you will need, making sure it is below the "MAX" level on the reservoir. Once finished, slide the milk reservoir back onto the unit ensuring it fits tightly. You should feel the milk reservoir lock in place.

NOTE: You can use any type of milk you prefer, i.e. whole milk, low fat milk, organic or soy milk.
CHOOSING THE PORTA-FILTER
Your unit includes one porta-filter for use with ground coffee and E.S.E. pods.
USING THE PORTA-FILTER FOR GROUND COFFEE AND ESE PODS
CHOOSING THE FILTER
Select the filter to be used as follows:
- FOR A SINGLE SHOT – use the filter for a single shot of espresso if using ground coffee, or if using E.S.E. (Easy Serving Espresso) pods.
![]()
- FOR A DOUBLE SHOT OR TWO SINGLE SHOTS – use the filter for a double shot of espresso. By placing two small cups underneath the portafilter, you may prepare two single shots of espresso at once.

NOTE: The pod filter included with your unit has been designed to work only with E.S.E. (Easy Serving Espresso) (45 mm) pods.
PLACING THE FILTER ON THE PORTAFILTER
- Insert the filter into the porta-filter, making sure to align the filter dimple to the porta-filter notch.
![]()
- Turn the filter to the left or right to lock it in place.
![]()


NOTE: To remove the filter for cleaning, turn the filter to the left or right to align the filter dimple to the porta-filter notch and proceed to remove.

Make sure the filter has cooled down before attempting to remove it from the porta-filter.
SECURING THE FILTER WHEN EMPTYING THE PORTA-FILTER
When you have finished brewing your coffee flip the tab located in the handle to hook over the edge of the filter, lock in place when knocking out the 'cake' of coffee. Flip the tab back ( ![]() ) in the handle and remove the filter for cleaning. DO NOT have the tab in the locked position when attaching the portafilter to the brew head.
) in the handle and remove the filter for cleaning. DO NOT have the tab in the locked position when attaching the portafilter to the brew head.

FILLING WITH COFFEE
Place selected filter in porta-filter as follows:
FOR GROUND COFFEE:
- Fill the filter with fresh, fine ground espresso coffee about 3mm from the rim (DO NOT overfill).
![]()
- Using the tamping part of the scoop, push the coffee grounds downwards as far as the tamper will go to get your espresso grounds compact and even.
![]()
- Clean any excess coffee from the rim to ensure proper fit under brew head.
![]()


FOR ESE (EASY SERVING ESPRESSO) PODS
Simply place the pod in the filter for a single shot of espresso. If there is any loose paper from the pod sticking out from the filter, be sure to fold it inside to ensure a good seal when brewing.

PLACING THE PORTA-FILTER
- Position porta-filter underneath the brew head.
![]()
- Position handle so that the handle lines up with the open lock icon "
![]() " on the unit and fits into the groove.
" on the unit and fits into the groove.
![]()
- Then, slowly turn it to the right until the handle is aligned with the closed lock symbol "
![]() " on the unit.
" on the unit.
![]()
Ensure you do not accidentally press a drinks button.
![]()


PLACING THE CUP(S)
- Adjust the height by inserting the removable drip grid in the height adjusting slot if you are using a small "demitasse" cup(s) to brew espresso.
![]()
- Keep the removable drip grid on top of the removable drip tray if you are using a larger cup to brew cappuccino or latte.
![]()
![]()
When brewing cappuccino or latte, please make sure to adjust the frothing tube lever in order to position the frothed milk dispensing tube to point inside the cup that is being used.
![]()


TURNING THE UNIT ON
- Make sure unit is plugged into the appropriate electrical outlet.
![]()
- Turn unit on "I" using the on/off "I/O" switch located on the right side on the unit.
![]()


The control panel progress bar will illuminate (Espresso heater and Steam heater "  ") during the heating process and until the water and milk (if preparing cappuccino or latte) reach the perfect temperature. Once the progress bar is a fully illuminated and a solid light, the unit is ready to use.
SELECT THE FUNCTION
PREPARING ESPRESSO
- Press the Espresso Button "
![]() " once to brew a single shot. The indicator symbol (1) will illuminate for a single shot of espresso. The progress bar will indicate a single shot of espresso is brewing.
" once to brew a single shot. The indicator symbol (1) will illuminate for a single shot of espresso. The progress bar will indicate a single shot of espresso is brewing.
![]()
- Press the Espresso Button "
![]() " twice to brew a double shot or two single shots of espresso. The indicator symbol (2) will illuminate for a double shot of espresso. The progress bar will indicate a double shot of espresso is brewing. For both Automatic Espresso functions, the unit will start brewing the espresso according to your selection. The unit will stop automatically after the brewing process and the progress bar will fully illuminate in a solid light, indicating that the cycle has been completed. Your delicious espresso is ready to be enjoyed!
" twice to brew a double shot or two single shots of espresso. The indicator symbol (2) will illuminate for a double shot of espresso. The progress bar will indicate a double shot of espresso is brewing. For both Automatic Espresso functions, the unit will start brewing the espresso according to your selection. The unit will stop automatically after the brewing process and the progress bar will fully illuminate in a solid light, indicating that the cycle has been completed. Your delicious espresso is ready to be enjoyed!
NOTE: If you would like to brew less coffee than the preset serving, press the function button at any time during the brewing process to stop when the desired amount of coffee is reached.
![]()
- For manual espresso, press the Manual Espresso Button "
![]() " once to begin brewing. When you have the desired amount of espresso, press the Manual Espresso button once again to stop the machine.
" once to begin brewing. When you have the desired amount of espresso, press the Manual Espresso button once again to stop the machine.
![]()


PREPARING CAPPUCCINO
Prior to preparing your cappuccino, adjust the level of frothed milk according to your preference by turning the Froth Control Knob to the right for more foam (cappuccino) and to the left for less foam (latte).

NOTE: The level of foam can also be adjusted during the brewing cycle.
- Press the Cappuccino Button "
![]() " once to brew a small cup of cappuccino. The indicator symbol (1) will illuminate for a small cup of cappuccino. The progress bar will indicate a small cup of cappuccino is brewing.
" once to brew a small cup of cappuccino. The indicator symbol (1) will illuminate for a small cup of cappuccino. The progress bar will indicate a small cup of cappuccino is brewing.
![]()
- Press the Cappuccino Button "
![]() " twice to brew a large cup of cappuccino. The indicator symbol (2) will illuminate for a large cup of cappuccino. The progress bar will indicate a large cup of cappuccino is brewing.
" twice to brew a large cup of cappuccino. The indicator symbol (2) will illuminate for a large cup of cappuccino. The progress bar will indicate a large cup of cappuccino is brewing.
![]()
 " once to brew a small cup of cappuccino. The indicator symbol (1) will illuminate for a small cup of cappuccino. The progress bar will indicate a small cup of cappuccino is brewing.

The unit will start brewing cappuccino according to your selection. The unit will stop automatically after the brewing process and the progress bar will become a solid illuminated light, indicating that the cycle has completed. Your delicious cappuccino is now ready to be enjoyed!
PREPARING LATTE
Prior to preparing your latte, adjust the level of frothed milk according to your preference by turning the Froth Control Knob to the right for more foam (cappuccino) and to the left for less foam (latte).

- Press the Latte Button "
![]() " to brew a small cup of latte. The indicator symbol (1) will illuminate for a small cup of latte. The progress bar will indicate a small cup of latte is brewing.
" to brew a small cup of latte. The indicator symbol (1) will illuminate for a small cup of latte. The progress bar will indicate a small cup of latte is brewing.
![]()
- Press the Latte Button "
![]() " to brew a large cup of latte. The indicator symbol (2) will illuminate for a large cup of latte. The progress bar will indicate a large cup of latte is brewing.
" to brew a large cup of latte. The indicator symbol (2) will illuminate for a large cup of latte. The progress bar will indicate a large cup of latte is brewing.
![]()
 " to brew a small cup of latte. The indicator symbol (1) will illuminate for a small cup of latte. The progress bar will indicate a small cup of latte is brewing.

The unit will start brewing latte according to your selection. The unit will stop automatically after the brewing process and the progress bar will become a solid illuminated light, indicating that the cycle has completed.
PREPARING FROTHED MILK
The Breville One-Touch Coffeehouse II also allows you to prepare frothed milk alone. Press the Manual Foam "Froth" Button "  " if you wish to add more foam to your beverage or to prepare frothed milk for any other beverage, e.g. macchiato, hot chocolate, chai latte, etc. Press the Manual

Foam "Froth" Button " " once again to stop the machine.
AFTER PREPARING YOUR BEVERAGES WITH MILK
Once you are done preparing your beverage with milk, you can either store the unit's milk reservoir directly in the refrigerator (ready to be used for the next time) or dispose of the leftover milk.
Place a large empty cup (with at least 325 mL/ 11 fl. oz. capacity) under the frothed milk dispensing tube. Turn the Froth Control Knob counter clockwise to the clean position "  " then press the Clean button "
  " to activate the clean function. Let the unit dispense the water through the tube until it comes out clear. The unit will automatically stop when the progress bar stops cycling and fully illuminates in a solid light, the clean cycle is completed, or you can press the clean button " " to stop the process.

CLEANING
CLEANING LIGHT WILL REMAIN ILLUMINATED WHEN YOUR MACHINE IS READY FOR A CLEANING CYCLE
Always switch off, unplug and allow to cool before removing parts and cleaning
CLEANING THE MILK RESERVOIR AND FROTHING TUBE
Although you can store the milk reservoir with leftover milk in the refrigerator, it is important to clean the reservoir and frothing tube regularly to avoid clogging and residue buildup. In order to clean the milk reservoir, please follow the instructions listed below:
- Remove the milk reservoir from the unit by lifting up the milk reservoir release button and simultaneously sliding the milk reservoir out.
- Remove the lid of the reservoir.
- Dispose of any milk left, then rinse and wash the milk reservoir and its lid thoroughly with warm soapy water. Make sure to rinse and dry them well. Do not use abrasive cleaners and scouring pads, as they will scratch the finish.
NOTE: The milk reservoir is also dishwasher safe (top rack). Do not place the lid of the milk reservoir in the dishwasher. - Fill milk reservoir with water, not above the MAX fill line. Place milk reservoir back onto unit, lifting up on reservoir release button and simultaneously sliding milk reservoir in, holding reservoir by the lid.
- Place a large empty cup under the froth dispensing tube.
- Turn the Froth Control Knob counter clockwise to the clean position "
![]() " then press the Clean "
" then press the Clean " ![]() " button to activate the clean function. The unit will start releasing steam through the froth dispensing tube. Let the cleaning cycle run until you no longer see any water coming out of the tube, or let the cycle run until it stops automatically.
" button to activate the clean function. The unit will start releasing steam through the froth dispensing tube. Let the cleaning cycle run until you no longer see any water coming out of the tube, or let the cycle run until it stops automatically. - Dispose of any water left in the milk reservoir and place it back in the unit. You should feel the milk reservoir lock in place.
DEEP CLEANING THE FILTERS
Make sure to deep clean your filter every 90 days for optimal brewing performance. Follow these disassembly instructions and rinse the pieces in a large bowl of warm water. Once rinsed thoroughly, wipe dry and reassemble.


CLEANING THE FILTERS
- To remove the detachable bottom covers from under the filters, rotate them counterclockwise towards the unlock icon "
![]() ".
". - Wash the detachable bottom covers and filters with warm soapy water. Make sure to rinse and dry them well.
- Place the detachable bottom covers back onto the filters by inserting them in their place and then rotating them clockwise (away from the unlock icon "
![]() ") until you hear it click.
") until you hear it click.
Froth Milk Dispensing Tube Cleaning - without affecting milk in resorvoir
- Ensure the milk reservoir and lid are properly inserted in the unit.
- Place a large empty mug under the froth dispensing tube.
- Turn the Froth Control Knob counter clockwise to the clean position "
![]() " then press the "
" then press the " ![]() " button to activate the clean function. The unit will start releasing steam through the froth dispensing tube. Let the cleaning cycle run until you no longer see any water coming out of the tube, or let the cycle run until it stops automatically.
" button to activate the clean function. The unit will start releasing steam through the froth dispensing tube. Let the cleaning cycle run until you no longer see any water coming out of the tube, or let the cycle run until it stops automatically. - Dispose of the water in the mug.
- You can remove the milk reservoir with the lid and store it in the fridge for later use.
CLEANING THE BREW HEAD, THE PORTA-FILTER AND FILTERS
- Press the on/off "I/O" switch located on the right side of the unit to the off position "O" and unplug the power cord from the electrical outlet.
- Some of the metal parts may still be hot. Do not touch them with your hands until they have cooled.
- Remove the porta-filter and discard the coffee grounds or used pod. Wash both the porta-filter and filter thoroughly with warm soapy water. Make sure to rinse and dry them well.
NOTE: Do not wash the porta-filters and filters in the dishwasher. - Wipe the lower part of the brew head in the unit with a damp cloth or paper towel to remove any coffee grounds that might have been left.
- Place the porta-filter (without any filter) back in the brew head in the unit and lock it in place.
- Place a large empty cup under the porta-filter.
- Plug the power cord into the electrical outlet. Press the on/off "I/O" switch to the on position "I". Press the Espresso "
![]() " button once and let the unit brew with water until it stops automatically.
" button once and let the unit brew with water until it stops automatically.
 " button once and let the unit brew with water until it stops automatically.
CLEANING THE WATER RESERVOIR
- Dispose of the remaining water by removing the water reservoir and turning it upside down over the sink. It is recommended to empty the water reservoir between uses.
- Wash the water reservoir and its lid thoroughly with warm soapy water. Make sure to rinse and dry them well.
NOTE: Do not wash the water reservoir or its lid in the dishwasher.

Do not immerse main body of the appliance or power cord and plug in water or any other liquid.
CLEANING THE UNIT
- Wipe housing with a soft wet cloth. Do not use abrasive cleaners or scouring pads, as they will scratch the finish.
- Do not store any of the porta-filters in the brew head. This can adversely affect the seal between the brew head and the porta-filter while brewing espresso.
DESCALING
Build-up of mineral deposits in the unit will affect the operation of the appliance. Your appliance must be descaling when you begin to notice an increase in the time required to brew espresso, or when there is excessive steaming. Also, you may notice a build-up of white deposits on the surface of the brew head.
The frequency of cleaning depends upon the hardness of the water used.
The following table gives the suggested cleaning intervals.
SUGGESTED CLEANING INTERVALS
| Type of Water | Cleaning Frequency |
| Soft Water (Filtered Water) | Every 80 Brew Cycles |
| Hard Water (Tap Water) | Every 40 Brew Cycles |
TO DESCALE WATER RESERVOIR:
- Fill the reservoir with fresh, undiluted white household vinegar.
- Allow appliance to sit overnight with the vinegar solution in the water reservoir.
- Discard vinegar by removing the reservoir and turning it upside down over the sink.
- Rinse the water reservoir thoroughly with tap water by filling the tank half full with water and then pouring the water back out into the sink, repeating this step twice.
TO DESCALE INTERNAL PARTS:
- Make sure you descale the inside of the water reservoir first by following the descale steps above.
- Make sure to switch the on/off button to the off "O" position and the power cord is disconnected from the electrical outlet. Fill the reservoir with undiluted white household vinegar.
- Insert the porta-filter (with filter and no coffee) and place a large empty cup on top of the drip tray and under the portafilter.
- Plug the power cord into the electrical outlet.
- Press the on/off button to switch the unit on (I), the control panel progress bar will illuminate (Espresso heater and Steam heater "
![]() " ) showing the progress. Once the progress bar is a fully illuminated and a solid light, press the automatic espresso button "
" ) showing the progress. Once the progress bar is a fully illuminated and a solid light, press the automatic espresso button " ![]() " twice (2). The vinegar will start flowing, allow to fill a cup, then stop by pressing the button again. The progress bar illumination will cycle whilst operating.
" twice (2). The vinegar will start flowing, allow to fill a cup, then stop by pressing the button again. The progress bar illumination will cycle whilst operating. - Place a large empty cup (with at least 325 mL/ 11 fl. oz. capacity) under the frothed milk dispensing tube. Fill the milk reservoir with water and place it back on the unit. Turn the Froth Control Knob counter clockwise to the clean position "
![]() " then press the Clean "
" then press the Clean " ![]() " button to activate the clean function. Let the cleaning cycle run until you no longer see any milk coming out of the tube, or let the cycle run until it stops automatically.
" button to activate the clean function. Let the cleaning cycle run until you no longer see any milk coming out of the tube, or let the cycle run until it stops automatically. - Repeat Steps 1 – 6 as necessary using only tap water to rinse any remaining traces of vinegar out of the machine.
CLEANING NOTIFICATION
After 200 cycles the Cleaning Notification will activate.
- The Cleaning Indicator Light will remain on as a notification until the cleaning procedure is completed.
- If you brew another espresso. latte. or cappuccino. the cleaning light will turn off momentarily, but will start flashing after completion of the brew.
- When the unit is powered off the Cleaning Indicator Light will turn off.
- When the unit powers down and goes into sleep mode, the cleaning indicator light will turn off.
CLEANING PROCEDURE
- Pour a solution of 50% white vinegar and 50% clean water into the water tank. Stir the solution with a spoon to make sure it is properly mixed.
- Rotate the milk tank knob to the clean position. Place a large cup under the frothed milk dispensing tube.
- Press the clean button for 5 seconds to activate the deep clean mode.
- The progress bar slowly cycles, same as when the brew cycle is operating, through the entire cleaning cycle.
- The pump will turn on and off multiple times for about 12 minutes. The cleaning light will then turn off indicating that the cleaning cycle is completed.
- Pour out any remaining solution from the water tank and replace with clean water. Fill with clean water up to the Max level line.
- Press the manual Espresso button "
![]() " and let the water fill a cup, then press the manual espresso button to stop the machine.
" and let the water fill a cup, then press the manual espresso button to stop the machine. - Rotate the milk tank knob to the clean position and press the clean button to run the normal clean mode.
- Press the espresso button and then the steam function to flush the system out.
MAINTENANCE
This appliance has no user serviceable parts. Any servicing beyond that described in the Cleaning Section should be performed by an Authorized Service
Representative only. See warranty section.
PROBLEMS, CAUSES AND SOLUTIONS
| PROBLEM | CAUSES | SOLUTIONS |
Coffee does not come out |
|
|
Coffee comes out around the edge of the porta-filter |
|
|
| Milk is not foamy after frothing or it is not coming out of the frothing tube. |
|
|
Coffee comes out too quickly |
|
|
Coffee is too weak |
|
|
The control panel lights are flashing |
|
|
Cleaning light remains on |
|
|
PRODUCT SAFETY
READ CAREFULLY AND KEEP FOR FUTURE REFERENCE
This appliance can be used by children aged from 8 years and above and persons with reduced physical, sensory or mental capabilities or lack of experience and knowledge if they have been given supervision or instruction concerning use of the appliance in a safe way and understand the hazards involved. Children shall not play with the appliance. Cleaning and user maintenance shall not be made by children unless they are older than 8 and supervised. Keep the appliance and its cord out of reach of children aged less than 8 years.
If the supply cord is damaged, it must be replaced by the manufacturer, its service agent or similarly qualified persons in order to avoid a hazard.

This appliance generates heat during use. Adequate precaution must be taken to prevent the risk of burns, scalds, fires or other damage to persons or property caused by touching the exterior whilst in use or during cooling.
 Never use this appliance for anything other than its intended use. This appliance is for household use only. Do not use this appliance outdoors.
Always ensure that hands are dry before handling the plug or switching on the appliance.
Always use the appliance on a stable, secure, dry and level surface.
This appliance must not be placed on or near any potentially hot surfaces (such as a gas or electric hob).
Do not use the appliance if it has been dropped, if there are any visible signs of damage or if it is leaking.
Ensure the appliance is switched off and unplugged from the supply socket after use and before cleaning.
Always switch off, unplug and allow to cool before removing/fitting parts, cleaning or storing.
Never immerse the main body of the appliance or power cord and plug in water or any other liquid.
Never let the power cord hang over the edge of a worktop, touch hot surfaces or become knotted, trapped or pinched.
Never leave the appliance unattended when in use.
The coffee maker shall not be placed in a cabinet when in use.

Documents / ResourcesDownload manual
Here you can download full pdf version of manual, it may contain additional safety instructions, warranty information, FCC rules, etc.
Download Breville Prima Latte III; VCF146X; VCF147X - Espresso and Cappuccino Machine Manual
Advertisement


Need help?
Do you have a question about the Prima Latte III and is the answer not in the manual?
Questions and answers