Table of Contents
Advertisement
Advertisement
Chapters
Table of Contents

Related Manuals for Skydroid H16 Series


Summary of Contents for Skydroid H16 Series
- Page 1 SKYDROID-H16/H16 PRO User Manual V1.0...
-
Page 2: Table Of Contents
Contents A.Overview Product Features Main purpose and scope of application Specifications The composition of the model and its significance Port definition Environment conditions Working conditions Safety B.Operation Preparation and pre-checking before use Operation Part 1: Language setting Part 2: Status Part 3: H16 Helper Part 4: Binding operation Part 5: Video/Image connection and settings... -
Page 3: A.overview
A.Overview 1.Product Features ①The H16 series uses the newest surging processor, equipped with an Android embedded system and advanced SDR technology, also with a super protocol stack to make the image clearer, lower latency, longer distance transmission, and stronger anti-interference. Wildly applied for drones, Robots, industrial controlled equipment, etc. -
Page 4: The Composition Of The Model And Its Significance
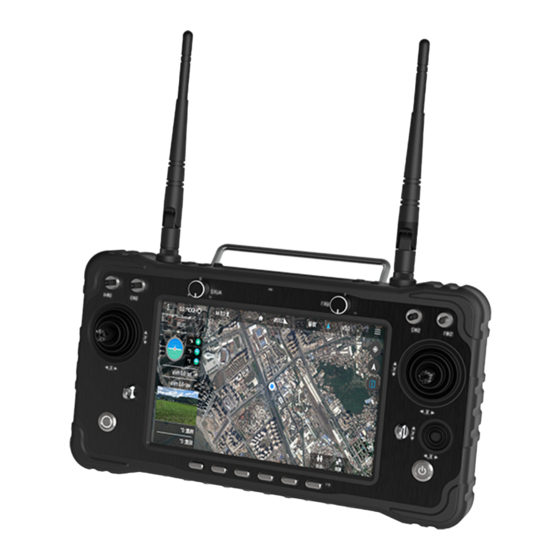
Receiver Specification Model No. Channels Working Voltage 7.2-72V RF Power 20DB@CE/23DB@FCC Size 76*69*11mm Weight MIPI Night Camera Specification Model No. MIPI Working current (light on) 140mA Working voltage 14-72V Working current (light off) 14mA Size 102.1*42.6*36.5mm Weight 4.The composition of the model and its significance H16/H16 PRO Controller... - Page 5 Number Description Number Annotation Number Annotation 2.4G 3dB antenna Toggle 3 positions switcher SW4 Toggle 3 positions switcher SW2 Toggle 3 positions switcher SW3 Toggle 3 positions switcher SW1 Knob AUX2 Left stick X1. Y1 Knob AUX1 Little stick X3. Y3 Power switcher 6 positions switcher Key button...
-
Page 6: Port Definition
7.Working conditions Power supply and attentions H16 series uses a built in Li-ion battery. Charging port is compatible with common Type-C 9V-2A chargers (such as cell phone, digital cameras’ USB charger). In case of smoke, heat or unusual smell during charging, please stop charging immediately and return to our company for servicing as soon as possible. -
Page 7: B.operation
B.Operation 1.Preparation and pre-checking before use Pay attention ① Check battery level. ② Check position of the antenna to get the best performance. ③ Make sure the firmware is the latest version. ④ DO NOT operate under the influence of alcohol or drugs. 2.Operation Part 1: Language setting ①... -
Page 8: Part 2: Status
Part 2: Status ① ② ③ ④ ⑤ ⑥ ⑦ ① Icon for connecting internet by network port or USB. ② Icon for connecting well between the TX and RX (icon in picture shows no connecting with RX). ③ Icon for Power level. ④... -
Page 9: Part 4: Binding Operation
Part 4: Binding operation ① After powering on the receiver, wait 10 seconds, then press and hold the receiver “SET” , and release “SET” when the white light flashes. ② Enter the H16 helper, click on the “binding” , click on the “binding” (after the binding is successful, it will show “connected”... -
Page 10: Part 6: How To Show Video & Data Transmission And Telemetry
Part 6: How to show video & data transmission and telemetry Take QGC as the example for reference to connect video/image transmission 1) Showing video/image from network port ① ② ③ ④ ① Click the setting icon in QGC. ② Click “Normal” . ③... -
Page 11: Part 7: How To Connect The Internet
③ ④ ⑤ ③ Change the mode into UDP. ④ listening port to 14551. ⑤ Click “OK” to save. Part 7: How to connect the internet The remote control can be connected to the Internet in three ways : ① Connected to 5G wifi network. ②... -
Page 12: Part 8: How To Share Internet, Video/Image Transmission And
Part 8: How to share internet, video/image transmi ssion and data/telemetry transmission ① Sharing network Turn on the remote controller’ s hotspot is OK. ② Sharing data transmission 1) Turn on the hotspot of the remote controller. 2) Connect the hotspot by PC. 3) Open Mission Planner, choose the connecting way into TCP. - Page 13 5)Port number, please enter “5760” and click “OK” , then, can get the telemetry. ③ Sharing video/image transmission 1) Open the hotspot of the remote controller. 2) Connect the hotspot by PC. 3) Download VLC exe. to show video/image. 4) Open VLC and choose network streaming. ①...
-
Page 14: Part 9:Master&Slave Controlling Mode,Coach Mode And Student Mode
5) Enter “rtsp://192.168.43.1:8554/fpv_stream” to URL and click “play” . ② ③ Part 9: master & slave controlling mode, coach mode and student mode Master & slave controlling mode: Connect PPM port of each H16 with Aux cable (3.5mm audio cable) can implement a single operating of master controlling mode, a single operating ofslave controlling mode and mixed controlling mode. -
Page 15: Part 10: Q & A
Part 10: Q & A 1: Can the remote control install other apps? The permissions of the remote control are all open, and there is no special software or restricted software installation and uninstallation. 2:How does the remote control enter the fast charge mode? Only under using the original charger to enter the fast charge mode, and there is a text prompt on the lock screen interface. -
Page 16: C.maintenance, Servicing
C.Maintenance, servicing Storage for not using certain period Put H16/H16 Pro in a dry and ventilated area. No direct sun light to prevent harm to the internal li-ion battery. If store it over three months, it is highly recommended to put room temperature between 22℃ to 28 ℃. DO NOT put it below 20 ℃... - Page 18 云卓-H16/H16 PRO 使用说明书 V1.0...
- Page 19 目录 一、 概述 产品特性 主要用途及适用范围 品种、 规格 型号的组成及其代表的意义 端口定义图 使用环境条件 工作条件 安全 二、 使用、 操作 使用前的准备和检查 使用方法 语言设置 状态栏提示 H16助手介绍 对频操作 图像连接及设置 如何在地面站显示数传图传 如何联网 如何共享网络、 数传、 图传 主副控、 教练、 学员模式 常见问题与解决办法 三、 保养、 维修 四、 运输、 储存 五、 其他...
-
Page 20: 一、 概述
一、 概述 1、 产品特性 ① H16系列采用全新的澎湃处理器, 搭载安卓嵌入式系统, 采用先进的SDR技术, 和超级协议栈, 让 图像更加清晰, 延迟更低, 距离更远, 抗干扰更强, 无论是无人机, 机器人, 工控设备等都可以应用。 ② 支持HDMI、 网口、 sensor接口、 双路串口透传、 SBUS等丰富的接口, 航拍、 FPV安防、 消防、 电力、 测绘机器人、 边防等都可以得心应手, 如至现场的体验。 ③ 采用IP67级防水防尘防摔材料和结构, 保证不仅仅是手感好, 而且耐用。 ④ H16采用7寸高清高亮显示屏, 原厂A规屏, 1800 nits亮度IPS液晶屏, 阳光下依然可以清晰查看。 支持1080P高清数字图传。... - Page 21 接收机参数 型号 通道数 工作电压 7.2-72V 射频功率 20DB@CE/23DB@FCC 尺寸 76*69*11毫米 重量 90克 三体-MIPI摄像头 型号 MIPI 工作电流 (开灯) 140mA 工作电流 (不开灯) 14mA 工作电压 14-72V 尺寸 102.1*42.6*36.5毫米 重量 55克 4、 型号的组成及其代表的意义 H16/H16 PRO遥控器...
- Page 22 各按键代表的含义 序号 注解 序号 注解 2.4G 3dB 天线 拨动三档开关SW4 拨动三档开关SW2 拨动三档开关SW3 拨动三档开关SW1 旋钮 AUX2 左摇杆 X1、 Y1 旋钮 AUX1 小摇杆 X3、 Y3 电源开关 六段开关 按键(默认MIPI LED灯开关) 右摇杆 X2、 Y2 接收机 注解 序号 序号 注解 网口 串口0 电源和SBUS输入 串口1 Type-C接口 MIPI摄像头接口 TF卡接口...
- Page 23 5、 端口定义图 POW+SBUS 6、 使用环境条件 注意 A) 环境温度:-10°C~z+55°Co B) 贮存温度: -25°C~+70°C。 C) 相对湿度: Not exceed 85%。 D) 大气压力:86kPa~106kPao E) 使用地点不允许有爆炸危险的介质, 周围介质中不应含有腐蚀金属和破坏绝缘的气体及导电介 质 ,不允许充满水蒸气及有严重的霉菌存在。 F) 使用地点应具有防御雨、 雪、 风、 沙、 灰的设施。 7、 工作条件 供电方式和注意事项 H16系列地面端内置一体式可充电锂电池, 兼容市场标准TYPE-C接口, 9v-2A规格的电源适配器 ( 例如手机、 相机等数码产品USB充电器) 进行充电。 如在地面端充电时遇到冒烟、 有异味、 漏夜的情况下时, 请勿继续给地面端充电, 请移送至本公司 进行维修。...
-
Page 24: 二、 使用、 操作
二、 使用、 操作 1、 使用前的准备和检查 注意 ① 使用前务必先检查遥控器电量是否充足。 ② 使用前请检查天线是否按要求摆放, 已获得最佳效果。 ③ 首次使用请确保固件已经升级至最新版本。 ④ 用户应确保自己不在醉酒、 药物影响下操作使用。 2、 使用方法 第一部分 语言设置 ① 进入系统设置, 选择语言和输入法 ② 进入语言和输入法后, 点击语言可进行语言的切换、 添加、 删除... -
Page 25: H16助手介绍
第二部分 状态栏提示 ① ② ③ ④ ⑤ ⑥ ⑦ ① 通过网口、 USB联网成功标识 ② 遥控器与接收机信号强度标识 (图中为未连接接收机) ③ 电量显示 ④ 时间显示 ⑤ 返回按键 ⑥ 返回主界面按键 ⑦ 后台任务管理/分屏按键 第三部分 H16助手介绍 ① ② ③ ④ ⑤ ① 对遥控器的摇杆操作方式进行切换。 ② 检查遥控器各个通道的值是否正常。 ③ 可以查看MIPI、 HDMI、 UART VIDEO和其他RTSP视频 (详细在下方介绍) ④... - Page 26 第四部分 对频操作 ① 将接收机通电后等待10秒后长按接收机SET, 白灯闪烁时松开SET ② 进入H16助手, 点击对频, 点击对频 (对频成功后会显示已连接) 第五部分 图像连接及设置 ① 出厂默认设置为HDMI/MIPI模式, 用来显示通过接收机端MIPI/HDMI传输的图像 ② UART VIDEO模式, 来显示单轴云台、 mini摄像头图像 (仅限于部分设备: MX680) ③ 自定义模式, 此模式来显示通过天空端的网口来传输图像, 网口设备的网段必须改为144 网段才能使用...
- Page 27 第六部分 如何在地面站显示数传图传 以QGC地面站为列做参考连接图传 1) 显示网口的图像 ① ② ③ ④ ① 点击QGC中的系统设置标识 ② 点击常规 ③ 将视频来源更改为RTSP Video Stresm ④ 在RTSP URL填入图像的RTSP地址 2) 显示MIPI、 HDMI的图像 ① 在RTSP URL中填入rtsp://192.168.0.10:8554/H264Video即可 以QGC地面站为列做参考连接数传 ① ② ① 点击通讯连接 ② 点击添加...
- Page 28 ③ ④ ⑤ ③ 将类型更改为UDP ④ 监听端口改为14551 ⑤ 点击确定进行保存 第七部分 如何联网 遥控器可以通过三种方式联网 ① 连接5Gwifi联网 ② 通往遥控器端的WAN口联网 ③ 通过遥控器端的OTG口连接无线卡托进行上网 (目前只支持华为 中兴品牌) ④ 手机蓝牙共享联网...
-
Page 29: 如何共享网络、 数传、 图传
第八部分 如何共享网络、 图传、 数传 ① 共享网络 将遥控器的热点打开, 进行网络共享 ② 共享数传 1)遥控器打开热点 2)用电脑连接遥控器的热点 3)打开Mission Planner, 连接方式选择TCP 4)点击连接后, IP输入192.168.43.1输入完成后点击OK... - Page 30 5)端口号输入 5760 点击ok, 即可连上数传。 ③共享图传 1) 遥控器打开热点 2) 用电脑连接遥控器的热点 3) 下载VLC软件来进行显示图像 4) 打开VLC软件, 在媒体中选择网络串流 ①...
- Page 31 5) 在网络URL的输入栏中, 输入rtsp://192.168.43.1:8554/fpv_stream后点击播放 ② ③ 第九部分 主副控、 教练、 学员模式 主副控: 通过Aux连接线 (3.5MM音频线) 连接两台H16 遥控器的ppm口可以实现主控单独操作模 式, 副控单独操作模式, 以及主副混控模式。 具体操作步骤: 1) 使用Aux连接线插入两台遥控器顶端的ppm接口, 然后选取其中一台与飞机对频。 对频后设置为教练 控。 进入遥控器内打开H16助手选择高级参数, 输入密码999后点击教练模式, 选择为教练控主机模式。 选择教练开关的通道后点击保存 (教练开关仅支持SW1-SW4) 。 2)打开另一台遥控器进入H16助手选择高级参数, 输入密码999点击教练模式, 选择为学员控从机模式, 点击保存。 3)在教练控端SW开关控制三个模式切换。 ① 开关向上拨是学员模式, 由学员完整操作, 教练不参与。 当学员遇到突发情况时教练可以切换模式快 速接管。 ②...
- Page 32 第十部分 常见问题与解决办法 1: 遥控器可以安装其他APP吗? 答: 遥控器端权限全开放, 没有任何专用软件和限制软件的安装与卸载。 2: 遥控器如何进入快充模式? 答: 必须使用专配的充电器才会进入快充模式, 在锁屏界面有文字提示。 3: 使用MIPI或HDMI摄像头如何获取RTSP地址 答: 打开H16助手, 打开视频查看点击设置 (虚拟按键) , 点击视频流地址, 点击自定义将下方以RTSP开 头的链接复制, 然后进行粘贴。 4: 数传无法连接 答: 检查遥控端地面站是否是已UDP的类型去连接遥控器, 接收机串口0 ( UART0) 监听端口是否为14551。 检查波特率是否正常。 检查RX、 TX是否反接 (正确接法RX接TX、 TX接RX) 。 5: 连接网络摄像头后无法显示图像 答: 通过网口传输的图像, 有专用的RTSP地址。 与MIPI/HDMI的不通用。 此RTSP地址需和网络摄像厂 家询问。...
-
Page 33: 三、 保养、 维修
三、 保养、 维修 长期停放时的维护、 保养 将遥控器存放于干燥通风处, 减少阳光直射以防止电池过热。 若需存放超过三个月, 则推荐的存放温 度区间为22摄氏度至28摄氏度。 切勿将电池存在于低于零下20摄氏度或高于45摄氏度的场所。 四、 运输、 储存 警告 为避免可能的伤害和损失, 务必遵守以下各项: 由于线材和小零件可能对儿童造成危险, 所以务必让儿童远离遥控器的部件。 注意 1) 切勿让遥控器浸入水中, 若入水, 请及时用松软干布擦拭, 并立即关闭电源。 2) 禁止机械撞击、 碾压、 刺穿电池, 禁止将电池跌落。 五、 其他 QQ群 微信公众号 新浪微博 优酷平台 说明书如有更新, 恕不另行通知, 请持续关注官网www.skydroid.xin...
Need help?
Do you have a question about the H16 Series and is the answer not in the manual?
Questions and answers