Table of Contents
Advertisement
Quick Links
Advertisement
Table of Contents

Related Manuals for Sonel KT-400F


Summary of Contents for Sonel KT-400F
- Page 1 USER MANUAL THERMAL IMAGER KT-400F...
- Page 3 USER MANUAL THERMAL IMAGER KT-400F SONEL S.A. Wokulskiego 11 58-100 Świdnica, Poland Version 0.01 19.07.2022...
- Page 4 Copyrights © Sonel S.A., 2022. All rights reserved. This manual may not be copied, reproduced, translated or transferred to any electronic carriers or in machine-readable form, in whole or in part, without the prior written consent of Sonel SA.
-
Page 5: Table Of Contents
Out of range isotherm ..................... 35 6.8 Adjusting temperature range and span ..............36 6.8.1 Adjusting temperature range ................... 37 6.8.2 Adjusting temperature scale span ................... 37 6.8.3 Semi-automatic adjustment ..................... 37 6.9 Edit menu ....................... 38 KT-400F – USER MANUAL... - Page 6 11.3 USB Interface ......................52 11.4 USB cable connection .................... 53 11.5 Installing memory card and lens ................55 11.5.1 Installing memory card ....................55 11.5.2 Removing memory card....................56 11.6 Installing optional lens .................... 56 KT-400F – USER MANUAL...
- Page 7 14 Storing ......................59 15 Dismantling and disposal ................59 16 Specifications ....................60 17 Accessories ....................61 17.1 Standard accessories .................... 61 18 Manufacturer ....................62 19 Examplary emissivity coefficient values ............. 63 20 Laboratory services ..................64 KT-400F – USER MANUAL...
-
Page 8: Safety
When the camera is not in use or is to be transported, ensure that the unit and its accessories are stored in the protective carry case. Do not obstruct the speaker holes in the camera’s body. KT-400F – USER MANUAL... - Page 9 When the battery is charging, the charging indicator light on the side of the camera lights up red. When the battery is fully charged, the charging indicator light changes from red to green, indicating that no further charging is required. KT-400F – USER MANUAL...
- Page 10 For proper battery performance, charge unused batteries every 3 months. If you do not use the unit for a long time, remove the batteries and store them separately. KT-400F – USER MANUAL...
-
Page 11: Description Of The Camera
The camera operation and available options may vary, depending on the camera model. This manual describes the operation based on the highest specs model available. KT-400F – USER MANUAL... -
Page 12: Function Buttons And Menu
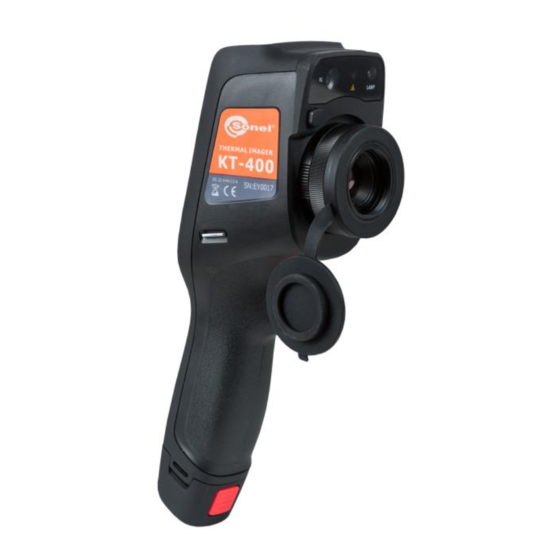
Camera body description Flashlight Battery release button Laser pointer micro USB connector Visual image camera micro SD card slot Lens release button micro HDMI connector Lens Power supply connector Wrist strap holder Charging indicator Trigger button KT-400F – USER MANUAL... - Page 13 Power On/Off button Return button Speaker Microphone LCD display Battery lock KT-400F – USER MANUAL...
-
Page 14: Overview Of The Camera's Functional Areas
Overview of the camera’s functional areas A. Functional areas Display area Gallery Real-time editing mode Control area System settings Palette Central point cursor Shortcut menu button Status identification area KT-400F – USER MANUAL... - Page 15 2. Tap the Edit button at the bottom to enter the analysis object editing areas. When the image is modified, the system will prompt a dialog box asking to save the changes: Save Picture? press OK to save modifications, or Cancel to keep the image unchanged. KT-400F – USER MANUAL...
- Page 16 Light: turns the flashlight on/off. Laser: turns the laser pointer on/off. AP: turns the wireless access point on/off. Digital zoom: sets the digital magnification from x1 to x4. USB Realtime Video: enables/disables the USB video connection in real time mode. KT-400F – USER MANUAL...
-
Page 17: Manual Calibration
Enter the real-time image mode and tap the IR mode button on the shortcut menu multiple times to perform multiple mode switching operations for the current image. The screen can be switched between the following four modes: A. Infrared B. Visible C. Fusion D. PIP KT-400F – USER MANUAL... -
Page 18: Temperature Measurement
Align the central point cursor with the measured object for temperature measurement. Ro- tate the outer lens clockwise or counter clockwise to adjust the focus point. KT-400F – USER MANUAL... -
Page 19: Digital Zoom
Set the trigger button function in the system settings (sec. 7.14). For freeze/photo mode: Press trigger button to freeze an image. With the image frozen, press the trigger button again to save the image. This function works only in the in- frared mode. KT-400F – USER MANUAL... -
Page 20: Creating A Panorama
If you want to quit before the end, select (X) and confirm your decision. 4. Start Sonel ThermoAnalyze, go to the Others tab, click Open and load 9 component photos of the panorama - the program will stitch them together. -
Page 21: Adding Notes
3. Tap the Remark [ ] icon, to enter the notes adding menu. 5.4.1 Adding picture notes 1. Tap the Picture note [ ] icon in the toolbar below to enter the main interface for the picture notes. KT-400F – USER MANUAL... - Page 22 If the picture is not taken correctly, it can be deleted by pressing the delete button (X) in the upper right corner of the photo and then a new one can be tak- KT-400F – USER MANUAL...
-
Page 23: Adding Text Notes
4. Play the recorded voice note by tapping PLAY button or delete by pressing 5. Press the Return hardware button or the onscreen [<] symbol. 6. Press Ok, to save the voice note or Cancel to exit without saving. KT-400F – USER MANUAL... -
Page 24: Adding Sketch Note
Back – removes the last sketch bit, Restore – brings the most recently deleted element back on screen. 4. Once the sketch note is complete, the Return hardware button or the onscreen [<] symbol; 6. Press Ok to save the sketch note or Cancel to exit without saving. KT-400F – USER MANUAL... -
Page 25: Video Recording
3. Press the trigger button to start recording. Recording time information will be displayed at the top of the screen. 4. Press the trigger button again to stop recording and the video data will be saved. It can later be checked and played in the gallery. KT-400F – USER MANUAL... -
Page 26: Image Analysis
The selected temperature is displayed in the upper left corner of the screen. Centre: press to reposition the selected analysis object to the centre of the screen. Delete: deletes selected analysis object. KT-400F – USER MANUAL... -
Page 27: Resizing The Analysis Objects
2. Move any node – the analysis object area will be changed. 6.1.3 Analysis function of a moving object 1. Tap the [ ] button to display a submenu for adding the analysis object. 2. Select the desired analysis objects, eg. a rectangle KT-400F – USER MANUAL... - Page 28 (tap the analysis objects again to bring back the cursors). Select one of the many analysis objects, and the selected object will be able to be moved using virtual cursors. KT-400F – USER MANUAL...
-
Page 29: Selecting A Color Palette
1. In the real-time image mode, press the maximum temperature value or the minimum temperature value of the colour bar on the right side of the screen. 2. A maximum or a minimum value of the colour bar temperature in the real-time image mode will be locked. KT-400F – USER MANUAL... -
Page 30: Temperature Difference Analysis
Select at least 2 analysis objects, press the shortcut menu button and then the Delta T temperature difference button; Tap the [ ] button, to activate the temperature difference mode and select two objects for analysis KT-400F – USER MANUAL... -
Page 31: File Browsing
2. Files and videos on a microSD card: In the real-time image mode, tap the gallery button to en- ter the file browsing main menu, then press SD CARD - the system will display all the files on the microSD card. KT-400F – USER MANUAL... -
Page 32: Image Analysis
] button - the system will enter the edit mode. In this mode, following elements can be added or modified: analysis object, isotherm and temperature difference (Delta T) between two points for the selected picture. 3. Tap Parameter button, to modify other parameters. KT-400F – USER MANUAL... -
Page 33: Zooming In And Out
Zooming out 3. To slide an enlarged image within the screen, place one finger on the screen and move it in the desired direction The enlarged image can be moved by swiping a finger across the screen. KT-400F – USER MANUAL... -
Page 34: Creating A Pdf File
2. Tap Select button, and choose up to 5 images as shown in the figure below; 3. Press Export PDF button in the lower left corner to create a PDF file preview. 4. Press the Generate button to create the file. KT-400F – USER MANUAL... -
Page 35: Pdf File Printing
Play the video: Follow these steps: Tap 'Play' button at the center of the screen to play the video; Tap 'Pause' button at the bot- tom of the screen to suspend video playback KT-400F – USER MANUAL... -
Page 36: Isotherm
High isotherm 1. Enter the edit mode and select Object → Isotherm. ] icon on the isotherm bar – the camera will display a target view for the high isotherm pic- 2. Tap [ ture mode. KT-400F – USER MANUAL... -
Page 37: Low Isotherm
Out of range isotherm 1. Enter the edit mode and select Object → Isotherm. ]icon on the isotherm bar – the camera will display a target view for the out of range iso- 2. Tap [ therm picture mode. KT-400F – USER MANUAL... -
Page 38: Adjusting Temperature Range And Span
2. Depending on the camera version: tap the virtual round button to view the virtual cursors on screen (see Figure 3 below), use the joystick. Figure 3 Double-tap one of the locks to return to autoranging mode. KT-400F – USER MANUAL... -
Page 39: Adjusting Temperature Range
ΔT by 2°C will cause Tmin to fall by 1°C and Tmin to rise by 1°C. Adjusting the ΔT span is done by: selecting the desired value using the joystick - up/down movements, touching the ΔT field and selecting the desired value KT-400F – USER MANUAL... -
Page 40: Edit Menu
A distance of the camera from the tested object. Customizable in the range: 1 m to 50 m. To customize the reflected temperature set the Auto option to OFF. 6.9.4 Humidity Relative humidity at the measurement site: customizable from 0% to 100%. KT-400F – USER MANUAL... -
Page 41: System Settings
This option enables/disables the central point temperature cursor on the screen in real-time image mode and turns on/off the display of the central point temperature value on screen. Temperature measurement range Allows to set the range of the measurable temperature of the measured object. KT-400F – USER MANUAL... -
Page 42: Temperature Unit Selection
By default the temperature alarm is off. The alarm temperature should be set within the selected temperature range, eg. if the temperature range is set as -20°C to 150°C, then the temperature alarm value should be defined within this range. KT-400F – USER MANUAL... -
Page 43: High Temperature Alarm
3. Tap [ ] icon, to turn off the high temperature sound alarm. Brightness The brightness of the touch screen can be manually adjusted by the user. KT-400F – USER MANUAL... -
Page 44: Auto Off Time Settings (Timing Shutdown)
The camera can be set to go into sleep mode after 1, 5 or 15 minutes of not being used. Sleep mode can also be deactivated by choosing 'Never Sleep' option. By default the camera is in 'Never Sleep' mode. Volume Adjust the volume of the camera or mute it. KT-400F – USER MANUAL... -
Page 45: Vibrate Feedback
Disabling the automatic lens recognition When automatic lens recognition is turned off, users can manually select a standard, wide-angle or telephoto lens, according to the characteristics of the lens of their choice. Standard is for lens: 28.4° x 21.5°/19 mm KT-400F – USER MANUAL... -
Page 46: Indication Of The Maximum And The Minimum Temperature On Screen (Full Image Temperature Marking)
In real-time image mode the camera can be set to display the maximum, the minimum or both the temperatures on screen. By default the min/max temperature indicator is off. 7.13 Isotherm Color The colors of high/low temperature isotherms are customizable. KT-400F – USER MANUAL... -
Page 47: Image Taking Mode Settings (Photo Setting)
In this mode, an image can’t be saved. Panorama: taking a series of images to be stitched together into a single larger image in the Sonel ThermoAnalyze software. Super Resolution: like Frozen/Photo. The image has an increased resolution. -
Page 48: Local Settings
2. Once the settings are done, go to real-time mode screen and take a sample picture. 3. Tap the gallery shortcut button, enter the image viewing mode and select the preview of the cap- tured image. 4. All selected watermarks are displayed at the bottom of the preview. KT-400F – USER MANUAL... -
Page 49: Date/Time
Date/Time Set the date and time in the system manually by scrolling their components up/down. System Language Settings Select a language from the list of available languages. KT-400F – USER MANUAL... -
Page 50: Connection Settings
Connection settings Wi-Fi settings 1. Enter Wi-Fi Setting menu. 2. To select a network: tap one of the networks shown in the list and enter the password if required. 3. Type in correct password and press OK. KT-400F – USER MANUAL... -
Page 51: Wi-Fi Hotspot Configuration
2. In the configuration interface (AP Setting), enter the name of the hotspot, which is set as default as: "Camera" and the default password is "12345678", then tap the Save button to save the settings. 3. The custom SSID settings and the hotspot access point password are saved successfully. KT-400F – USER MANUAL... -
Page 52: Other Settings (Info)
10.2 Storage This option mainly shows basic information about the remaining internal and external memory space. It also allows to select the storage location for files: built-in internal memory or external memory - mi- cro SD card. KT-400F – USER MANUAL... -
Page 53: Formatting Microsd Card
Before formatting, make a backup of your files if necessary. 10.4 Restoring the default settings 1. Tap Reset and then Ok. 2. Enabling this function will reset the device to its factory settings. Use it carefully. KT-400F – USER MANUAL... -
Page 54: Connection With External Devices
Use the USB cable to connect to the computer, and then open My Computer to view the internal memory icon. Click enter memory path … \IrCamera\ SDCard\DCIM\GCamera\SourceImage. KT-400F – USER MANUAL... -
Page 55: Usb Cable Connection
2. A new network connection should appear. If the connection has not been set up automatically, go to "TCP/IP v4" in the network settings menu, configure "Internet protocol version 4 (TCP/IPv4)" as "obtain an IP address automatically and "obtain DNS server address automatically" (see images be- low): First step Second Step KT-400F – USER MANUAL... - Page 56 4. After the camera has been identified by the computer, open the analysis software (see image be- low). 5. Click the "video" button and select the "On-line" option and then the camera. Then follow the in- structions provided with the PC software. KT-400F – USER MANUAL...
-
Page 57: Installing Memory Card And Lens
3. Close the slot cover by sliding it in the direction of the arrow. 4. Turn on the camera. The number of images that can be stored on a card depends on the size of the data carrier used. KT-400F – USER MANUAL... -
Page 58: Removing Memory Card
1. Mounting the lens: Press the Split (lens release) button to align the red dot on the back of the lens with the red dot on the device. 2. Select an appropriate lens, and then rotate it clockwise to mount it. (the wide angle lens) (the tele lens) KT-400F – USER MANUAL... -
Page 59: Installing High Temperature Filter Lens
(factory default SSID: GCamera); SSID is the name of the network (changeable in the camera menu). 3. To turn off this function tap the AP button again. KT-400F – USER MANUAL... -
Page 60: Troubleshooting
5-10 minutes after start-up To ensure accurate temperature measurements, we Long time since the last factory calibration recommend to periodically send back the thermal im- ager for calibration (once a year) KT-400F – USER MANUAL... -
Page 61: Cleaning And Maintenance
Before delivering the equipment to the collection centre do not attempt to dismantle any of its parts. NOTE! Follow local regulations related to disposing of packaging, used-up batteries and re- chargeable batteries. KT-400F – USER MANUAL... -
Page 62: Specifications
30 g 11 ms (IEC 60068-2-27 / 10 Hz ~ 150 Hz ~ 10 Hz 0.15 mm (IEC 60068-2-6) Encapsulation IP54 Weight approx. 0,84 kg (with battery) Dimensions (including 274 mm x 110 mm x 78 mm standard lens and battery) KT-400F – USER MANUAL... -
Page 63: Accessories
Protective gloves (for operating the touchscreen) – WAREK1 MicroSD card 16 GB – WAPOZMSD16 Power supply adaptor Z13 – WAZASZ13 L-6 hard carrying case – WAWALL6 User manual Factory calibration certificate KT-400F – USER MANUAL... -
Page 64: Manufacturer
The manufacturer and provider of warranty and post-warranty services for this instrument is: SONEL S.A. Wokulskiego 11 58-100 Świdnica Poland tel. +48 74 858 38 60 fax +48 74 858 38 09 e-mail: bok@sonel.pl web page: www.sonel.pl NOTE! Only the manufacturer is authorized to perform service repairs. KT-400F – USER MANUAL... -
Page 65: Examplary Emissivity Coefficient Values
......0.85 brass ............0.10 cast: raw casting ........0.81 brass: oxidized ........0.61 cast: polished ......... 0.21 nickel : polished ........0.05 The given values may vary depending on the conditions. KT-400F – USER MANUAL... -
Page 66: Laboratory Services
National Metrological Institute. According to ILAC-G24 „Guidelines for determination of calibration intervals of measuring instru- ments”, SONEL S.A. recommends periodical metrological inspection of the instruments it manufac- tures no less frequently than once every 12 months. - Page 68 SONEL S.A. Wokulskiego 11 58-100 Świdnica Poland tel. +48 74 858 38 60 fax +48 74 858 38 00 e-mail: sonel@sonel.pl www.sonel.pl...
Need help?
Do you have a question about the KT-400F and is the answer not in the manual?
Questions and answers