Fujitsu MH380 User Manual
Hide thumbs
Also See for MH380:
- User manual (259 pages) ,
- Bios manual (23 pages) ,
- Getting started (12 pages)
Table of Contents
Advertisement
Quick Links
Advertisement
Table of Contents
Troubleshooting

Related Manuals for Fujitsu MH380


Summary of Contents for Fujitsu MH380
- Page 1 User’s Guide Learn how to use your Fujitsu MH380 notebook...
- Page 2 © Copyright 2009 Fujitsu America, Inc. All rights reserved. No part of this publication may be copied, reproduced, or translated, without prior written consent of Fujitsu. No part of this publication may be stored or transmitted in any electronic form without the written consent of Fujitsu.
- Page 3 (408) 746-6000 Declares that product: Base Model Configuration: Fujitsu MH380 notebook Complies with Part 15 of the FCC Rules. This device complies with Part 15 of the FCC rules. Operations are subject to the following two conditions: (1) This device may not cause harmful interference, (2) This device must accept any interference received,...
- Page 4 IMPORTANT SAFETY INSTRUCTIONS This unit requires an AC adapter to operate. Use only UL Listed I.T.E. Class II Adapters with an output rating of 19 VDC, with a minimum current of 2.1 A (40 W). AC adapter output polarity: When using your notebook equipment, basic safety precautions should always be followed to reduce the risk of fire, electric shock and injury to persons, including the following: •...
- Page 5 * To order a new battery for your Fujitsu mobile computer, go to the Fujitsu shopping site at www.shopfujitsu.com in the US or www.fujitsu.ca/products/notebooks in Canada. ** RBRC is an independent third party to which Fujitsu provides funding for battery recycling; RBRC is in no way affiliated with Fujitsu.
-
Page 6: Table Of Contents
Fujitsu Contact Information ........13... - Page 7 Connecting the Power Adapters ....... . . 41 Starting Your MH380 Notebook ....... . . 42 Power On .
- Page 8 Power Management..........47 Power/Suspend/Resume Button .
- Page 9 Care and Maintenance Caring for your MH380 Notebook ....... 79 Cleaning your notebook .
- Page 10 Keyboard........... 89 Power .
- Page 11 Using the Bluetooth Device........123 What is Bluetooth .
-
Page 12: Preface
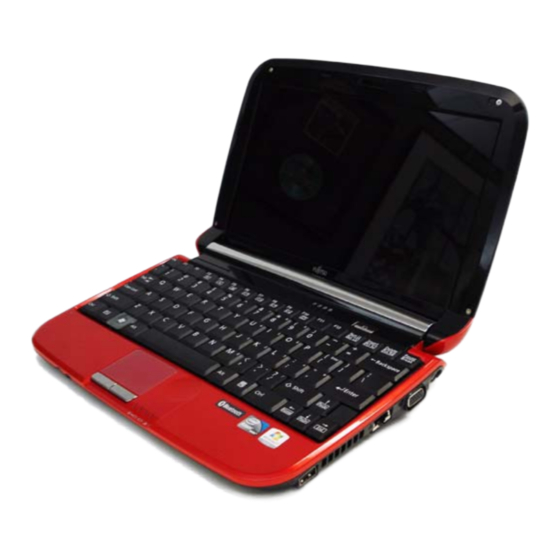
Preface About This Guide The MH380 notebook from Fujitsu is a small yet powerful computer, perfect for networking. It is powered by an Intel Atom® processor and integrated Intel® NM10 Express chipset. The notebook has a built-in 10.1” wide SVGA color display with LED backlight. -
Page 13: Fujitsu Contact Information
LEASE READ ALL WARNING INFORMATION CAREFULLY Fujitsu Contact Information Service and Support You can contact Fujitsu Service and Support in the following ways: • Toll free: 1-800-8Fujitsu (1-800-838-5487) • Website: http://www.computers.us.fujitsu.com/support Before you place the call, you should have the following information ready so that the customer support representative can provide you with the fastest possible solution: •... - Page 14 OU MUST HAVE AN ACTIVE INTERNET CONNECTION TO USE THE ONLINE LINKS Limited Warranty Your MH380 notebook is backed by a Fujitsu International Limited Warranty. Check the service kit that came with your notebook for the Limited Warranty period and terms and conditions. 14 - About This Guide...
-
Page 15: Getting To Know Your Notebook
Getting to Know Your Notebook Overview This section describes the components of your Fujitsu MH380 notebook. We strongly recommend that you read it before using your notebook – even if you are already familiar with notebook computers. Figure 1. Fujitsu MH380 notebook... -
Page 16: Locating The Controls And Connectors
Connectors and peripheral interfaces on the MH380 notebook allow you to connect a variety of devices. Specific locations are illustrated in Figures 2 through 6. The table below provides a short description of each icon on the MH380 notebook. Each of the icons is either molded into or printed on the notebook chassis. - Page 17 Connection Notebook Purpose Icon Suspend/ Resume The Suspend/Resume button allows you to suspend notebook activity button without powering off, resume your notebook from suspend mode, and power on the system when it has been shut down from Windows. The LAN (RJ-45) jack is used to connect the internal 10/100 Base-T/Tx Local Area Ethernet to a Local Area Network (LAN) in your office or home, or Network (LAN)
- Page 18 1.3 Megapixel Web Camera Display Panel Status Indicator Panel Touchpad Pointing Built-in Microphone Device Power/Suspend/ Resume Button Keyboard Status Indicator Panel Scroll wheel Figure 2. MH380 notebook with display open 18 - Locating the Controls and Connectors...
-
Page 19: Keyboard And Display Components
Status Indicator Panel There are two Status Indicator Panels that display symbols corresponding to specific components of your MH380 notebook. See “Status Indicator Panel” on page 26. Keyboard A full-function keyboard with dedicated Windows keys. See “Keyboard” on page 32. -
Page 20: Front Components
Stereo Speaker Microphone Jack Stereo Speaker Headphone Jack Secure Digital Card Slot Figure 3. MH380 notebook front components Front Components Stereo Speakers The speakers allows you to listen to stereo sound from your system. Headphone Jack The headphone jack allows you to connect stereo headphones or powered external speakers. See “Headphone Jack”... -
Page 21: Left-Side Panel Components
Air Vents USB 2.0 Ports Anti-Theft Lock Slot Figure 4. MH380 notebook left-side panel Left-Side Panel Components The following is a brief description of your notebook’s left-side components. Anti-theft Lock Slot The anti-theft lock slot allows you to attach a optional physical lock-down device. -
Page 22: Right-Side Panel Components
Video Port USB 2.0 Port LAN (RJ-45) Jack DC Power Jack Figure 5. MH380 notebook right-side panel Right-Side Panel Components The following is a brief description of your notebook’s right-side components. USB 2.0 Ports The three USB 2.0 ports (two on the left side, one on the right side) allow you to connect Universal Serial Bus devices. - Page 23 LAN (RJ-45) Port The internal LAN (RJ-45) port is used for an internal 10/100 Base-Tx Ethernet. See “Internal LAN (RJ- 45) jack” on page 62. External Video Port The external video port allows you to connect an external monitor or LCD projector. See “External Video Port”...
-
Page 24: Bottom Components
Battery Latch Battery Latch Lithium ion Battery Figure 6. MH380 notebook bottom panel Bottom Components The following is a brief description of your notebook’s bottom panel components. Battery Latches The battery latches are used to secure the Lithium ion battery in the battery bay. - Page 25 Lithium ion Battery The battery compartment contains the Lithium ion battery. The battery should be removed when the computer is stored over a long period of time or for swapping a discharged battery with a charged Lithium ion battery. See “Lithium ion Battery” on page 51. Memory Upgrade Compartment Your notebook comes with high speed DDR2 Synchronous Dynamic RAM (SDRAM).
-
Page 26: Status Indicator Panel
Hard NumLock ScrLock Drive Access CapsLock Wireless Battery Battery Power Device Charge/ Remaining Indicator Indicator DC In NEED SYSTEM GRAPHIC Figure 7. Status Indicator Panel Status Indicator Panel The status indicators display symbols that correspond to specific components of your notebook. (Figure 7) The symbols show how each of those components is operating. -
Page 27: Wireless Device Emission Indicator
Wireless Device Emission Indicator The Wireless Device Emission indicator appears when the Wireless LAN or Bluetooth are emitting. Power Indicator The Power indicator symbol located on the power button shows whether your system is operational. When it is solid blue, it means that there is power to your computer and that it is ready for use. Battery Level Indicator The Battery Level indicators display the charge level of the indicated battery pack, as follows: •... - Page 28 • Batteries subjected to shocks, vibration or extreme temperatures can be permanently damaged. • A shorted battery is damaged and must be replaced. Battery Charge/DC-In Indicator Depending upon whether you have an AC adapter connected or not, the battery indicator will appear in a variety of colors and states.
-
Page 29: Hard Drive Access Indicator
Hard Drive Access Indicator The Hard Drive Access indicator lights blue when your internal hard drive is being accessed. Number Lock Indicator The NumLk indicator glows green when the integral keyboard is set in ten-key numeric keypad mode. Caps Lock Indicator The CapsLock indicator glows green when your keyboard is set to type in all capital letters. -
Page 30: Display Panel
Figure 2. Opening the Display Panel Display Panel Your Fujitsu notebook contains a display panel that is backlit for easier viewing in bright environments. Opening the Display Panel Lift the display backwards, being careful not to touch the screen with your fingers, until it is at a comfortable viewing angle. -
Page 31: Adjusting Display Panel Brightness
Adjusting Display Panel Brightness Once you have turned on your Tablet PC, you may want to adjust the brightness level of the screen to a more comfortable viewing level. There are two ways to adjust the brightness: keyboard and power management utility. -
Page 32: Keyboard
Figure 3. Keyboard Using the Keyboard Your MH380 notebook has an integral 82-key keyboard. The keys perform all the standard functions of a 101-key keyboard, including the Windows keys and other special function keys. This section describes the following keys. (Figure 3) •... - Page 33 (Figure 3) Windows Keys Your MH380 notebook has two Windows keys: a Start key and an Application key. The Start key displays the Start menu. This button functions the same as your onscreen Start menu button. The Application key functions the same as your right mouse button and displays shortcut menus for the selected item.
- Page 34 Function Keys Your notebook has 11 function keys, F1 through F11/F12. The functions assigned to these keys differ for each application. • [Fn+F3]: Pressing [F3] while holding [Fn] will toggle the Audio Mute on and off. • [Fn +F4]: Pressing [F4] while holding [Fn] allows you to toggle the touchpad on and off. •...
-
Page 35: Touchpad Pointing Device/Scroll Wheel
Figure 4. Touchpad pointing device The Touchpad pointing device comes built into your Fujitsu notebook. It is used to control the movement of the pointer to select items on your display panel. The Touchpad is composed of a cursor control, a left button and a right button. -
Page 36: Clicking
N EXTERNAL MOUSE CAN BE CONNECTED TO THE PORTS ON YOUR NOTEBOOK AND USED SIMULTANEOUSLY WITH THE OUCHPAD OWEVER IF YOU BOOT THE SYSTEM WITH AN EXTERNAL MOUSE CONNECTED THE OUCHPAD WILL BE DISABLED OR ENABLED DEPENDING ON THE BIOS . -
Page 37: Double-Clicking
Double-Clicking Double-clicking means pushing and releasing the left button twice in rapid succession. This procedure does not function with the right button. To double-click, move the cursor to the item you wish to select, press the left button twice, and immediately release it. You can also perform the double-click operation by tapping lightly on the Touchpad twice. -
Page 38: Touchpad Control Adjustment
Touchpad Control Adjustment The Windows Control Panel allows you to customize your touchpad with selections made from within the Mouse Properties dialog box. To access the Mouse Properties dialog, go to the Control Panel, then select Mouse from the menu. Using the Scroll Wheel The scroll wheel is located to the right of the touchpad (Figure 4). -
Page 39: Volume Control
Volume Control Your Fujitsu notebook has multiple volume controls which interact with each other. NY SOFTWARE THAT CONTAINS AUDIO FILES WILL ALSO CONTAIN A VOLUME CONTROL OF ITS OWN YOU INSTALL AN EXTERNAL AUDIO DEVICE THAT HAS AN INDEPENDENT VOLUME CONTROL... -
Page 40: Getting Started With Your Notebook
Chapter 2 Getting Started with Your Notebook DC Power Jack DC Output Cable AC Adapter AC Cable Figure 10. Connecting the AC Adapter... -
Page 41: Power Sources
Power Sources Your Fujitsu notebook has three possible power sources: a primary Lithium ion battery, an AC adapter or an optional Auto/Airline adapter. Connecting the Power Adapters The AC adapter or optional Auto/Airline adapter provides power for operating your notebook and charging the batteries. -
Page 42: Starting Your Mh380 Notebook
Depending on the nature of the problem, you may be able to continue by starting the operating system or by entering the BIOS setup utility and revising the settings. After satisfactory completion of the POST, your notebook will load your operating system. 42 - Starting Your MH380 Notebook... -
Page 43: Boot Sequence
This information is in the BIOS program. Each time you power up or restart your notebook, it goes through a boot sequence which displays a Fujitsu logo until your operating system is found. During booting, your notebook is performing a standard boot sequence including a Power On Self Test (POST). -
Page 44: Booting The System
When you turn on your notebook for the first time, it will display a Fujitsu logo on the screen. If you do nothing the system will load the operating system, and then the Windows Welcome will begin. -
Page 45: Starting Windows The First Time
Once you are connected to the Internet, you will be asked if you wish to continue with the registration. If you select Yes you will then enter your name and address, and email address if desired. Click Next to complete registration. 45 - Starting Your MH380 Notebook... -
Page 46: Installing Clickme
Your system has a convenient tool called the Fujitsu Driver Update (FDU) utility. With FDU, you can choose to automatically or manually go to the Fujitsu site to check for new updates for your system. For more information about the FDU utility, refer to “Automatically Downloading Driver Updates” on page 77. -
Page 47: Power Management
Power Management Your notebook has many options and features for conserving battery power. Some of these features are automatic and need no user intervention. However, others depend on the parameters you set to best suit your operating conditions, such as those for the display brightness. Internal power management for your notebook may be controlled from settings made in your operating system, pre-bundled power management application, or from settings made in BIOS setup utility. -
Page 48: Hibernation (Save-To-Disk) Feature
• Timing out from lack of activity. • Allowing the battery to reach the Dead Battery Warning condition. Your notebook’s system memory typically stores the file on which you are working, open application information, and any other data required to support operations in progress. When you resume operation from Standby mode, your notebook will return to the point where it left off. -
Page 49: Windows Power Management
Windows Power Management The Power Options icon located in the Windows Control Panel allows you to configure some of the power management settings. For example, you can use the Power Options to create a power plan, turn on password protection, or determine what the power button does. Restarting the System If your system is on and you need to restart it, be sure that you use the following procedure. -
Page 50: Energy Star® Compliance
Sleep mode, press the Suspend/Resume Button. Energy saving benefits: Fujitsu ENERGY STAR qualified mobile PCs use about half as much electricity as standard equipment – saving half in utility costs. But more than that, ENERGY STAR also makes a difference for the environment. -
Page 51: User-Installable Features
Chapter 3 User-Installable Features Lithium ion Battery Your notebook has a Lithium ion battery that provides power for operating your notebook when no external power source is available. The battery is durable and long lasting, but should not be exposed to extreme temperatures, high voltages, chemicals or other hazards. -
Page 52: Recharging The Batteries
• CTUAL BATTERY LIFE WILL VARY BASED ON SCREEN BRIGHTNESS APPLICATIONS FEATURES POWER MANAGEMENT SETTINGS BATTERY CONDITION AND OTHER CUSTOMER PREFERENCES PTICAL DRIVE OR HARD DRIVE USAGE MAY ALSO HAVE A SIGNIFICANT IMPACT ON BATTERY LIFE BATTERY CHARGING CAPACITY IS REDUCED AS THE BATTERY AGES F YOUR BATTERY IS RUNNING LOW QUICKLY YOU SHOULD REPLACE IT WITH A NEW ONE... -
Page 53: Replacing The Battery
SING HEAVY CURRENT DEVICES OR FREQUENT EXTERNAL OPTICAL DRIVE ACCESSES MAY PREVENT CHARGING COMPLETELY Low Battery State When the battery is running low, the Battery Level indicator will glow red. If you do not respond to the low battery alarm, the batteries will continue to discharge until they are too low to operate. Your notebook will then go into Standby mode to try and protect your data for as long as possible. - Page 54 Cold-swapping Batteries Have a charged battery ready to install. Shut down your system and disconnect the AC adapter. Close the display and turn the system over. Holding the system upside down with the battery towards the back, slide the left battery release latch (labeled “1 HOLD”) to the left and hold it.
- Page 55 F THE ITHIUM ION BATTERY CONNECTOR IS NOT FULLY SEATED YOU MAY NOT BE ABLE TO USE YOUR NOTEBOOK OR CHARGE YOUR BATTERY NEW GRAPHIC Figure 11. Removing a Battery 55 - Lithium ion Battery...
-
Page 56: Memory Upgrade Module
Memory Upgrade Module Your Fujitsu MH380 notebook comes with 1GB of high speed Double Data Rate Synchronous Dynamic RAM 2 (DDR2 SDRAM), 667 MHz factory installed. To ensure 100% compatibility, purchase the SDRAM module only from the Fujitsu web store at www.shopfujitsu.com. - Page 57 Install a new module as outlined in the procedure below. Replace the cover. Replace the screws. Figure 12. Opening the Memory Compartment Figure 13. Removing a Memory Module 57 - Memory Upgrade Module...
-
Page 58: Installing A Memory Upgrade Module
Installing a Memory Upgrade Module Remove the new memory upgrade module from the static guarded sleeve. Align the memory upgrade module with the component side up. Align the connector edge of the memory upgrade module with the connector slot in the compartment. -
Page 59: Checking The Memory Capacity
Checking the Memory Capacity Once you have changed the system memory capacity by replacing the installed module with a larger one, be sure to check that your notebook has recognized the change. Check the memory capacity by clicking [Start] > Control Panel, then clicking the System icon. On the main screen, check the amount of memory under System, next to Installed memory (RAM): F THE TOTAL MEMORY DISPLAYED IS INCORRECT CHECK THAT YOUR MEMORY UPGRADE MODULE IS... -
Page 60: Secure Digital Cards
SD Card SD Card Slot Figure 15. Installing an SD Card Secure Digital Cards Your notebook supports Secure Digital (SD) cards, on which you can store and transfer data to and from a variety of digital devices. These cards use flash memory architecture, which means they don’t need a power source to retain data. -
Page 61: Inserting Sd Cards
Inserting SD Cards Secure Digital Cards are inserted in the SD Card slot (Figure 15). To insert a card, follow these steps • SD C ’ NSERTING OR REMOVING AN ARD DURING YOUR NOTEBOOK S SHUTDOWN OR BOOTUP PROCESS MAY DAMAGE THE CARD AND OR YOUR NOTEBOOK •... -
Page 62: Device Ports
Device Ports Your MH380 notebook comes equipped with multiple device ports to which you can connect an external device including: disk drives, keyboards, modems, printers, etc. Internal LAN (RJ-45) jack The internal LAN (RJ-45) jack is used for an internal 10/100 BaseTx Ethernet connection. You will need to configure your notebook to work with your particular network. -
Page 63: Headphone Jack
Headphone Jack The headphone jack allows you to connect headphones or powered external speakers to your notebook. Your headphones or speakers must be equipped with a 1/8” (3.5 mm) stereo mini-plug. In order to connect headphones or speakers follow these easy steps: (See Figure 5 on page 22 for location) Align the connector with the port opening. -
Page 64: Troubleshooting Your Notebook
Chapter 4 Troubleshooting Your Notebook Troubleshooting There may be occasions when you encounter simple setup or operating problems that you can solve on the spot, or problems with peripheral devices that can be solved by replacing the device. The information in this section helps you isolate and resolve some of these straightforward issues and identify failures that require service. - Page 65 If you have tried the solutions suggested in the Troubleshooting Table without success, contact your support representative: Toll free: 1-800-8Fujitsu (1-800-838-5487) Web site: http://www.computers.us.fujitsu.com/support. Before you place the call, you should have the following information ready so that the customer support representative can provide you with the fastest possible solution: •...
-
Page 66: Specific Problems
Specific Problems Using the Troubleshooting Table When you have problems with your notebook, try to find the symptoms under the Problem column of the troubleshooting table for the feature giving you difficulty. You will find a description of common causes for that symptom under the column Possible Cause and what, if anything, you can do to correct the condition under Possible Solutions. -
Page 67: Audio Problems
Problem Possible Cause Possible Solutions Audio Problems There is no sound coming The volume is turned too low. Adjust the volume control on your notebook and operating from the built-in speakers. system. Use the [Fn+F9] key combination on your keyboard to increase the volume of your notebook. -
Page 68: Memory Problems
Problem Possible Cause Possible Solutions You have installed an Your external device is not Re-install your device. See “Device Ports” on page 62. external keyboard or properly installed. mouse, and it does not Your operating system (OS) is Check your device and operating system documentation seem to work. -
Page 69: Power Failures
Problem Possible Cause Possible Solutions Power Failures You turn on your notebook The installed battery is com- Check the Status Indicator Panel to determine the presence and nothing seems to hap- pletely discharged or there is and condition of the battery. See “Status Indicator Panel” on pen. - Page 70 Problem Possible Cause Possible Solutions Your notebook turns off all You are operating on battery Install a power adapter, then push the Power/Sus- by itself. power and ignored a low bat- pend/Resume button. See “Power Sources” on page 41. (continued) tery alarm until the battery was at the dead battery state and the system has entered...
-
Page 71: Shutdown And Startup Problems
Set the operating source by pressing the [ESC] key while the and displays power on of the setup utility are not Fujitsu logo is on screen or use the [F2] key and enter the information, but fails to compatible with your configu- setup utility and adjust the source settings from the Boot load the operating system. -
Page 72: Video Problems
Problem Possible Cause Possible Solutions Your notebook appears to The BIOS CMOS hold-up bat- Contact your support representative for repairs. This is not a change setup parameters tery has failed. user serviceable part but has a normal life of 3 to 5 years. when you start it. -
Page 73: Miscellaneous Problems
Problem Possible Cause Possible Solutions The display goes blank by Power timeouts are set for Press any button on the keyboard, or move the mouse to itself after you have been very short intervals and you restore operation. If that fails, push the Power/Sus- using it. -
Page 74: Power On Self Test Messages
Power On Self Test Messages The following is an alphabetic list of error-and-status messages that Phoenix BIOS and/or your operating system can generate and an explanation of each message. Error messages are marked with an *. If an error message is displayed that is not in this list, write it down and check your operating system documentation both on screen and in the manual. - Page 75 *Keyboard error Keyboard not working. You may have to replace your keyboard or keyboard controller but may be able to use an external keyboard until then. Contact your support representative. Non-system disk or disk error Replace the disk and then press any key to continue. NTLDR is missing Press any key to restart.
- Page 76 PXE-E78: Could not locate boot server Contact your support representative for more information. PXE-E89: Could not download boot image Contact your support representative for more information. *Real time clock error Real-time clock fails BIOS test. May require board repair. Contact your support representative. Remove disks or other media Remove disks or other media, then press any key to restart.
-
Page 77: Restoring Your System Image And Software
Your system has a convenient tool called the Fujitsu Driver Update (FDU) utility. With FDU, you can choose to automatically or manually go to the Fujitsu site to check for new updates for your system. The FDU icon should appear in the system tray at the bottom right of your screen (roll the cursor over the icons to find the correct one). - Page 78 Automatically searches for new updates on a regular basis (approximately every 3 days). Show update history Brings up a screen that displays a history of updates that have been made via the FDU. About Fujitsu Driver Update Displays the FDU version number and copyright information. Fujitsu Driver Update Readme Displays the FDU readme.
-
Page 79: Care And Maintenance
Chapter 5 Care and Maintenance Caring for your MH380 Notebook If you use your Fujitsu notebook carefully, you will increase its life and reliability. This section provides some tips for looking after the notebook and its devices. • N THE EVENT YOU DROP YOUR NOTEBOOK OR DAMAGE THE HOUSING IN ANY WAY... - Page 80 If your notebook will not boot after it has dried out, call your support representative. • Do not use your Fujitsu notebook in a wet environment (near a bathtub, swimming pool). • Always use the AC adapter and batteries that are approved for your notebook.
-
Page 81: Cleaning Your Notebook
Cleaning your notebook • Always disconnect the power plug. (Pull the plug, not the cord.) • Clean your notebook with a damp, lint-free cloth. Do not use abrasives or solvents. • Use a soft cloth to remove dust from the screen. Never use glass cleaners. •... -
Page 82: Storing Your Notebook
• Store your notebook and batteries separately. If you store your notebook with a battery installed, the battery will discharge, and battery life will be reduced. In addition, a faulty battery might damage your notebook. • Store your Fujitsu notebook in a cool, dry location. Temperatures should remain between 13ºF (-25ºC) and 140ºF (60ºC). •... -
Page 83: Traveling With Your Notebook
Traveling with your notebook • Do not transport your notebook while it is turned on. • It is recommended that you carry your notebook with you while traveling, rather than checking it in as baggage. • Always bring your System Recovery CD that came with your notebook when you travel. If you experience system software problems while traveling, you may need it to correct any problems. -
Page 84: Batteries
Batteries Caring for your Batteries • Always handle batteries carefully. • Do not short-circuit the battery terminals (that is, do not touch both terminals with a metal object). Do not carry lose batteries in a pocket or purse where they may mix with coins, keys, or other metal objects. -
Page 85: Media Care
Media Care Caring for your Media (optional) Media discs (DVD/CD/CD-R) are precision devices and will function reliably if given reasonable care. • Always store your media disc in its case when it is not in use. • Always handle discs by the edges and avoid touching the surface. •... -
Page 86: System Specifications
Chapter 6 System Specifications Specifications This section provides the hardware and environmental specifications for your Fujitsu MH380 notebook. Specifications of particular configurations will vary. Configuration Label The configuration label located on the bottom of your notebook contains specific information regarding the options you’ve chosen for your notebook. -
Page 87: Microprocessor
Microprocessor Intel® Atom™ N450 Processor Chipset • Mobile Intel NM10 Express • I/O Controller Hub 7 Mobile (ICH7M) Memory System Memory • DDR2-667 MHz SDRAM memory module. • One DIMM slot; upgradeable. Cache Memory 512 KB L2 cache on-die Video Built-in color flat-panel TFT active matrix LED backlight display with simultaneous display capability. -
Page 88: Audio
Audio • Realtek codec ALC269 with High Definition (HD) audio. • Headphones: Stereo headphone jack, 3.5 mm, 1 V or less, minimum impedance 32 Ohms • Microphone: Stereo microphone jack, 3.5 mm, 100 mV or less, minimum impedance 10K Ohms •... -
Page 89: Device Ports
Device Ports On the notebook: • Secure Digital (SD) Card slot • One 15-pin D-SUB connector for VGA external monitor (see Display specifications) • Three USB 2.0 (Universal Serial Bus) connectors for input/output devices • One DC In connector • One LAN (RJ-45) connector •... -
Page 90: Dimensions And Weight
Operating: 20% to 85%, relative, non-condensing. Non-operating: 8% to 85%, relative, non-condensing Altitude Operating: 10,000 feet (3,048 m) maximum Popular Accessories For ordering or additional information on Fujitsu accessories please visit our Web site at www.shopfujitsu.com or call 1-800-FUJITSU. 90 - Specifications... -
Page 91: Included Software
• CyberLink YouCam • Google Desktop • Google Picasa • Google Toolbar • Roxio Creator • Fujitsu Driver Update utility • Microsoft Works with Office 2007 Student and Home Trial Edition • Microsoft Windows 7 Starter Edition Learning About Your Software Tutorials All operating systems and most application software have tutorials built into them upon installation. - Page 92 Adobe Reader The Adobe Reader allows you to view, navigate, and print PDF files from across all of the major computing platforms. Norton Internet Security Your system is preinstalled with a free 60-day trial version of Symantec’s Norton Internet Security™. Internet Security is a suite of tools designed to protect your notebook from viruses, hackers, spyware, and spam.
- Page 93 Fujitsu Driver Update Utility The Fujitsu Driver Update (FDU) utility is pre-installed on your system. With FDU, you can choose to automatically or manually go to the Fujitsu site to check for new updates for your system. See “Automatically Downloading Driver Updates” on page 77.
-
Page 94: Glossary
Glossary AC Adapter A device which converts the AC voltage from a wall outlet to the DC voltage needed to power your notebook. Access point Wireless network device used to bridge wireless and wired network traffic. ACPI Advanced Configuration and Power Interface Active-Matrix Display A type of technology for making flat-panel displays which has a transistor or similar device for every pixel on the screen. - Page 95 ADSL Asymmetric Digital Subscriber Line. Technology for transporting high bit-rate services over ordinary phone lines. Accelerated Graphics Port. Graphics port specifically designed for graphics-intensive devices, such as video cards and 3D accelerators. Auto/Airline Adapter A device which converts the DC voltage from an automobile cigarette lighter or aircraft DC power outlet to the DC voltage needed to power your notebook.
- Page 96 An electrical circuit which passes data between the CPU and the sub-assemblies inside your notebook. Byte 8 bits of parallel binary information. Cache Memory A block of memory built into the micro-processor which is much faster to access than your system RAM and used in specially structured ways to make your overall data handling time faster.
- Page 97 Direct current. A voltage or current that does not fluctuate periodically with time. Default Value A pre-programmed value to be used if you fail to set your own. DHCP Dynamic Host Configuration Protocol. A protocol used to automatically acquire parameters required for the communication, such as IP address.
- Page 98 Desktop Management Interface. A standard that provides PC management applications with a common method of locally or remotely querying and configuring PC computer systems, hardware and software components, and peripherals. Domain Name System. A function to control the association between the IP address and the name assigned to the computer.
- Page 99 Electrostatic Discharge. The sudden discharge of electricity from a static charge which has built-up slowly. Example: the shock you get from a doorknob on a dry day or the sparks you get from brushing hair on a dry day. Federal Communication Commission. Gigabyte.
- Page 100 IEEE802.11g Wireless LAN standard that supports a maximum data rate of 54 Mbps. 802.11g devices operate in the 2.4 GHz ISM band. IEEE802.11n Wireless LAN standard that supports a maximum data rate of 200 Mbps. 802.11n devices operate in the 2.4 GHz ISM band. Infrastructure A name of a wireless LAN configuration.
- Page 101 Interrupt Request. An acronym for the hardware signal to the CPU that an external event has occurred which needs to be processed. Kilobyte. One thousand bytes. Local Area Network. An interconnection of computers and peripherals within a single limited geographic location which can pass programs and data amongst themselves. Liquid Crystal Display.
- Page 102 Megahertz 1,000,000 cycles per second. Memory A repository for data and applications which is readily accessible to your notebook’s CPU. Megahertz. MIDI Musical Instrument Digital Interface. A standard communication protocol for exchange of information between computers and sound producers such as synthesizers. Modem A contraction for MOdulator-DEModulator.
- Page 103 Network name (SSID: Service Set Identifier When a wireless LAN network is configured, grouping is performed to avoid interference or data theft. This grouping is performed with “Network name (SSID)”. In order to improve security, the network key is set allowing no communication unless “Network name (SSID)” coincides with the network key. Open system authentication Null authentication method specified in the 802.11 standard that performs no authentication checks on a wireless client before allowing it to associate.
- Page 104 POST Power On Self Test. A program which is part of the BIOS which checks the configuration and operating condition of your hardware whenever power is applied to your notebook. Status and error messages may be displayed before the operating system is loaded. If the self test detects failures that are so serious that operation can not continue, the operating system will not be loaded.
- Page 105 Reset The act of reloading the operating system. A reset erases all information stored in RAM. Restart See Reset. Resume To proceed after interruption. In your notebook this refers to returning to active operation after having been in one of the suspension states. SDRAM Synchronous Dynamic Random Access Memory.
- Page 106 Standby To make inoperative for a period of time. Your notebook uses various suspension states to reduce power consumption and prolong the charge of your battery. Status Indicator A display which reports the condition of some portion of your hardware. On your notebook this is an LCD screen just above the keyboard.
- Page 107 Thin Film Transistor – A technology for flat display panels which uses a thin film matrix of transistors to control each pixel of the display screen individually. Underwriters Laboratories – An independent organization that tests and certifies the electrical safety of devices.
-
Page 108: Regulatory Information
Regulatory Information Notice Changes or modifications not expressly approved by Fujitsu could void this user’s authority to operate the equipment. FCC NOTICES Notice to Users of Radios and Television This equipment has been tested and found to comply with the limit for class B digital devices, pursuant to parts 15 of the FCC Rules. - Page 109 DOC (INDUSTRY CANADA) NOTICES Notice to Users of Radios and Television This Class B digital apparatus meets all requirements of Canadian Interference-Causing Equipment Regulations. CET appareil numérique de la class B respecte toutes les exigence du Réglement sur le matérial brouilleur du Canada.
-
Page 110: Appendix A: Wlan User's Guide
Appendix A: WLAN User’s Guide FCC Regulatory Information Please note the following regulatory information related to the wireless LAN device. Regulatory Notes and Statements Wireless LAN, Health and Authorization for use Radio frequency electromagnetic energy is emitted from Wireless LAN devices. The energy levels of these emissions, however, are much less than the electromagnetic energy emissions from wireless devices such as mobile phones. - Page 111 Regulatory Information/Disclaimers Installation and use of this Wireless LAN device must be in strict accordance with the instructions included in the user documentation provided with the product. Any changes or modifications made to this device that are not expressly approved by the manufacturer may void the user’s authority to operate the equipment.
- Page 112 003 B / NMB 003 B. Operation is subject to the following two conditions: (1) this device may not cause harmful interference, and (2) this device must accept any interference received, including interference that may cause undesirable operation. Modifications not expressly authorized by Fujitsu America Inc. may invalidate the user's right to operate this equipment. Canadian Notice The device for the 5150 - 5250 MHz band is only for indoor usage to reduce the potential for harmful interference to co-channel mobile satellite systems.
-
Page 113: Before Using The Wireless Lan
Before Using the Wireless LAN This manual describes the procedures required to properly set up and configure the integrated Wireless LAN Mini-PCI device (referred to as "WLAN device" in the rest of the manual). Before using the WLAN device, read this manual carefully to ensure its correct operation. Keep this manual in a safe place for future reference. -
Page 114: Wireless Lan Modes Using This Device
Wireless LAN Modes Using this Device Ad Hoc Mode "Ad Hoc Mode" refers to a wireless network architecture where wireless network connectivity between multiple computers is established without a central wireless network device, typically known as Access Point(s). Connectivity is accomplished using only client devices in a peer-to-peer fashion. That is why Ad Hoc networks are also known as peer-to-peer networks. - Page 115 Access Point (Infrastructure) Mode Infrastructure mode refers to a wireless network architecture in which devices communicate with wireless or wired network devices by communicating through an Access Point. In infrastructure mode, wireless devices can communicate with each other or with a wired network. Corporate wireless networks operate in infrastructure mode because they require access to the WLAN in order to access services, devices, and computers (e.g., file servers, printers, databases).
-
Page 116: Deactivating The Wlan Device
How to Handle This Device The WLAN device is a device that omes pre-installed in your mobile computer. Under normal circumstances, it should not be necessary for you to remove or re-install it. The operating system that your mobile computer comes with has been pre-configured to support the WLAN device. •... -
Page 117: Disconnection Using The Icon In The Taskbar
Disconnection Using the Icon in the Taskbar Note that disconnecting via the icon in the system tray does not turn off the radio; it continues to transmit and receive even though it’s not connected. Right-click the WLAN icon in the taskbar at the bottom right of your screen. Choose Disconnect from a network. -
Page 118: Configuring The Wireless Lan
Configuring the Wireless LAN The WLAN device can be configured to establish wireless network connectivity using the software that is built into Windows for most industry standard security solutions is contained in this software. Pre-defined parameters will be required for this procedure. Please consult with your network administrator for these parameters: Configuring the WLAN using Windows 7 Procedure... -
Page 119: Troubleshooting The Wlan
Troubleshooting the WLAN Troubleshooting Causes and countermeasures for troubles you may encounter while using your wireless LAN are described in the following table. If you are unfamiliar with the steps required, consult your System Administrator or go to [Start] -> Help and Support -> Networking and the Web Problem Possible Cause Possible Solution... - Page 120 Problem Possible Cause Possible Solution Unavailable RF interference from The use of identical or overlapping RF channels can cause interference with the network Access Points or operation of the WLAN device. Change the channel of your Access Point to a connection other wireless channel that does not overlap with the interfering device.
-
Page 121: Wlan Specifications
WLAN Specifications Specifications Item Specification Type of network The integrated Atheros AR5B95 802.11bgn Wireless LAN device conforms to 802.11b, 802.11g, and 802.11n Wi-Fi based*. Transfer rate (Automatic switching) 54 Mbps maximum data rate • Active frequency 802.11n: 2.4 GHz or 5 GHz •... - Page 122 * “Wi-Fi based” indicates that the interconnectivity test of the organization which guarantees the interconnectivity of wireless LAN (Wi-Fi Alliance) has been passed. ** The communication ranges shown above will increase or decrease depending on factors such as number of walls, reflective material, or interference from external RF sources.
- Page 123 Using the Bluetooth Device The Bluetooth module (Broadcom BCM92070MD_REF) is integrated into your Fujitsu mobile computer. What is Bluetooth Bluetooth technology is designed as a short-range wireless link between mobile devices, such as laptop computers, phones, printers, and cameras. Bluetooth technology is used to create Personal Area Networks (PANs) between devices in short-range of each other.
- Page 124 Users are not authorized to modify this product. Any modifications invalidate the warranty. This equipment may not be modified, altered, or changed in any way without signed written permission from Fujitsu. Unauthorized modification will void the equipment authorization from the FCC and Industry Canada and the warranty.
- Page 125 Index BIOS guide About This Guide setup utility Bluetooth adapter Boot Sequence plug adapters Booting the System Air Vents Built-in Speakers Anti-theft Lock Slot Auto/Airline Adapter CapsLock Indicator Click Me! Battery Clicking alarm Configuration Label care Contact Information Charge/DC-In Indicator Controls and Connectors cold-swapping Conventions Used in the Guide...
- Page 126 Error Messages Keyboard External Monitor Port cursor keys numeric keypad problems windows keys Fujitsu Contact Information Fujitsu Driver Update utility Fujitsu Shopping Online LAN (RJ-45) Jack Function Key Lithium ion Battery Bay Local Area Network (LAN) Memory capacity checking capacity...
- Page 127 failure Audio indicator Chipset management Device Ports Dimensions and Weight Environmental Requirements problems Keyboard sources mass storage device options Power Management Memory Power On Self Test Microprocessor Power/Suspend/Resume Button Power Pre-Installed Software Video Adobe Acrobat Reader status indicators Google Toolbar Suspend/Resume Button manuals Touchpad...
- Page 128 Wireless LAN before using the wireless LAN configuring connection to the network deactivating/disconnecting modes Specifications Troubleshooting...
Need help?
Do you have a question about the MH380 and is the answer not in the manual?
Questions and answers