
Related Manuals for ZOSI 306 Pro


Summary of Contents for ZOSI 306 Pro
- Page 1 306 Pro Wire-Free Battery Security Camera System Quick Start Guide www.zositech.com V6.G.01.Z...
- Page 2 Contents...
- Page 3 Packing List of NVR Kit 4-cam: Quick Start Guide USB Mouse*1 NVR*1 Camera*4 Quick Start Guide*1 Mounting Base*4 Mounting Screw Bag*4 Screwdriver*1 1 meter Network Cable*1 5V-1A USB Charger 12V-2A Power Battery Pack*1 +Cable*1 Supply of NVR*1 8-cam: Quick Start Guide USB Mouse*1 NVR*1 Camera*8...
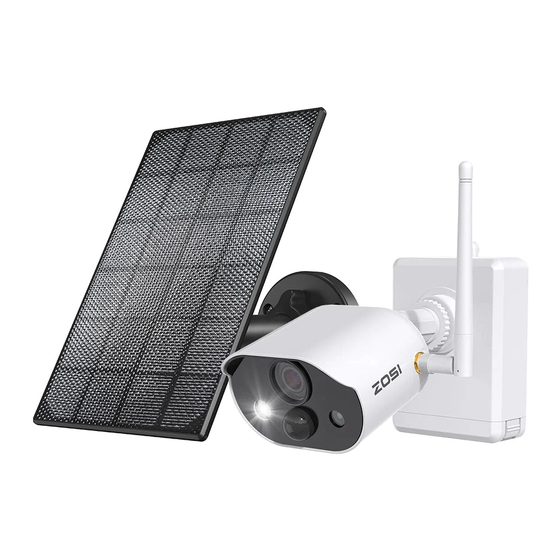
- Page 4 Specification and interface description 2.1 Camera ①Antenna ⑤Network Indicator ⑨Release Button ⑬Retaining Screw ②HD Lens ⑥PIR Sensor ⑩Power Switch ⑭Micro USB Port ③Infrared LEDs ⑦White LED Spotlight ⑪Loudspeaker ④Microphone ⑧Adjusting Screw ⑫Charge Indicator Description of the Camera Network indicators: Blue light on: The camera is paired or woken up Red light fleshes slowly: Waiting for pairing with NVR Red light on: Low Battery Red and blue lights off: In Standby...
-
Page 5: Connection Diagram
2.3 Connection Diagram Router Mouse USB Port Camera HDMI USB2.0 DC12V VGA/HDMI Output Power Supply Camera Installation 3.1 You can place it on any flat surface: table, chair, floor etc.. 3.2 Install with Wall Mount (as shown in the figure) Drill 5 holes according to the position of the mounting base, 3.2.1 and mount the base on the wall with the included pack of screws. - Page 6 Install and tighten the safety set screw. 3.2.3 Insert and tighten the screw on the bottom of the camera battery pack. 3.2.4 Use the included screwdriver to adjust the camera to a proper angle 3.2.5 and tighten the adjustment screw. Wall Adjusting Screw...
-
Page 7: Installation Precautions
Installation precautions 1. Please fully charge the camera battery before use. 2. Do not disassemble the device. This product is not equipped with any parts that can be disassembled/maintained by yourself. 3. Do not install at location with objects covering or obscuring the camera. 4. -
Page 8: Add Devices
Personal account registration 5.1 Search “ZOSI Smart” in App Store or Android Market, or scan the QR code below to download on your mobile phone.( Please grant the App to obtain the corresponding permission for the first time use, otherwise, it will cause the device fails to add, or when the camera triggers motion detection or alarm, the mobile phone cannot receive the alarm push.) - Page 9 6.1. 2 Pair the Cameras with the NVR NOTE: The battery camera has been paired with the NVR, no code pairing is required. But if the pairing information between the camera and NVR is cleared, you need to re-pair the code, and follow the steps below: (1)...
- Page 10 NOTE: If you don’ t have an account, please register first. It is recommended to use the Zosi Smart APP account to login, avoid multiple account passwords or choose local login. (no account password required).
- Page 11 7.2 Device Management (1) Add Devices: Click "Add Devices" at the bottom right>Select device model>Enter the device name, device ID, user name, device password and the number of channels>Click “Save” to complete the addition. 7.3 Enjoy Live View and Playback 7.3.1 Click “Live”...
- Page 12 7.3.2 Click the playback button in the upper left corner to enter the playback interface to watch the video playback. Faults and Solutions (1) Device Offline Check the Internet connection of the router. Check the connection between wireless NVR and the router. (2)...
- Page 13 Lista del envío Kit NVR con 4 cámaras: Quick Start Guide Ratón*1 NVR*1 Cámara*4 Manual*1 Base de montaje*4 Bolsa de tornillos*4 Destornillador*1 Cable Ethernet de 1M*1 5V-1A Cargador USB*1 Transformador 12V-2A Batería*1 para NVR*1 Kit NVR con 8 cámaras: Quick Start Guide NVR*1 Cámara*8 Manual*1...
- Page 14 Detalles del producto y descripción de puertos 2.1 Cámara: ①Antena ⑤Luz indicadora de red ⑨Posición de extracción ⑬Tornillo de fijación de la de la batería batería ②Lente ⑥PIR ⑩Botón de encendido ⑭Puerto de carga de la batería ③LED IR ⑦Luz blanca de alarma ⑪Altavoz ④Micrófono ⑧Tornillo de ajuste de...
-
Page 15: Instalar La Cámara
2.3 Diagrama de conexión del sistema Puerto para ratón/ memoria USB Enrutador Cámara HDMI USB2.0 DC12V Monitor Puerto de alimentación Instalar la cámara 3.1 Se puede colocar en cualquier superficie de plataforma: mesas, sillas, suelos, etc. 3.2 Instalación en pared (como se muestra en la figura) Primero taladre 5 orificios en la pared y luego use los tornillos 3.2.1 para fijar la base de montaje en la posición de instalación deseada. - Page 16 Utilice tornillos para bloquear la cámara y la base de montaje. 3.2.3 Apriete el tornillo en la parte inferior de la batería de la cámara para fijar 3.2.4 la batería. Puerto de tornillo de la batería Ajuste la cámara a un ángulo adecuado con un destornillador y apriete el 3.2.5 tornillo de ajuste.
- Page 17 Precauciones de instalación 1. Por favor cargue completamente la batería de la cámara antes de usarla. 2. No desmonte el dispositivo. Este producto no está equipado con ninguna pieza que se pueda desarmar o mantener por su mismo. 3. No instale en un lugar con objetos que cubran u oscurezcan la cámara. 4.
- Page 18 Aplicación para móvil 6.1 Agregar el dispositivo Abra la aplicación "Zosi Smart" en el móvil, inicie sesión e ingrese a la interfaz "Dispositivo", haga clic en "+" en la esquina superior derecha o en la parte inferior, y luego seleccione "Agregar el dispositivo". Seleccione el tipo del dispositivo en la interfaz "Agregar el dispositivo"...
- Page 19 6.1. 2 Emparejamiento de cámara y NVR Nota: Las cámaras con batería incluidas en el kit se han emparejados con el NVR, no se requiere coincidencia de código. Si se borra la información de emparejamiento entre la cámara y el NVR, debe volver a emparejar el código.
- Page 20 7.1 Instale y abra el software AVSS, seleccione el idioma y haga clic en "Iniciar sesión". Nota: por favor regístrese una cuenta primero si no la tiene. Se recomienda iniciar sesión con la cuenta de la aplicación Zosi Smart o elegir el inicio de sesión local (no se requiere cuenta ni contraseña).
- Page 21 7.2 Gestión de dispositivos (1) Añadir dispositivo: haga clic en "Añadir dispositivo" debajo de la lista de dispositivos. Seleccione el tipo del dispositivo, introduzca el nombre del dispositi- vo, la ID del dispositivo, el nombre de usuario, la contraseña del dispositivo y número de canal, luego haga clic en "Guardar".
- Page 22 7.3.2 Haga clic Reproducción en la esquina superior izquierda y luego haga clic en el dispositivo en la lista de dispositivos para ver las grabaciones anteriores de este dispositivo. Fallos y soluciones (1) Dispositivo desconectado Compruebe si el enrutador está conectado a Internet. Compruebe si la conexión entre el NVR inalámbrico y el enrutador es correcta.
-
Page 23: Liste D'emballage
Liste d’emballage Le kit de nvr avec 4 caméras inclut : Quick Start Guide Souris*1 NVR*1 Caméra*4 Mode d’emploi*1 Base de montage*4 Set de vis*4 Tournevis*1 1 mètre de câble RJ45*1 Chargeur DC 5V-1A Transformateur DC Groupe de batteries*1 avec câble USB*1 12V 2A*1 Le kit de nvr avec 8 caméras inclut : Quick Start Guide... -
Page 24: Présentation Du Système
Présentation du système 2.1 Caméra IP ①Antenne ⑤Voyant de réseau ⑨Insérer ou retirer la ⑬Fixer la batterie batterie ⑭Charge de la batterie ②Objectif ⑥PIR ⑩Power ③LEDs IR ⑦Lumières blanches ⑪Haut-parleur ④Mricophone ⑧Vis de réglage ⑫Voyant de charge Présentation du voyant de réseau : Le voyant est bleu : la caméra a été... - Page 25 2.3 Connexion des éléments Routeur Souris & Clé USB Caméra IP HDMI USB2.0 DC12V Moniteur Power Installation de la caméra 3.1 La caméra peut être placée sur toutes les surfaces horizontales, tels que les tables, les chaises, le sol, etc. 3.2 Installez la caméra sur un mur (comme l’image illustrée) Percez d'abord 5 trous dans le mur, puis utilisez les accessoires 3.2.1...
- Page 26 Fixez la caméra et la base de montage. 3.2.3 Serrez la vis au bas du compartiment de la batterie de la caméra pour 3.2.4 fixer la batterie. Trou de vis au bas de la batterie Ajustez la caméra à un angle approprié avec un tournevis et serrez la vis 3.2.5 de réglage.
-
Page 27: Précautions D'installation
Précautions d'installation 1. Assurez-vous une charge complète de la batterie avant d’ utiliser la caméra. 2. Ne démontez pas l'appareil. Ce produit n'est équipé d'aucune pièce pouvant être démontée/entretenue par vous-même. 3. N’ installez pas la caméra à un endroit où des objets recouvrent. 4. - Page 28 Création d’un compte 5.1 Recherchez et téléchargez l’ application «Zosi Smart» dans App Store ou Google Play, ou numérisez le code QR ci-dessous pour terminer le Pour la première utilisation, veuillez accorder à l'APP pour téléchargement. obtenir les autorisations correspondantes. Si cela n'est pas autorisé, cela entraînera l'échec de l'ajout de l'appareil, ou l’...
- Page 29 6.1. 2 Ajoutez la caméra au NVR Note: Les caméras livrées dans le kit ont été jumelées avec le NVR lors de sortie d’ usine, aucune opération n'est requise. Si les informations de jumelage entre les caméras et le NVR sont effacées, vous devez faire les opérations suivantes : (1)...
- Page 30 à distance, etc. 7.1 Double-cliquez sur l'icône «AVSS» pour installer cette application. Sélectionnez la langue et vous connectez. Note: Il est recommandé d’ utiliser le compte créé de Zosi Smart pour vous connecter à AVSS.
- Page 31 7.2 Gestion des appareils (1) Cliquez sur «Ajouter», sélectionnez le type de l’ appareil, puis saisissez le nom de l'appareil, l'ID de l'appareil, le nom d'utilisateur, le mot de passe de l'appareil et le numéro de canal, puis cliquez sur «OK» pour sauvegarder. 7.3 Lecture &...
- Page 32 7.3.2 Cliquez sur «Playback» pour relire les vidéos enregistrées. (1) Q : L’ appareil est hors ligne, comment faire ? R : Vérifiez le réseau du routeur et vérifiez la connexion du réseau de NVR. (2) Q : Pourquoi il est impossbile d’ accéder à la vidéo en temps réel ? R : Le serveur est occupé, essayez de redémarrer l'application et réessayez.
- Page 33 Packliste 4er Wireless Kamerasset enthält: Quick Start Guide Maus*1 NVR*1 Kamera*4 Kurzanleitung*1 Montagesockel*4 Schraubenpaket*4 Schraubendreher*1 1m Netzwerkkabel*1 5V-1A USB-Ladegerät + 12V-2A NVR-Netzteil*1 Akku*1 Ladekabel*1 8er Wireless Kamerasset enthält: Quick Start Guide NVR*1 Kamera*8 Kurzanleitung*1 Maus*1 Schraubenpaket*8 Schraubendreher*1 1m Netzwerkkabel*1 Montagesockel*8 5V-1A USB-Ladegerät + 12V-2A NVR-Netzteil*1 Akku*1...
- Page 34 Übersicht 2.1 Kamera ①Antenne ⑤Netzwerkanzeige ⑨Druckstelle, um ⑬Batteriebefestigungsschraube Batteriefach abzunehmen ②Linse ⑥PIR ⑭Batterieladeanschluss ⑩Strom Knopf ③IR LEDs ⑦Weiße LEDs ⑪Lautsprecher ④Mikrofon ⑧Winkeleinstellschraube ⑫Ladestandanzeige Beschreibung der Kameranetzwerkanzeige: Blaues Licht ist immer an: Die Kamera wurde erfolgreich gekoppelt oder geweckt Rotes Licht blinkt kontinuierlich und langsam: Warten auf Kopplung mit dem Wireless Recorder Konstantes rotes Licht: schwache Batterie Rotes und blaues Licht sind aus: im Standby...
-
Page 35: Kamera Installieren
2.3 Systemanschlussplan Router Port USB Port Kamera HDMI USB2.0 DC12V HDMI/VGA Anschluss Strom Knopf Kamera installieren 3.1 Die Kamera kann auf jede Plattformoberfläche platziert werden: Tische, Stühle, Böden usw. 3.2 Montage an der Wand (wie im Bild gezeigt) Zuerst 5 Löcher in die Wand bohren und dann mit dem Zubehör aus dem 3.2.1 Schraubenpaket den Montagesockel an der gewünschten Einbauposition befestigen. - Page 36 Befestigen Sie die Kamera und die Befestigungsplatte des Montagesockels 3.2.3 mit Schrauben. Ziehen Sie die Schrauben an der Unterseite des Batteriefachs der Kamera 3.2.4 fest, um den Akku zu befestigen. Schraubenloch unten im Batteriefach Stellen Sie die Kamera mit einem Schraubendreher auf einen geeigneten 3.2.5 Winkel ein und ziehen Sie die Einstellschraube fest.
- Page 37 Vorsichtsmaßnahmen bei der Installation 1. Bitte laden den Kameraakku vor dem Gebrauch vollständig auf. 2. Bauen das Gerät nicht auseinander. Dieses Produkt ist nicht mit Teilen ausgestattet, die von Ihnen selbst demontiert/gewartet werden können. 3. Installieren die Kamera nicht an einem Ort, an dem das Objektiv verdeckt wird. 4.
- Page 38 ZOSI Smart APP 6.1 Gerät hinzufügen Öffnen Sie die Zosi Smart App auf Ihren Handy, melden Sie sich an und rufen Sie die Seite ,,Geräte" auf, klicken Sie auf das ,,+"-Symbol und wählen Sie ,,Gerät hinzufügen" aus. Wählen Sie das Gerätemodell auf der Seite ,,Gerät hinzufügen"...
- Page 39 6.1. 2 Kopplung von Kamera und NVR Hinweis: Die Originalkamera wurde mit dem NVR gekoppelt, es ist keine Konfiguration erforderlich. Wenn die Pairing-Informationen der Kamera und des NVR gelöscht werden, muss die Kamera erneut codiert werden. Die Schritte von der Konfiguation sind wie folgt: (1)...
- Page 40 ,,AVSS", um sie zu treiben. Wählen Sie die Sprache aus und klicken Sie auf Anmelden. Hinweis: Wenn Sie noch kein Konto haben, müssen Sie sich zuerst ein Konto registrieren. Es wird empfohlen, die gleichen Zugangsdaten für die ZOSI Smart App zu benutzen, oder sich lokal anzumelden (dafür ist kein Benutzername und Passwort erforderlich).
- Page 41 7.2 Geräteverwaltung (1) Gerät hinzufügen: Klicken Sie unten rechts, um ein Gerät hinzuzufügen> wählen Sie den Gerätetyp> geben Sie den Gerätenamen, die Geräte-ID, den Benutzernamen, das Gerätepasswort und die Kanalnummer ein> klicken Sie dann auf Speichern, das Gerät wird gezeichnet und Hinzufügen ist erfolgreich. 7.3 Live Video und Wiedergabe 7.3.1 Klicken Sie auf Live Video in der oberen linken Ecke und dann auf das Gerät in der Geräteliste unten, um Live Video anzusehen.
-
Page 42: 8/ Fehlerbehebung
7.3.2 Klicken Sie in der oberen rechten Ecke auf Wiedergabe, um die Wiederga- beschnittstelle aufzurufen und das aufgenommen Videos des Geräts zu spielen. Fehlerbehebung (1) Das Gerät ist offline Überprüfen Sie die Internetverbindung des Routers. Überprüfen Sie die Verbindung zwischen dem drahtlosen NVR und dem Router. (2)... -
Page 43: Lista Di Imballaggio
Lista di imballaggio Kit di quattro telecamere include: Quick Start Guide Mouse*1 NVR*1 Telecamera*4 Guida Rapida all’Uso*1 Base di Montaggio*4 Pacchetti di viti*4 Cacciavite*1 Cavo di Rete da 1m*1 Caricatore USB 5V 1A e Adattatore di Alimentazione Pacco di Batteria*1 Cavo di Ricarica*1 per NVR 12V 2A*1 Kit di otto telecamere include:... - Page 44 Dettagli del prodotto e descrizione di ogni parte 2.1 Telecamera ①Antenna ⑤Indicatore della rete ⑨Punto di pressione ⑬Vite di fissaggio della batteria per staccare la batteria ②Obiettivo ⑥PIR ⑭Porta di ricarica ⑩Tasto di accensione ③LED a infrarossi ⑦Indicatore di allarme ⑪Altoparlante ④Microfono ⑧Vite di regolazione...
-
Page 45: Installare La Telecamera
2.3 Schema della connessione del sistema Porta Router Porta USB Telecamera HDMI USB2.0 DC12V Porta VGA/HDMI Porta di Accensione Installare la telecamera 3.1 È possibile posizionare qualsiasi superficie della piattaforma: tavoli, sedie, pavimenti, ecc. 3.2 Installazione a parete (come mostrato in figura) Praticare 5 fori in base alla posizione della base di montaggio e montare la 3.2.1 base a parete con le viti in dotazione. - Page 46 Utilizzare le viti per fissare la telecamera e la piastra di fissaggio della base 3.2.3 di montaggio. Stringere la vite sul fondo del vano batteria della telecamera per fissare la 3.2.4 batteria in posizione. Foro per vite sul fondo del vano batteria Regolare la telecamera all’angolazione corretta con un cacciavite e 3.2.5 serrare la vite di regolazione.
- Page 47 Precauzioni per l’installazione 1. Caricare completamente la batteria della telecamera prima dell’ uso. 2. Non smontare il dispositivo. Questo prodotto non è dotato di parti che possono essere smontate/manutenute da soli. 3. Non installare il dispositivo in luoghi con oggetti che coprono o oscurano la telecamera.
- Page 48 Applicazione 6.1 Aggiungere il dispositivo Avviare l’ applicazione “ZOSI Smart” , effettuare il login e accedere all’ interfac- cia “Dispositivo” , fare clic sul pulsante “+” nell’ angolo in alto a destra o sul “+” in basso per selezionare “Aggiungi dispositivo” , selezionare il modello di dispositivo nell’...
- Page 49 6.1. 2 Accoppiamento delle telecamere e NVR Nota: le telecamere a batteria fornite con il kit sono state accoppiate all'NVR, non è richiesto l’ accoppiamento. Se le informazioni di accoppiamento delle telecamere e dell’ NVR vengono cancellate, è necessario accoppiare le telecamere all’...
- Page 50 NOTA: Se non si dispone di un account, registrarsi prima. Si consiglia di utilizza- re l’ account dell’ APP Zosi Smart per l’ accesso. Evitare account multipli o di scegliere l’ accesso locale. (non è richiesta la password dell’ account).
- Page 51 7.2 Gestione del dispositivo (1) Aggiungere dispositivi: Fare clic su “Aggiungi dispositivi” in basso a destra>Selezionare il modello di dispositivo modello>Inserire il nome del disposi- tivo, l’ ID del dispositivo, il nome utente, la password del dispositivo e il numero di canali>Cliccare su “Salva”...
-
Page 52: 8/ Problemi E Soluzioni
7.3.2 Fare clic sul pulsante di riproduzione nell’ angolo in alto a sinistra per accedere all’ interfaccia di riproduzione e guardare la riproduzione del video. Problemi e soluzioni (1) Il dispositivo è offline Controllare la connessione Internet del router. Controllare la connessione tra l’ NVR wireless e il router. (2)... - Page 53 Paklijst 4-delige draadloze cameraset omvat: Quick Start Guide muis*1 NVR*1 camera*4 snelstartgids*1 montagebasis*4 schroefpakket*4 schroevendraaier*1 1 m netwerkkabel*1 5V-1A USB-oplader + 12V-2A NVR-voeding*1 batterij*1 oplaadkabel*1 8-delige draadloze cameraset omvat: Quick Start Guide NVR*1 camera*8 snelstartgids*1 muis*1 schroefpakket*8 schroevendraaier*1 1 m netwerkkabel*1 montagebasis*8 5V-1A USB-oplader + 12V-2A NVR-voeding*1...
- Page 54 Overzicht 2.1 Camera ①Antenne ⑤Netwerkindicator ⑨Drukpunt om ⑬Batterijbevestigingsschroef batterijvak te verwijderen ②Lens ⑥PIR ⑭Batterij-oplaadconnector ⑩Aan/uit-knop ③IR LED's ⑦Witte LED's ⑪Luidspreker ④Microfoon ⑧Hoekstelschroef ⑫Oplaadniveau-indicator Beschrijving van de cameranetwerklamp: Blauw lampje brandt altijd: de camera is succesvol gekoppeld of gewekt Rood lampje knippert continu en langzaam: Wachten op koppelen met de draadloze recorder Constant rood licht: batterij bijna leeg Rode en blauwe lampjes zijn uit: in stand-by Beschrijving van de cameraknop:...
- Page 55 2.3 Systeemaansluitschema Router-poort USB poort Camera HDMI USB2.0 DC12V HDMI / VGA-aansluiting Aanknop Installeer de camera 3.1 De camera kan op elk platformoppervlak worden geplaatst: tafels, stoelen, vloeren, enz. 3.2 Montage aan de muur (zoals op de afbeelding te zien is) Boor eerst 5 gaten in de muur en gebruik vervolgens de accessoires 3.2.1 uit het schroefpakket om de montagesokkel op de gewenste inbouwpositie...
- Page 56 Bevestig de camera en de bevestigingsplaat van de montagesokkel 3.2.3 met schroeven. Draai de schroeven aan de onderkant van het batterijcompartiment van de 3.2.4 camera vast om de batterij vast te zetten. Schroefgat in de bodem van het batterijcompartiment Zet de camera in een geschikte hoek met een schroevendraaier en draai 3.2.5 de stelschroef vast.
- Page 57 Installatievoorzorgsmaatregelen 1. Laad de batterij van de camera volledig op voor gebruik. 2. Haal het apparaat niet uit elkaar. Dit product is niet uitgerust met onderdelen die u zelf kunt demonteren/onderhouden. 3. Installeer de camera niet op een plaats waar de lens is bedekt. 4.
- Page 58 ZOSI Smart-APP 6.1 Apparaat toevoegen Open de Zosi Smart App op uw mobiele telefoon, log in en ga naar de pagina "Apparaten", klik op het "+"-symbool en selecteer "Apparaat toevoegen". Selecteer het apparaatmodel op de pagina "Apparaat toevoegen" en scan de QR-code op de recorder of op het scherm om het apparaat toe te voegen.
- Page 59 6.1. 2 De camera en NVR koppelen Opmerking: de originele camera is gekoppeld aan de NVR, er is geen configu- ratie vereist. Als de koppelingsinformatie van de camera en de NVR wordt verwijderd, moet de camera opnieuw worden gecodeerd. De stappen van de configuratie zijn als volgt.
- Page 60 Het is aan te raden om dezelfde toegangsgegevens te gebruiken voor de ZOSI Smart App of om lokaal in te loggen (hier zijn geen gebruikersnaam en wachtwoord voor nodig).
- Page 61 7.2 Apparaatbeheer (1) Apparaat toevoegen: Klik rechtsonder om een apparaat toe te voegen> selecteer het apparaattype> voer de apparaatnaam, apparaat-ID, gebruikers- naam, apparaatwachtwoord en kanaalnummer in> klik vervolgens op opslaan, het apparaat wordt getekend en het toevoegen is gelukt. 7.3 Live video en afspelen 7.3.1 Klik op Live Video in de linkerbovenhoek en klik vervolgens op het apparaat in de lijst met apparaten hieronder om Live Video te bekijken.
- Page 62 7.3.2 Klik op Afspelen in de rechterbovenhoek om de afspeelinterface te openen en de opgenomen video van het apparaat af te spelen. Probleemoplossing (1) het apparaat is offline Controleer de internetverbinding van de router. Controleer de verbinding tussen de draadloze NVR en de router. (2)...
- Page 63 F921014Z3006110...
Need help?
Do you have a question about the 306 Pro and is the answer not in the manual?
Questions and answers