Advertisement
Available languages
Available languages
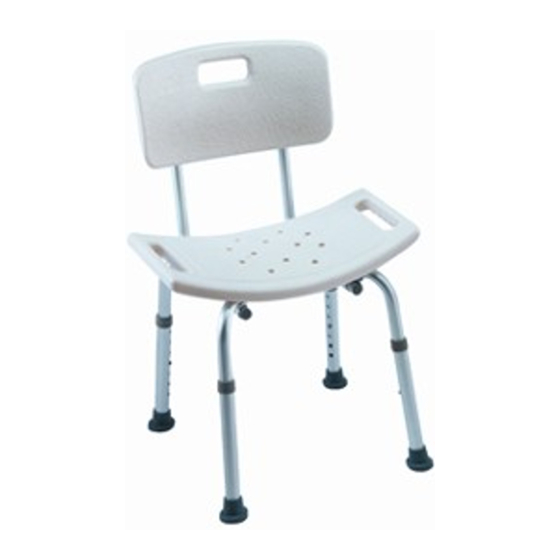
Shower Chairs
Assembly, Installation and Operating Instructions
NOTE: Check ALL parts for shipping damage. If shipping damage is noted, DO NOT use. Contact carrier/dealer for further instruction.
• DO NOT install or use this equipment without first reading and understanding these instructions. If you are unable to understand the
Warnings, Cautions or Instructions, contact a healthcare professional, dealer or technical personnel before attempting to use this
equipment - otherwise, injury or damage may occur.
• All four leg tips MUST be in contact with shower/tub floor at all times.
• ALWAYS inspect the shower chair to ensure that it is properly positioned and stable before using. DO NOT use if shower chair is wobbly or
unstable.
• Ensure that the snap buttons fully protrude through their respective adjustment holes.
• Check leg tips for rips, tears, cracks or wear. If any of these conditions exist, replace leg tips IMMEDIATELY.
• Users with limited physical capabilities should be supervised or assisted when using the shower chair.
• The shower chair is not to be used as a transfer bench, transfer device or climbing device.
• Exercise caution when assembling the chair to avoid pinching.
• After ANY adjustments, repair or service and BEFORE use, make sure that all attaching hardware and parts are secure.
• Ensure that all four chair legs are adjusted to the same height, and that all height adjustment buttons protrude fully through adjustment
holes before use.
• ALWAYS observe the weight limit on the labeling of your product. Check that all labels are present and legible. Replace if necessary.
• Invacare products are specifically designed and manufactured for use in conjunction with Invacare accessories. Accessories designed by other
manufacturers have not been tested by Invacare and are not recommended for use with Invacare products.
Shower Chair Models
MODEL
DESCRIPTION
91-2
Shower Chair
95-2
Shower Chair with Back
96-2
Shower Chair with Back
9981
Folding Shower Chair with Back
9785-1
Bariatric Shower Chair with Back
9785-2
Bariatric Shower Chair with Back
Assembling the Shower Chair
NOTE: Not all procedures apply to all chair types. Refer to the chair type
to verify if the procedure applies before attempting any procedure.
NOTE: For this procedure, refer to FIGURE 1.
• For models 96‐2 (DETAIL "A") or 9785‐1 and 9785‐2 (DETAIL "B"):
1. Put the shower chair on its side on a flat, stable surface.
2. Press the snap buttons on the back support tubes and slide the
back support tubes into the back support brackets on the leg
frame until both snap buttons are fully engaged inside the
holes in the back support brackets.
NOTE: Two audible "clicks" will be heard.
• For model 95‐2 (DETAIL "C"):
1. Place the seat upside down on a flat, stable surface.
2. Put a leg over one socket in the seat and align.
3. Insert the leg into the socket until it is fully seated and the
socket tabs snap into the socket tab windows.
4. Pull up on the leg to ensure that it has "locked" into place.
5. Repeat STEPS 1‐4 for the remaining three legs.
6. Put the back into the slot in the seat.
7. Push down on the back until it snaps securely in place.
8. Ensure the compression buttons are fully visible through the
notches in the back of the seat.
NOTE: If both compression tabs are visible, the back is installed properly.
If the compression tabs are not visible, apply pressure to the back until it
snaps into place and both compression tabs are visible.
Adjusting the Shower Chair Height
NOTE: For this procedure, refer to FIGURE 2.
1. Press the snap button and slide leg extension up or down to
desired adjustment hole.
2. Ensure the snap button protrudes fully through the adjustment
holes of the leg extension.
NOTE: There will be an audible click when the snap button fully engages.
3. Repeat STEPS 1 and 2 for the other legs.
NOTE: Make sure that all four legs are adjusted to the same height.
For more information regarding Invacare products, parts, and services, please visit www.invacare.com
Part No 1145752
SAVE THESE INSTRUCTIONS
WARNING
ACCESSORIES WARNING
WEIGHT LIMITATION
315 lb (143 kg)
300 lb (136 kg)
315 lb (143 kg)
250 lb (114 kg)
700 lb (318 kg)
700 lb (318 kg)
DETAIL "A" - MODEL 96-2
Back Support Tubes
DETAIL "B" - MODEL 9785-1 AND 9785-2
Back Support Tubes
Brackets
DETAIL "C" - MODEL 95-2
Back
Seat
Notches in
Seat
Compression
Tabs
FIGURE 1 Assembling the Shower Chair
Leg
Extension
Snap
Button
FIGURE 2 Adjusting the Shower Chair Height
1
Snap Button
Back
Support
Brackets
Snap
Button
Back
Support
Socket Tab
Window
Socket
Tab
Leg
Height Adjustment Holes
Shower Chairs
Advertisement
Table of Contents

Subscribe to Our Youtube Channel
Related Manuals for Invacare 96-2


Summary of Contents for Invacare 96-2
- Page 1 • ALWAYS observe the weight limit on the labeling of your product. Check that all labels are present and legible. Replace if necessary. ACCESSORIES WARNING • Invacare products are specifically designed and manufactured for use in conjunction with Invacare accessories. Accessories designed by other manufacturers have not been tested by Invacare and are not recommended for use with Invacare products.
- Page 2 This warranty gives you specific legal rights and you may also have other legal rights which vary from state to state. Invacare warrants its product to be free from defects in materials and workmanship for three years for the original purchaser. If within such warranty period any such product shall be proven to be defective, such product shall be repaired or replaced, at Invacare’s option.
- Page 3 • Les produits Invacare sont spécialement conçus et fabriqués pour être employés conjointement avec les accessoires Invacare. Les acces- soires conçus par d’autres fabricants n’ont pas été testés par Invacare et il n’est pas recommandé qu’ils soient employés avec les produits Invacare.
- Page 4 Cette garantie vous octroie des droits juridiques spécifiques mais vous pouvez également jouir d’autres droits juridiques qui varient d’un état à l’autre. Invacare garantit à l’acheteur initial son produit contre tout vice de matériaux et de fabrication pendant une durée de trois ans. Si, durant cette période couverte par la garantie, un produit s'avère défectueux, il sera réparé...
Need help?
Do you have a question about the 96-2 and is the answer not in the manual?
Questions and answers
9781P Invacare BATH CHAIR