Advertisement
Quick Links
QUICK START GUIDE
Thank you for choosing
Analog Way
and use your powerful High End Remote Controller within minutes. Discover the
intuitive interface while configuring your first show, and unleash your creativity for a new experience in show and event
Analog
Way.
management by
What's in the box
1 x
Orchestra
(ORC50)
1 x Power supply cord
1 x Console mounting bar and screws
2 x Adjustable feet
1 x User Manual (PDF Version) *
1 x Quick Start Guide *
* Download on our website:
Orchestra settings
Before starting with ORC50, please see the following
steps:
- Front Panel Description
- Setting up the ORC50
- Configurating the show.
If connecting the Orchestra and device directly, be sure to
use an Ethernet crossover cable, otherwise you can use a
standard ethernet hub and straight cables.
The ORC50 automatically detects if the connected devices
are running the correct firmware version.
To program a preset, use the following steps:
#1- Select a Screen #1 to #6
#2- Create a layer by "Preset Edition" section
#3- Select a source
#4- Save the configuration of the Screen in a Preset.
=> Restart the steps #1 to #4 if several Screens are
associated to a Preset.
Specific commands:
- For saving a Preset with black content, you must save an
empty Preset.
- Short press on a preset: loads the saved preset and
saved screen selection.
- Long press on a preset: loads the saved preset on only
the currently selected screens
- For clearing a Preset (Memory): Save To Preset =>
Confirm the reset of the preset on the touch screen.
The check boxes are not automatically checked by the
software.
The operator must confirm the action of erasing.
and the Orchestra. By following these simple steps, you will be able to setup
www.analogway.com
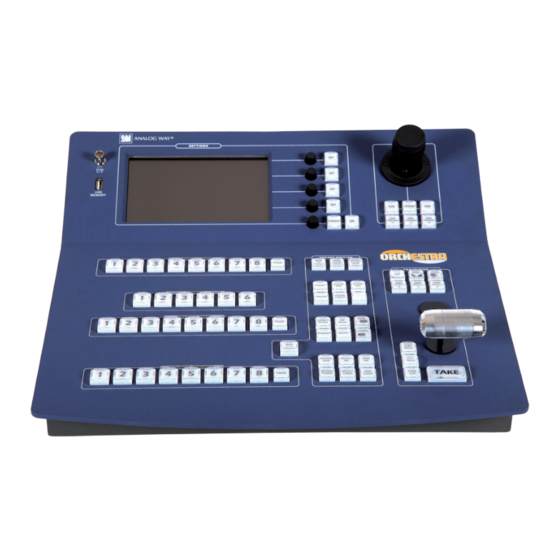
Orchestra - Ref. ORC50
Orchestra
Status Bar (upper right corner of the screen).
Each Screen is represented as a circle:
● Ready Status Bar
- Grey dark circle: No device Configured
- Grey light circle: Device not connected
- Yellow circle: Initializing and synchronizing device
- Green circle: Device connected and ready for operation.
● TAKE Status Bar
- Grey dark circle: No device
- Grey light circle: Screen unselected, no action scheduled
- Red circle: The Main is different from Preview.
The screen will change after a Take.
Navigation bar (bottom of screen):
The Navigation bar shows your current page, and is also
a shortcut to the listed menu pages.
extensive capabilities and
Advertisement

Subscribe to Our Youtube Channel
Related Manuals for Analog way Orchestra


Summary of Contents for Analog way Orchestra
- Page 1 Orchestra - Ref. ORC50 QUICK START GUIDE Thank you for choosing Analog Way and the Orchestra. By following these simple steps, you will be able to setup and use your powerful High End Remote Controller within minutes. Discover the Orchestra extensive capabilities and...
- Page 2 > Settings: allows you to access all of the Orchestra menus and functional- ities quickly and easily. The 4 top rota- tive knobs will allow you to set values, while the last knob will allow to navigate...
- Page 3 RJ-45 into, edit size, position with the joystick, and the Clone of the tactile screen RJ-45 connector: Connect the Orchestra to keying settings by rotating the approriate knobs. 10/100 Ethernet LAN using this female RJ-45 4/ Press [STORE] to store your logo or frame.
- Page 4 (drop/crush), and/or any other damage caused by misuse. Please note: The included carrying case and protective foam is not covered under warranty. Going further with the Orchestra Please check the User Manual and our website for further information: www.analogway.com Version: 3.10 - M5.0 - 14/09/11...
Need help?
Do you have a question about the Orchestra and is the answer not in the manual?
Questions and answers