Analog way ORCHESTRA ORC50 User Manual
Hide thumbs
Also See for ORCHESTRA ORC50:
- User manual (48 pages) ,
- Quick start manual (4 pages) ,
- Quick start manual (4 pages)
Table of Contents
Advertisement
Quick Links
Advertisement
Table of Contents

Subscribe to Our Youtube Channel
Related Manuals for Analog way ORCHESTRA ORC50


Summary of Contents for Analog way ORCHESTRA ORC50
- Page 1 version 1.0...
-
Page 3: Table Of Contents
THANK YOU Thank you for choosing Analog Way and the ORCHESTRA. By following these simple steps, you should be able to setup and use your powerful remote controller within minutes. Discover the ORCHESTRA’s extensive capabilities and intuitive interface while configuring your first show, and,... - Page 4 ORCHESTRA OVERVIEW THE ORCHESTRA FRONT PANEL Overview Settings section Layout section Preset Memory section Screen section Source Main section Source Preview section Preset Edition section User Effect section Transition section STARTING WITH THE ORCHESTRA OPERATIONAL CONFIGURATION User configuration System configuration Show configuration SHOW SETTINGS Screen setup...
- Page 5 OPERATING THE ORCHESTRA USING THE JOYSTICK Position Size Zoom LAYER SETTINGS Layer Settings Element Settings Source Settings LIVE BACKGROUNDS Adding a Live Background Clearing a Live Background FRAME BACKGROUNDS Adding a Frame Background Clearing a Frame Background WORKING WITH PIPs Selecting a PIP Adding a PIP Manipulating a PIP...
- Page 6 PRESET MEMORIES Saving a Preset Memory Loading a Preset Memory Reloading Memory From Main Accessing Memory pages TRANSITIONS User Effects Take T-Bar Step back (toggle) Take Cut WORKING WITH A MATRIX MATRIX SETUP MATRIX CONFIGURATION APPLICATION NOTES AND TIPS ABOUT APPLICATION NOTES APPLICATION NOTES SOFT EDGE BLENDING SOFT EDGE BLENDING...
- Page 7 WARRANTY AND SERVICES INFORMATION ANALOG WAY LIMITED WARRANTY SERVICES AND RMA CONTACT INFORMATION HOW TO CONTACT US After sales services Analog Way offices worldwide Regional contact information Analog Way website...
-
Page 8: Introduction
* NOTE * : ORCHESTRA offers the control of matrices in order to multiply the number of live sources, whatever the Analog Way switcher number of inputs is. Designed with a 16/9 TFT color tactile screen for easy preview of all configurations, ORCHESTRA is especially dedicated to facilitate setting up and programming of multi-screen events and presentations. -
Page 9: Keying & Titling
PIP : a “PIP” refers to Picture-in-Picture. It is a source (typically of reduced size) that is positioned over another background image or another PIP. PIPs can be reduced, enlarged, bordered and shadowed. They can overlap one another, depending on their visual priority. LOGO : a “Logo”... -
Page 10: Hardware Installation
HARDWARE INSTALLATION SAFETY PRECAUTIONS All of the safety and operating instructions should be read before the product is operated and should be maintained for further reference. Please follow all of the warnings on this product and its operating instructions. WARNING : To prevent the risk of electric shock and fire, do not expose this device to rain, humidity, intense heat sources (such as heaters and direct sunlight). - Page 11 INSTRUCTIONS DE SÉCURITÉ Afin de mieux comprendre le fonctionnement de cet appareil nous vous conseillons de bien lire toutes les consignes de sécurité et de fonctionnement de l’appareil avant utilisation. Conserver les instructions de sécurité et de fonctionnement afin de pouvoir les consulter ultérieurement. Respecter toutes les consignes marquées dans la documentation, sur le produit et sur ce document.
- Page 12 INSTRUZIONI DI SECUREZZA Allo scopo di capire meglio il funzionamento di questa apparecchiatura vi consigliamo di leggere bene tutti i consigli di sicurezza e di funzionamento prima dell’utilizzo. Conservare le istruzioni di sicurezza e di funzionamento al fine di poterle consultare ulteriormente. Seguire tutti i consigli indicati su questo manuale e sull’apparecchiatura.
- Page 13 SICHERHEITSHINWEISE Um den Betrieb dieses Geräts zu verstehen, raten wir Ihnen vor der Inbetriebnahme alle Sicherheits und Betriebsanweisungen genau zu lesen. Diese Sicherheits- und Betriebsanweisungen für einen späteren Gebrauch sicher aufbewahren. Alle in den Unterlagen, an dem Gerät und hier angegebenen Sicherheitsanweisungen einhalten.
- Page 14 INSTRUCCIONES DE SEGURIDAD Para comprender mejor el funcionamiento de este aparato, le recomendamos que le acuidadosamente todas las consignas de seguridad y de funcionamiento del aparato antes de usarlo. Conserve las instrucciones de seguridad y de funcionamiento para que pueda consultarlas posteriormente. Respete todas las consignas indicadas en la documentación, relacionadas con el producto y este documento.
-
Page 15: Unpacking And Inspection
UNPACKING AND INSPECTION When unpacking your ORCHESTRA, please mind not to discard product packaging, as the removable feet and the rackmount ruler and screws are in the packing foam of the device. 1 x ORCHESTRA remote controller 1 x Power supply cord 1 x Quick Start guide 1 x User manual 1 x Rack mount ruler and screws... -
Page 16: Hardware Specifications
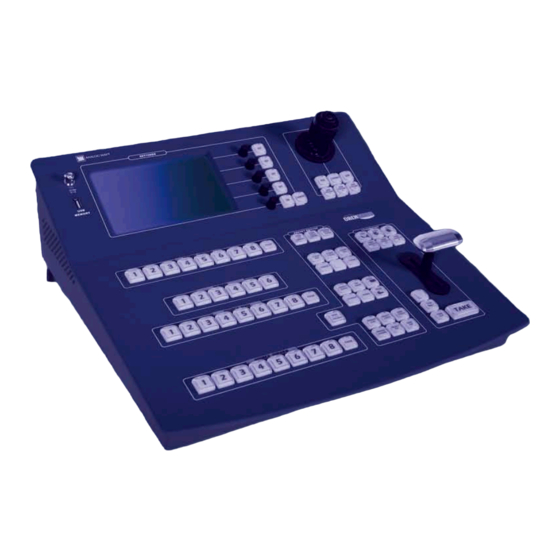
HARDWARE SPECIFICATIONS Dimensions : W 450 x D 440 x H 180 mm 17.8”W x 17.5”D x 7.1”H. Weight : 9 kg / 19.8 lbs. Cooling air flow from right side to left side. Maximum ambient operating temperature : < 40 °C ( < 104°F). Operating temperature : 0 to 40 °C / +32 °... - Page 17 ORCHESTRA OVERVIEW THE ORCHESTRA FRONT PANEL Overview 1 - Settings section 2 - Layout section 3 - Preset memory section 4 - Screen section 5 - Source Main section 6 - Source Preview section 7 - Preset Edition section 8 - User Effect section 9- Transition section Settings section The settings section of the ORCHESTRA allows you to access...
- Page 18 Screen section The Screen section of the ORCHESTRA allows users to select and edit screens. Screens on the ORCHESTRA contain all of the settings and information of any given device connected to the ORCHESTRA. In other words, any device connected to, and piloted by the ORCHESTRA, becomes an individual screen, though several Di-VentiX II in a Soft Edge setup can be considered as a Screen.
- Page 19 Transition section The Transition section of the ORCHESTRA will allow you to go live with whatever image, logo or PIP settings or changes you have made on your preview screen. The Transition section of the ORCHESTRA is also comprised of a Take Cut button, for instant transitions from Preview to Main, and a handy Step Back button, to toggle from Main back to Preview.
- Page 20 STARTING WITH THE ORCHESTRA OPERATIONAL CONFIGURATION User configuration When the ORCHESTRA starts up, the User page will be displayed over the Home page. Here, you can determine whether to create a new user to work as, or use an already existing one.
- Page 21 To configure keyboard brightness and parameter the joystick : 1/ Press the Keyboard tab on the System Configuration page. 2/ Rotate the corresponding knob to increase/decrease keyboard luminosity. 3/ Wriggle and turn the joystick, then let it return to its initial position.
- Page 22 SHOW SETTINGS Screen setup For the ORCHESTRA to pilote external devices, they must be set up as Screens. To setup a Screen, do the following : 1/ Select the next available screen (1-6) in the Screen section of the ORCHESTRA. The Screen button will light up yellow, and a display of your empty screen will appear on the ORCHESTRA tactile screen.
- Page 23 4/ Press the OK button to confirm and return to the Devices page. The ORCHESTRA will connect to the device. Press the OK button to return to the Screen Setup page. * NOTE * : Screen parameters should all be available now that a device is activated in the current Screen.
- Page 24 Input configuration To properly synchronize the slave device with your ORCHESTRA, you must setup the inputs of the device into the ORCHESTRA. 1/ In the Screen Setup page of the ORCHESTRA, press Edit Inputs. 2/ Select the input you wish to parameter, then select the plug type, and the type of signal.
- Page 25 Soft Edge Setup The Edit Soft Edge tab will be available only if the connected slave device is being used in Embedded Soft Edge mode (for example a Di-VentiX II). * NOTE * : for more detail on Soft Edge Blending, please refer to the Soft Edge Blending chapter of this manual, p.44.
- Page 26 Image Settings The Image Settings page allows to fine tune the source image of any input you have previously entered into your Screen. This menu is accessible when working directly with live sources on the ORCHESTRA front panel (for more detail on Image Settings, please refer to the Layer Settings chapter, p.28).
- Page 27 4/ In the Layout section, press the POS button, and with the help of the joystick, move the rectangle on screen to the area where your logo is. Resize the container to fit the logo if need be, by pressing the Size button then adjusting with the joystick. * NOTE * : to move the source, rather than the container rectangle itself, press Source rather than Logo on the Position/ Size Adjust panel, and adjust size and position with the help of...
- Page 28 2/ Press Erase Memories. 3/ Confirm by pressing Yes on the confirmation popup. 4/ Press the OK button to return to the Screen Setup page. To reset all settings on the slave device : 1/ In the Screen Setup page of the ORCHESTRA, press Controls.
- Page 29 OPERATING THE ORCHESTRA USING THE JOYSTICK The joystick in the Layout section of the ORCHESTRA allows users to move, resize or zoom any selected element on screen. To use the joystick to position elements on screen, select an element (logo, PIP...) and press the POS button, then, tilt the joystick left to move the selected element left, tilt right to move right, and so on.
- Page 30 On the Element page, you will find a list of several accessible tabs. The Transition tab (default), which allows users to determine how a layer comes into and goes out of your screen (cut, wipe, fade...). The Window tab, which will let users move and resize the layer container.
- Page 31 LIVE BACKROUNDS Adding a background To add a Live Background (motion content layer) to your empty Preset, proceed as follows : 1/ Press the BKGND LIVE button to activate the Live Background container rectangle on screen. The tactile screen of the ORCHESTRA will display a yellow rectangle, indicating the selected area, and your Preview output will display an empty selection rectangle.
- Page 32 1/ Press the BKGND FRAME button to activate the Background Frame container rectangle on screen. The tactile screen of the ORCHESTRA will display a yellow rectangle, indicating the selected area. 2/ The blue Source Preview section light will blink to indicate you can select the source you want to use as a Background Frame.
- Page 33 appear on your Preview output in the PIP rectangle, and on the tactile screen of the ORCHESTRA in the shape of a yellow rectangle above any Frame or Live Background. 3/ Press the TAKE button to view the result on your Main output. 4/ To add another PIP, follow steps 1-3 again.
- Page 34 3/ When you have set the PIP zoom, press the TAKE button to view the result on the Main output. To add a border to a PIP : 1/ Select the PIP you wish to add a border to. 2/ In the Preset Edition section, press the BORDER button to access border settings displayed on the tactile screen of the ORCHESTRA (see also Element Settings, p.27).
- Page 35 WORKING WITH LOGOS Adding a logo To add a logo to your Screen, proceed as follows : 1/ Press the ADD LOGO button to activate the Logo container rectangle on screen. The tactile screen of the ORCHESTRA will display a yellow rectangle, indicating the logo size and position.
- Page 36 Logo depth 1/ Select the LOGO you wish to work to move up or down. 2/ Press the LOWER button to move the logo back in the order, press the RAISE button to move the logo to front. Clearing a Logo To clear a Logo from your Screen, proceed as follows : 1/ Select the LOGO you wish to clear.
- Page 37 Loading a Preset Memory To call back an existing Preset Memory to use or start working from at any stage during your show, proceed as follows : 1/ Press the LOAD FROM PRESET button to access the Preset Memory page. 2/ On the tactile screen of the ORCHESTRA, select the screen (1-6) which you wish to load from memory.
- Page 38 TRANSITIONS User Effects With the ORCHESTRA, you can save the transition settings of any layer into 3 handy User Effects which can be called back and edited at any stage. To do this, proceed as follows : 1/ Select a layer and configure its in and out transitions via the Element page.
- Page 39 * NOTE * : Taking between presets which exceed the slave device’s ressources (too many layers for the device to handle simultaneously) is called a Sequenced Take. Typically, in a Sequenced Take, the device will execute all the closing effects of layers which are not in the following preset.
- Page 40 WORKING WITH A MATRIX Matrix setup If you are working with a matrix in your setup, you must add it into your show. To do so, follow these few steps : 1/ On the ORCHESTRA show page, press Matrix Setup to enter the Matrices page.
- Page 41 5/ Press LAN Settings to configure the IP address and port of the device. 6/ Press the OK button twice to return to the Devices page, which should now display the device you have configured. 7/ Press the OK button to return to the Screen Setup page. If you are working with an 8x4 matrix (8 in , 4 out) for example, you will need to define the links between the slave device and the matrix for the ORCHESTRA to route signals properly.
- Page 42 In an effort to make the use of our machines an experience as pleasant as possible, the Analog Way team are constantly aiming to create easy to follow examples, update information, and furnish our website with useful user information.
- Page 46 SOFT EDGE BLENDING SOFT EDGE BLENDING If you want to do a Soft Edge setup using only one unit, you need to set the unit in “Embedded SEB” mode and connect the Left projector to “Output 1” (Main) and the Right Projector to “Output 2”...
- Page 47 7/ If you do a multiple units Soft Edge, split all of your sources to input each one in the same input # on each unit. (i.e.: split your DVD player to input it on input 5 on each unit) 8/ In the “Input”...
- Page 48 WARRANTY AND SERVICES INFORMATION ANALOG WAY LIMITED WARRAN All Analog Way products have a 3 years warranty on parts and labor, back to factory, but do not include faults resulting from user negligence, special modifications, electrical surges, abuse (drop/ crush), and/or other unusual damage.
- Page 49 New York, NY 10007 United States of America Tel.: +1 212 269 1902 Fax. +1 212 269 1943 salesusa@analogway.com Analog Way Pte Ltd. No. 10 Ubi Crescent #03-05 Ubi Techpark Lobby A Singapore 408564 Tel.: +65 6292 5800 Fax: +65 6292 5205 sales@analogwayasia.com...
- Page 50 If the product is used for business purposes and you want to discard it: Please contact your Analog Way dealer who will inform you about take-back of the product. You might be charged for the costs arising from take-back and recycling.
- Page 51 Designs and specifications are subject to change without notice The illustrations and screens described in this manual may be exaggerated or simplified for easy recognition and may be slightly different from the actual unit. ANALOG WAY SAS 33 rue du Saule Trapu Parc du Moulin...
Need help?
Do you have a question about the ORCHESTRA ORC50 and is the answer not in the manual?
Questions and answers