Table of Contents
Advertisement
Quick Links
Advertisement
Table of Contents

Related Manuals for Stakpure Omnia Tap xs basic


Summary of Contents for Stakpure Omnia Tap xs basic
- Page 1 Operating manual basic Omnia Tap xs...
- Page 2 _________________________________________________________________________________ basic OmniaTap xs ; Version August 2023 Subject to technical changes...
- Page 3 _________________________________________________________________________________ basic OmniaTap xs ; Version August 2023 Subject to technical changes...
- Page 4 Foreword Dear Ladies and Gentlemen, The stakpure GmbH team thanks you for the trust you have placed in us. By choosing this ultrapure water system from our company, you have opted for an innovative, high- quality and durable product. Before installing and starting up your ultrapure water system, please read the installation and operating instructions in this operating manual carefully.
-
Page 5: Table Of Contents
Table of Contents User Notes ............................7 Safety instructions ........................... 8 Intended Use ..........................10 Transport and packaging ....................... 11 Delivery package..........................12 Technical data..........................12 Flow charts ............................ 15 basic Flow chart OmniaTap xs ....................15 basic Flow chart OmniaTap xs UV ..................... - Page 6 Spare parts..........................38 Consumables ..........................39 Accessories ..........................39 Malfunctions, causes & solutions ....................40 19.1 Automatic system monitoring ....................40 19.2 Faults table ..........................42 Disposal ............................. 44 EU declaration of conformity ....................46 _________________________________________________________________________________ basic OmniaTap xs ; Version August 2023 Subject to technical changes...
-
Page 7: User Notes
Symbols used Warning notices with this symbol indicate a hazard which, if not avoided, could result in death or serious injury. Warning notices with this symbol indicate a hazard which, if not avoided, could result in minor or moderate injury. This symbol indicates a risk with possible property damage. -
Page 8: Safety Instructions
2 Safety instructions The safety instructions described below are for your own safety and help to prevent possible damage to the OmniaTap xs system. Read the instructions before installation, commissioning and maintenance and follow them carefully. Danger of electric shock! Improper electrical supply of the OmniaTap xs system can lead to an electric shock! For the electrical supply of the OmniaTap xs system, only use the wide-range power pack included in the scope of delivery. - Page 9 Danger of skin and eye injuries! Contact with the disinfectant can lead to skin and eye irritation and/or injuries! Always wear appropriate protective clothing (at least gloves & goggles) when disinfecting the OmniaTap xs system to avoid contact with the disinfectant. Make sure that no disinfectant can escape uncontrolled from the OmniaTap system, check the connection hoses for correct and tight fit.
-
Page 10: Intended Use
Depending on the country, a safety combination consisting of a backflow preventer and a system separator may have to be available on the building side. A DN 50 floor drain with free drainage is to be provided in the operating room. If there is no floor drain, we recommend using a water monitor to prevent damage to the system and equipment as well as the building. -
Page 11: Transport And Packaging
4 Transport and packaging The OmniaTap xs systems are carefully inspected and packaged prior to shipment, however damage may occur in transit. Check the packaging and the system for possible transport damage. If you find any damage, please contact the shipping or transport company responsible for the delivery directly. For transport, only lift the device at holding points 1, 2 and 3. -
Page 12: Delivery Package
5 Delivery package The scope of delivery of the OmniaTap xs system consists of the following parts: Position Number Designation basic OmniaTap xs System Table power supply 48V 120W Power cord PE hose d8 2,5m PE hose d8 incl. input protection filter and Water connection adapter R ¾“... - Page 13 Product water ASTM II basic basic OmniaTap xs OmniaTap xs 5 UV Conductivity [µS/cm] at 25°C 0.067 – 0.1 0.067 – 0.1 Resistance [MΩ cm] at 25°C 15 – 10 15 – 10 Retention rate for germs and particles 99 % 99 % Permeate output / l/h at 15°C Water connections...
- Page 14 Dimensions & Weight basic basic OmniaTap xs OmniaTap xs 5 UV Height [mm] Depth [mm] Width [mm] Tank capacity (useful volume) [l] Empty weight kg] Operating weight [kg] Materials of the components in contact with water Solenoid valve input POM, EPDM Flush solenoid valve POM, EPDM Withdrawal solenoid valve...
-
Page 15: Flow Charts
7 Flow charts basic 7.1 Flow chart OmniaTap xs basic 7.2 Flow chart OmniaTap xs _________________________________________________________________________________ basic OmniaTap xs ; Version August 2023 Subject to technical changes... - Page 16 Designation Designation Pretreatment cartridge Circulation pump Ultrapure water cartridge Pure water tank Sterile filter UV Photooxidation Sterile ventilation filter Inlet solenoid valve Hat filter (in the connection hose) Rinsing solenoid valve Flow meter (option) Pressure hold valve QIA conductivity cell pretreatment Circulation solenoid valve TIA temperature sensor pretreatment Check valve...
-
Page 17: System Description
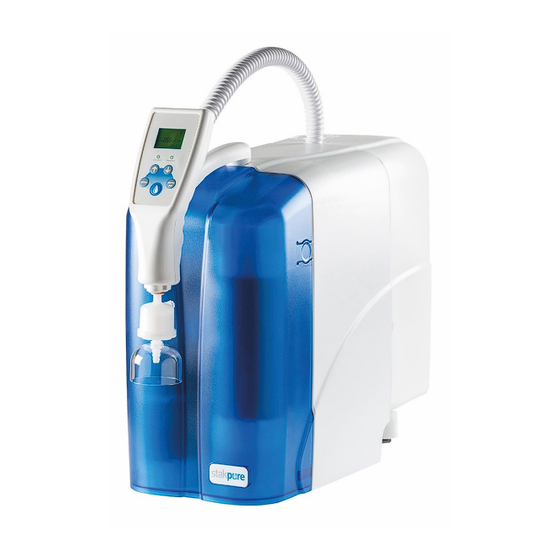
8 System description 8.1 System structure 1: Detachable OptiFill dispenser with integrated 7: Ultrapure water cartridge control unit 8: UV reactor 2: Rotating dispenser arm 9: Dispenser admission 3: Snap closure 10: Tank opening with lid 4: Removable cover hood 11: Sterile ventilation filter 5: Pure water tank 12: Sterile tank overflow... -
Page 18: System Connections On The Back
8.2 System connections on the back Inlet: Feed water connection Drain: Flushing water connection Power: Power supply connection 9 Function description The systems of the OmniaTap xs series prepare drinking water directly into pure and ultrapure water by using several treatment technologies. The produced ultrapure water meets the respective requirements of the ASTM, ISO, USP and CLSI standards. -
Page 19: Assembly
10 Assembly 10.1 Operating environment When selecting the installation location, observe the following requirements: The pressure of the feed water must be between 0.5 and 6 bar. The standing surface must be level. A suitable protective contact socket must be available for the electrical supply of the OmniaTap xs system (see technical data). - Page 20 Water can escape through leaks. Therefore, always make sure that the floor in the area of the work surface is dry to avoid accidents caused by slipping. Use the connection accessories to connect the OmniaTap xs system to the feed water connection and to the free drain.
- Page 21 Then screw the sterile filter with its G1/4" thread into the outlet of the OptiFill dispenser (see figure). Plug the 4-pin connector of the power supply into the "Power" port of the OmniaTap xs system. Make sure that the mains connection cable is connected to the table power supply and then insert the safety plug into a suitable safety socket (see technical data).
-
Page 22: Wall Mounting
10.3 Wall mounting Risk of injury from falling and crushing! The OmniaTap xs system may only be attached to a suitable wall using the optionally available wall holder. Use the wall mount exclusively for the OmniaTap xs system. Make sure that the wall and the fastening material have a sufficient load-bearing capacity of at least 100kg. - Page 23 The next step is to attach the wall holder rail to the wall. This requires 6 holes with a diameter of 8mm and a depth of at least 60mm. Drill the holes according to the pattern shown in the "Wall Mount Rail" figure below. Pay attention to a horizontal alignment. Wall mount rail Then insert the dowels into the drilled holes and fasten the wall mounting rail to the wall with the screws so that the two mounting holes are facing upwards.
-
Page 24: Installation Of An Optional Pump Station
10.4 Installation of an optional pump station An optional pump station, article number 16580000, is available to supply an external consumer such as an analyzer directly with pure water from the tank of the OmniaTap xs system. The pump station can be connected directly to the tank of the OmniaTap xs system. -
Page 25: Operating Concept
11 Operating concept The OmniaTap system is operated using the five buttons and the display of the OptiFill dispenser. The figure below shows the names of the individual keys. Display LED limit temperature LED conductivity limit value Arrow key up Arrow key down Enter key Menu / Esc button... - Page 26 LED limit temperature If the temperature limit value is set to "Off" (see 13.5.2 Setup) or if the current measured temperature value is below the set limit value, the LED lights up green. If the limit value is exceeded, the LED lights up red.
-
Page 27: Commissioning
12 Commissioning As soon as the OmniaTap xs system is supplied with power, the system starts. When the system is started, the start screen shown here is displayed first. The firmware version of your system is displayed below the system designation. -
Page 28: Operating
13 Operating The menu structure, the displays and the setting options of the OmniaTap xs system are described below. Use the system input options described under "Operating concept" to navigate in the menu and to change settings 13.1 Menu structure The diagram below depicts the menu structure of the OmniaTap xs system. -
Page 29: Main Display
13.2 Main display The main display (see page Image 3: Main display) appears automatically after switching on the device. It gives you information about the current system status and shows you the value of the conductivity (LF2) measured at the withdrawal point in the set unit (µS/cm or MΩcm) as well as the temperature of the ultrapure water and the actual tank level. -
Page 30: Volume Metered Water Withdrawal (Optional)
13.4 Volume metered water withdrawal (optional) Pressing the withdrawal button takes you from the main display to the withdrawal display. In the withdrawal display you have the option to select one of the preset withdrawal values. You can select one of the preset values (see table below) using the arrow keys and start the withdrawal by pressing the withdrawal button. -
Page 31: Menu / Settings
13.5 Menu / Settings If you press the menu / esc button when the main display is open, you get to the menu selection. Here you can use the arrow keys to choose between "System" and "Setup". 13.5.1 System If you have selected the "System" item in the menu selection, use the arrow keys to access the following menu items: "LF1"... -
Page 32: Setup
13.5.2 Setup By selecting "Setup" you first get to the PIN entry. After you have entered the correct PIN using the Enter and arrow keys (see Operating concept), the following menu items are available: You can set the limit value for the conductivity LF1, measured after the pretreatment cartridge, via the menu item "Limit value LF1". - Page 33 basic No function on OmniaTap xs devices. You can use the “Circulation” (duration) menu item to set the duration of the circulation phase in minutes. The following settings are available: 0 – 99 minutes, setting 0 min disables circulation The menu item "Circulation" (pause) allows you to set the pause duration between the individual circulation phases.
- Page 34 The "PIN" menu item allows you to reset the PIN for access to the setup menu. 0000 is set as the default value. In order to be able to change the PIN, you must first enter the current PIN. Here you can select the language of the ads. You can choose between German and English.
-
Page 35: Maintenance
14 Maintenance Regular maintenance and care of the OmniaTap xs system is required to ensure consistently good water quality. For professional and regular maintenance of the OmniaTap xs system, we recommend concluding a maintenance contract with an authorised customer service. If improper maintenance, care and repair work is carried out on the system, the warranty for this system will expire. -
Page 36: Changing The Cartridges
14.2 Changing the cartridges The cartridges have to be changed at regular intervals (12 months) or if the limit value you have specified is exceeded for a long time. The start of the interval is the point in time at which the respective filter cartridge was first connected to the system. -
Page 37: Disinfection
14.3 Disinfection To protect the OmniaTap xs system from contamination from biological deposits, disinfection should be carried out at regular intervals (12 months). For the implementation you need the disinfection kit article no.: 19200091. Risk of chemical burns! The disinfection of the OmniaTap xs system may only be carried out by appropriately qualified specialist personnel. -
Page 38: Decommissioning & Dismantling
15 Decommissioning & Dismantling Decommissioning and dismantling may only be carried out by authorised specialist personnel. If the OmniaTap xs system is to be decommissioned and dismantled, proceed as follows: Disconnect the system from the power supply by pulling out the mains plug Disconnect all hoses from the system connectors. -
Page 39: Consumables
17 Consumables R+I Nr. Designation Art. no. Pretreatment cartridge 19200007 Ultrapure water cartridge 19200103 Sterile filter capsule 0.2 µm 19100300 Sterile ventilation filter 19500400 UV lamp 185/254nm, 11W 50003452 18 Accessories Designation Art. no. Disinfection kit Omnia XS 19200091 Disinfection syringe including disinfectant (set of 3) 19200057 Wall holder Omnia XS 19200305... -
Page 40: Malfunctions, Causes & Solutions
19 Malfunctions, causes & solutions 19.1 Automatic system monitoring The OmniaTap xs system automatically monitors multiple system parameters for abnormalities. If one of the monitored system parameters deviates from the respective specification, both an optical and an acoustic error message are issued. In the event of a fault, the display lighting changes to red and, if activated, a warning tone is emitted. - Page 41 In the event of a defect in the inlet solenoid valve, the error message "MVIN!" is output. The error display will be reset as soon as the valve is functioning properly again. The error message "MVFL!" indicates a defect in the purge solenoid valve.
-
Page 42: Faults Table
19.2 Faults table Fault Possible cause Remedy System does not start / Ensure the power supply Display does not function No or faulty power supply according to the specifications under "6 Technical data". Pre-treatment cartridge is Install a new pre-treatment exhausted cartridge Conductivity LF1 permanently... - Page 43 Check the inlet pressure (feed Inlet pressure is too low water pressure) and increase it if necessary. If the leak sensor comes into contact with water, the system inlet valve is closed to prevent Leakage sensor responds / further water leakage. error Leakage! Is displayed.
-
Page 44: Disposal
20 Disposal Stakpure ultrapure water systems are marked with a "crossed out trash can". This means that according to the European Regulation 2012/19/EU, your old electronic device may not be disposed of with normal household waste. You can hand in your... - Page 45 _________________________________________________________________________________ basic OmniaTap xs ; Version August 2023 Subject to technical changes...
-
Page 46: Eu Declaration Of Conformity
21 EU declaration of conformity _________________________________________________________________________________ basic OmniaTap xs ; Version August 2023 Subject to technical changes... - Page 47 _________________________________________________________________________________ basic OmniaTap xs ; Version August 2023 Subject to technical changes...
- Page 48 GmbH Auf dem Kesseling 11 D – 56414 Niederahr Ph.: +49 2602 10673-0 Fax: +49 2602 10673-200 info@stakpure.com www.stakpure.de 50003538...
Need help?
Do you have a question about the Omnia Tap xs basic and is the answer not in the manual?
Questions and answers