Table of Contents
Advertisement
Quick Links
PLUM AUDIO - ADVA
3U User Manuel, rev 1.1 (GREENY Firmware)
TABLE OF CONTENTS
Page 2:
Page 3: SETUP & CONFIGURATION
Page 4:
Page 5: INTERFACE (Continue)
Page 6:
Page 7: ADVANCED TOPICS (Continue)
Page 8: ADVANCED TOPICS (Continue)
Page 9: ADVANCED TOPICS (Continue)
INTRODUCTION
•
•
•
Sound Path Chart
INTERFACE
•
•
•
•
•
•
•
•
•
Advertisement
Table of Contents

Subscribe to Our Youtube Channel
Related Manuals for Plum Audio ADVA


Summary of Contents for Plum Audio ADVA
-
Page 1: Table Of Contents
PLUM AUDIO – ADVA 3U User Manuel, rev 1.1 (GREENY Firmware) TABLE OF CONTENTS Page 2: INTRODUCTION Page 3: SETUP & CONFIGURATION • Installation Instructions • Power Supply Requirements • Sound Path Chart Page 4: INTERFACE • Inputs and Outputs Page 5: INTERFACE (Continue) •... - Page 2 With 7 filter modes, ADVA provides high richness and a wide variety of tones; it can filter gently like an LPG or it can be pushed up to the edges of hot acid tones.
-
Page 3: Installation Instructions
Before connecting ADVA, make sure to turn off and disconnect your case from its power supply. ● Connect one end of the ribbon cable provided to the power header of ADVA, and the other end ● to your case's power busboard. -
Page 4: Inputs And Outputs
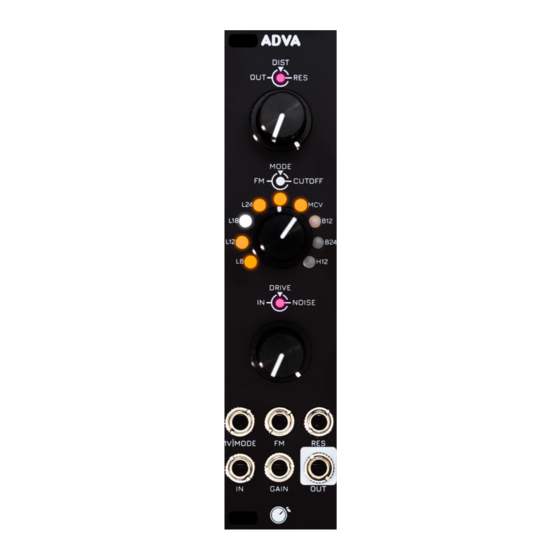
3U User Manuel, rev 1.1 (GREENY Firmware) ADVA - INTERFACE: The ADVA Interface includes 3 "CLICKKNOBS" — Plum Audio’s custom dual concentric knobs with push buttons. This special interface component allows us to keep the module size small whilst at the same time ensuring a convenient and intuitive interface. -
Page 5: Controls
PLUM AUDIO – ADVA 3U User Manuel, rev 1.1 (GREENY Firmware) CONTROLS: A. Click: Activate / Deactivate the drive circuit. Upper Knob: Noise Blend – Allows blending of the input signal with the internal white noise generator. When turning this knob clockwise, the input signal will be attenuated on a non-linear scale. -
Page 6: Advanced Topics
For updates, visit: https://www.plum-audio.com/adva-firmware CUTOFF CLICK LOCK MODE: When performing live with the ADVA, there may be situations where you want to disable the click action of the Cutoff knob to prevent accidentally changing the filter mode. Activating Click Lock Mode: 1. -
Page 7: Mcv (Mode Change Via Cv)
This design can occasionally produce a discernible "click" sound during mode transitions, particularly at lower frequencies. To mitigate or mask this 'click', ADVA is equipped with several tools. Here are general guidelines to help you smooth out the transition: 1. -
Page 8: Disable/Enable Noise Normalization To The Fm Input
PLUM AUDIO – ADVA 3U User Manuel, rev 1.1 (GREENY Firmware) DISABLE / ENABLE NOISE NORMALIZATION TO THE FM INPUT: Release the mounting screws and take off the module from your case to access the small slide switch, located on the left side of the module, on the central circuit board. -
Page 9: Led Ring Calibration (Post V/Oct Calibration)
PLUM AUDIO – ADVA 3U User Manuel, rev 1.1 (GREENY Firmware) LED Ring Calibration (Post V/OCT Calibration): After completing V/OCT calibration, it is crucial to calibrate the LED ring for accurate visual feedback due to changes in the values that the Cutoff knob sends to the microcontroller. - Page 10 PLUM AUDIO – ADVA 3U User Manuel, rev 1.1 (GREENY Firmware) ADVA IS AVAILABLE IN 3U/6HP AND 1U/22HP FORMATS WITH BLACK OR SILVER FRONT PANELS:...
Need help?
Do you have a question about the ADVA and is the answer not in the manual?
Questions and answers