Table of Contents
Advertisement
Quick Links
GTR-7535/1 04/1 02 Quick Start Guide
GTR-7535/1 04/1 02 Guide de demarrage rapide
GTR-7535/1 04/102 Gula de inicio rapido
GTR-7535/1 04/102 Guia de lnlcio Rapido
GTR-7535/1 04/102 Guida di avvio rapido
GTR-7535/1·04/1 02 Kurzanleitung
GTR-7535/1 04/102 KpaTKoe pyKOBOACTBO
GTR-7535/1 04/102 Snabbguide
GTR-7535/1 04/102 Pika-aloitusopas
GTR-7535/1 04/1 02 Przewodnik szybkiego startu
GTR-7535/1 04/102 Snelstartgids
GTR-7535/1 04/102 Hurtigstartsguide
GTR-7535/104/102
?-f':l?
A1l- t--
tJ'-f t:
GTR-7535/104/102
HHt::
AI~ 7~01
t:
GTR-7535/1 04/1 02
1*iiA.fl~~if.j
GTR-7535/1 04/102
t~Hi.Ar~~liif.i
GTR-7535/1 04/102 Panduan Memulai Cepat
GTR-7535/104/102 H1zh
ba~langu~
k1lavuzu
Advertisement
Table of Contents

Related Manuals for Harman JBL GTR-102


Summary of Contents for Harman JBL GTR-102
- Page 5 JBL GTR AMPLIFIERS POWER AMPLIFIERS...
- Page 6 GTR AMPLIFIERS THANK YOU FOR YOUR PURCHASE . . . Your JBL product has been designed to provide you with the performance and ease of operation you would expect from JBL. • Please take time to read your owner’s manual in its entirety before operating or installing your amplifier. •...
-
Page 7: Table Of Contents
GTR AMPLIFIERS TABLE OF CONTENTS CHAPTER 1: PICTORIAL INDEX OF INPUT CONNECTIONS ..........................1 CHAPTER 2: INSTALLATION AND WIRING ..........................2 What’s in the box ..........................2 Precautions ..........................2 Speaker output connectors ..........................3 Fuses ..........................4 Power input connector’s .......................... -
Page 8: Chapter 1: Pictorial Index Of Input Connections
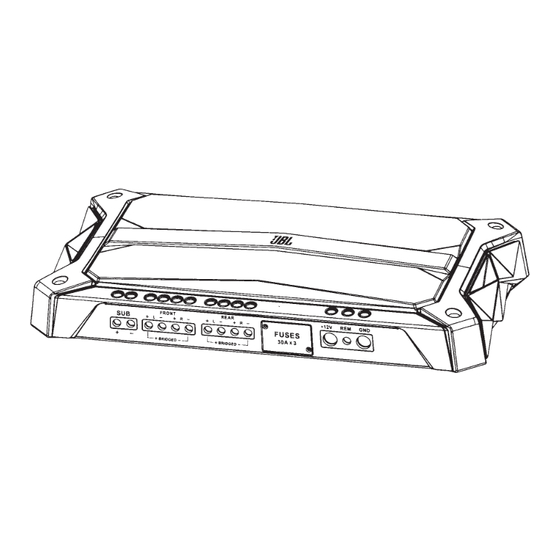
GTR AMPLIFIERS CHAPTER 1: PICTORIAL INDEX OF INPUT CONNECTIONS GTR Amplifier front panel FRONT REAR — — — — FUSES 30A x2 BRIDGED BRIDGED +12V GTR Amplifier back panel FRONT CONTROLLER PRE OUT REAR INPUT LEVEL GAIN REAR FRONT IN OUT •... -
Page 9: Chapter 2: Installation And Wiring
GTR AMPLIFIERS CHAPTER 2: INSTALLATION AND WIRING What’s in the box: 1 amplifier 2 spare fuses (X3 GTR-7535, GTR-1001; X1 GTR-102) 1 cabin-mounted control panel (GTR-102, GTR-104 and GTR-7535 models) 4 RCA adapters (X2 GTR-102, GTR-601, GTR-1001) 1 REM adapter (GTR-102 and GTR-104 models) 4 screws Owner’s Manual Precautions:... -
Page 10: Speaker Output Connectors
GTR AMPLIFIERS 1. Speaker output connectors: Connect speakers to terminals observing proper polarity: connect each speaker’s positive (+) lead to the appropriate positive (+) terminal, and negative (-) lead to the appropriate negative (-) terminal. • The GTR-102 features L+, L-, R+, and R- terminals For 2-channel operation connect the left speaker to the L+ and L- terminals, and right speaker to the Front R+ and R- terminals. -
Page 11: Fuses
GTR AMPLIFIERS For 3-channel operation connect the stereo speakers to the Front terminals as described above. Connect the single speaker’s + lead to the Rear L+ terminal, and the - lead to the Rear R- terminal. For 2-channel (bridged) operation connect one speaker’s + lead to the Front L+ terminal, and the - lead to the Front R- terminal. Connect the other speaker’s + lead to the Rear L+ terminal, and the - lead to the Rear R- terminal. -
Page 12: Remote (Gtr-102, Gtr-104, Gtr-7535)
GTR AMPLIFIERS 4. Remote (GTR-601, GTR-1001, GTR-7535): Connect an 18awg wire from the “Remote Out” lead of the source unit to the REM input. This lead detects signal and instructs the amplifier to turn on. (See 12. REM below for remote connection info for the GTR-102 and GTR-104 models.) GTR REM input power block +12V 5. -
Page 13: Rem (Gtr-102, Gtr-104)
GTR AMPLIFIERS 12. REM (GTR-102, GTR-104): Connect an 18awg wire from the Remote Out lead of the source unit to the included connector, and then plug the connector into this input (see illustration below). The REM lead detects signal and instructs the amplifier to turn on/off. GTR remote lead connector Remote turn-on lead from source unit In addition to REM inputs that turn on the amp, there are REM outputs that can be used to turn on other amps. -
Page 14: Bluetooth Indicator (Gtr-102, Gtr-104, Gtr-75352)
GTR AMPLIFIERS CHAPTER 3: REMOTE CONTROLLER (Controls and Indicators) 19. Phone Call button and 20. Phone End button: Call status Press Phone Call button to… Press Phone End button to… Outgoing call is ringing Cancel the outgoing call Incoming call is ringing Answer the call Reject the call Call is active... -
Page 15: Clari-Fi Button
GTR AMPLIFIERS 28. Clari-Fi button: Press this button to engage Clari-Fi, which automatically applies the appropriate amount of Sound Restoration technology required by the signal coming into the amp, whether through high-level inputs, low-level inputs, or wirelessly. Leave Clari-Fi engaged since it automatically detects and restores compressed music files and will have no effect on uncompressed sources. -
Page 16: Setting The Input Level Controls
GTR AMPLIFIERS Setting the input level controls To match your amplifier’s input sensitivity (gain) to your source unit’s output level, we recommend the following procedure: A. Turn both input level controls counterclockwise to MIN (minimum). B. Play a dynamic music track through your source unit. Turn the source unit’s volume control to the 3/4 position. C. -
Page 17: Chapter 5: Troubleshooting
GTR AMPLIFIERS CHAPTER 5: TROUBLESHOOTING PROBLEM: No audio and POWER INDICATOR is off. CAUSE and SOLUTION: No voltage at BATT+ and/or REM terminals, or bad or no ground connection. Check voltages at amplifier terminals with VOM. PROBLEM: No audio and PROTECT INDICATOR flashes every 4 seconds. CAUSE and SOLUTION: DC voltage on amplifier output. - Page 18 GTR AMPLIFIERS HARMAN International Industries, Incorporated © 2016 HARMAN International Industries, Incorporated. All rights reserved. JBL is a trademark of HARMAN International 8500 Balboa Boulevard, Northridge, CA 91329 USA Industries, Incorporated, registered in the United States and/or other countries. Features, specifications and appearance are www.jbl.com...
- Page 19 GTR Stadium Amplifiers Series of high-performance, mono and multi-channel Class D amplifiers with Clari-Fi ™ Music Restoration Technology Features Amplifiers with a small footprint and big impact. GTR mono and full-range, multi-channel amplifiers deliver the efficiency and power you Bluetooth ®...
- Page 20 Cabin Controls and Telephone Integration Owner’s manual High Efficiency, Low Distortion Class D Design © 2015 HARMAN International Industries, Incorporated. All rights reserved. JBL is a trademark of HARMAN International Industries, Incorporated, registered in the United States and/or other HARMAN International Industries, Incorporated ®...
Need help?
Do you have a question about the JBL GTR-102 and is the answer not in the manual?
Questions and answers