
Related Manuals for GeekChef GTO26

Summary of Contents for GeekChef GTO26
- Page 1 Air Fryer Oven User Manual Model No.: GTO26 Toll Free: 1-844-801-8880 Read the instructions carefully before operating the IMPORTANT: appliance and keep them for future reference.
-
Page 2: Table Of Contents
TABLE OF CONTENTS Safety Instructions Product Components How To Use Cleaning And Maintenance Troublshooting Limited Warranty TECHNICAL SPECIFICATIONS Model No.: GTO26 Rated Voltage : 120V~60Hz Rated Power : 1700W Oven Capacity : 26QT Product Dimension : 16.1*15.2*13.8 (inch) Scan the QR code for more... -
Page 3: Safety Instructions
SAFETY INSTRUCTIONS IMPORTANT SAFETY INSTRUCTIONS When using an electrical appliance, basic safety precautions should always be followed, including the following: 1. Read all instructions. UNPLUG FROM OUTLET WHEN NOT IN USE AND BEFORE CLEANING. Allow to cool before cleaning or handling, putting on or taking off parts. Do not touch hot surfaces. - Page 4 SAFETY INSTRUCTIONS 16. Do not cover Crumb Tray or any part of the oven with metal foil. This will cause overheating of the oven. 17. Oversize foods, metal foil packages and utensils must not be inserted in the Air Fryer Countertop Oven, as they may involve a risk of fire or electric shock. 18.
- Page 5 SAFETY INSTRUCTIONS 1. The marked electrical rating of the extension cord must be at least as great as the electrical rating of the appliance. 2. The longer cord should be arranged so that it will not drape over the countertop or tabletop, where it can be tripped over unintentionally or pulled on by children.
-
Page 6: Product Components
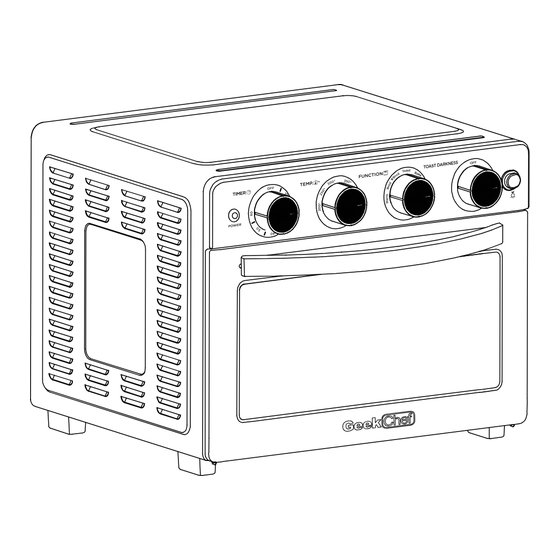
PRODUCT COMPONENTS PRODUCT COMPONENTS 1. Timer Dial 6. Power Indicator 2. Temperature Dial 7. Air Fryer Basket 3. Function Dial 8. Oven Rack 4. Toast Darkness Function 9. Baking Pan 5. Oven Light Button 10. Crumb Tray Product Features 1. Timer Dial Use to set the desired time for all functions except Toast.Setting the Oven timer, powers the unit on and begins the cooking cycle. -
Page 7: How To Use
HOW TO USE 5. Oven Light Button Push the button to turn on the interior oven light. The light will not work if the power is off. 6. Power Indicator Indicator light will turn on and remain lit when oven is in use. 7. - Page 8 HOW TO USE Before First Use 1. Remove all packaging materials, stickers and labels. 2. Clean all the accessories with hot water, cleaning agent and a non-abrasive sponge. 3. Wipe the inside and outside of the appliance with a damp cloth. •...
- Page 9 HOW TO USE 2. Crumb Tray Opening front door, put crumb tray into the unit according to the directions shown in the picture below: • Choose proper accessories for different cooking purpose. • Please use oven mitts to take out the crumb tray, baking pan, wire Note rack and air fry basket etc.
- Page 10 HOW TO USE 4. Oven Rack Insert the oven rack into the unit according to the directions shown in the picture below: 5. Air Fry Basket Insert the wire rack into the unit, then put the food into the air fry basket and put it on wire rack.
- Page 11 HOW TO USE Operations Unwind the power cord. Check that Crumb Tray is in place and that there is nothing in the oven. Plug power cord into the wall outlet. Broil or Broil(Convection) Set the Function Dial to Broil or Broil.Set Temperature Dial to Toast/Broil(450 °F Then turn the Timer Dial to the desired cooking time to turn on the oven and begin broiling, The power light will illuminate.
- Page 12 HOW TO USE Toast Fit Oven Rack into position 2. If toasting two items, center them in the middle of the Oven Rack. Four items should be evenly spaced - two in front, two in back. Six items should be evenly spaced - three in front, three in back. Set the Function Dial to toast. Set the Temperature Dial to Toast/Broil.
-
Page 13: Cleaning And Maintenance
CLEANING AND MAINTENANCE 1. Unplug your Air Fryer Oven and allow it to completely cool before cleaning. Do not use abrasive cleaners, as they will damage the finish. Simply wipe the exterior with a clean, damp cloth and dry thoroughly. Apply the cleaning agent to a cloth, not directly onto the Air Fryer Oven. - Page 14 TROUBLESHOOTING PROBLEM PROBABLE CAUSE Make sure the oven is plugged in. The oven will not turn on. Turn on the TIMER DIAL. Foods are not °F Increase cooking TEMP or time. completely cooked. Decrease cooking TEMP °F or time. Foods are over cooked or burned.
-
Page 15: Limited Warranty
LIMITED WARRANTY LIMITED WARRANTY Geek Technology Co., Ltd. warrants to the original consumer or purchaser this Geek Chef Air Fryer Oven is free from defects in material or workmanship for a period of One (1) year from the date of purchase. If any such defect is discovered within the warranty period, Geek Technology Co., Ltd. - Page 16 Geek Technology Co., Ltd. 120 US Route 46, Parsippany, NJ 07054 Toll Free 1-844-801-8880 Version Update --2022.11...
Need help?
Do you have a question about the GTO26 and is the answer not in the manual?
Questions and answers