Table of Contents
Advertisement
Quick Links
Advertisement
Table of Contents

Subscribe to Our Youtube Channel
Related Manuals for Transcend TS64GDPB60A


Summary of Contents for Transcend TS64GDPB60A
- Page 1 User’s Manual Body Camera DrivePro Body 60 2023/09 (Version 1.2)
-
Page 2: Table Of Contents
Table of Contents 1. Introduction ............................ 3 2. System Requirements ........................4 3. Getting Started..........................4 3-1 Mounting the DrivePro Body ..................... 4 3-2 Function Buttons ......................... 6 3-3 Function Buttons Description .................... 7 3-4 LED Indicator Table ......................8 3-5 Charging the DrivePro Body 60 .................. - Page 3 20. Eurasian Conformity Mark (EAC) ................. 42...
-
Page 4: Introduction
GPS receiver allows for GPS coordinates to be embedded on footage, enabling accurate retracing to the site of an incident. Paired with Transcend’s exclusive DrivePro Body App, the Wi-Fi network and Bluetooth allows live streaming to smartphones and adjusting the function settings. -
Page 5: System Requirements
2. System Requirements System requirements for connecting the DrivePro Body 60 to a computer and for using the DrivePro Body Toolbox: A desktop or a laptop with a working USB port Windows ® Windows ® Windows ®... - Page 6 3. Push the camera into the holder until 4. Mount the camera in place. you hear a click. Clip mount Adhesive mount Allow at least 24 hours for the adhesive mount to properly adhere to the surface. 5. Rotate the camera so that the LED 6.
-
Page 7: Function Buttons
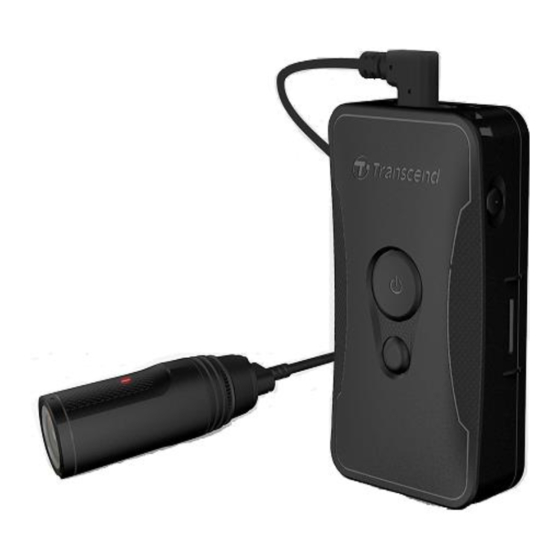
3-2 Function Buttons Lens Microphone Battery Indicator Status Indicator Lanyard Hole Assistive Button Status Button Buzzer Power Button Snapshot Button Reset Button Connection Socket... -
Page 8: Function Buttons Description
3-3 Function Buttons Description Power Button Long press once Power on/off. Short press twice Switch between Buffering mode and Recording mode. Default mode: Buffering mode. Snapshot Button Short press once Take a snapshot. In Recording mode, a note will be added to the recording file. -
Page 9: Led Indicator Table
3-4 LED Indicator Table Top View 1 Battery Indicator Recording Status LED Definition Flashing Low battery Connected to computer/power Status LED Definition Solid Charging Checking the battery status Status LED Definition Solid > 67% remaining Solid 31%-67% remaining ... -
Page 10: Charging The Drivepro Body 60
Connect the bundled 3.5mm to USB cable to a wall outlet with the included adapter Connect the bundled 3.5mm to USB cable to a computer Connect the DrivePro Body 30 to Transcend’s Docking Station (Optional) WARNING: Do not use the 3.5mm to USB cable on other devices. -
Page 11: Recording Videos
4. Recording Videos 4-1 Buffering Mode Recording in Buffering mode can greatly save storage space as the files are not recorded to the internal storage. To power on and start Buffering mode (by default), long press the button; you will hear 1 beep; the recording indicator will flash blue when powering on and then be solid in Buffering mode. -
Page 12: Taking Photos
5. Taking Photos To take photos while recording, quickly press the button, you will hear 1 beep. 6. Using the DrivePro Body App Developed for iOS and Android devices, the free DrivePro Body App allows you to wirelessly adjust the settings of the camera and to take snapshots, or live stream video to your smart device. 6-1 Downloading and Installing the App 1. - Page 13 button. Tap “Next” to continue. 2. Power on the DrivePro Body by long pressing the 3. Long press the Status button until you hear a beep. Tap “Next” on the App to connect to Bluetooth. You will hear 3 beeps. You can now take snapshots, switch recording modes, or adjust settings via the App.
- Page 14 4. Tap Live View or Browser and connect to “DPB60_XXXXXX” Wi-Fi with the default password “12345678”.
-
Page 15: Drivepro Body App Home
6-3 DrivePro Body App Home Device List Menu Battery Status Storage Status Recording Mode Snapshot Stealth Mode Microphone Live View Browser Note: The camera stops recording when you tap Browser or Settings after tapping using the App, the front LED turns solid blue/red. The camera will resume recording when you tap Home. 6-4 Playing Videos and Browsing Photos To play videos and browse photos, tap Browser on the Homepage, or tap on the... -
Page 17: Settings
6-5 Settings on the top left corner first then tap to enter the Settings menu. In the Settings menu, you can adjust the settings of video, device, Wi-Fi and System. Menu options Video Resolution: Set the resolution/quality for video recording. Available options: 1080p / 720p / 480p Video Length: Set the recording length of each recorded video file. - Page 18 Available options: Disable / Enable Video Label: Tap to edit the video label to be displayed (default label is DPB60_XXXXXX) Watermark: Display the Transcend logo watermark on the photo or video. Available options: Disable / Enable Device Default Recording Mode: Select the default recording mode.
-
Page 19: Using The Drivepro Body Toolbox Software
2. If the DrivePro Body cannot be turned on due to firmware upgrade failure, please contact Transcend customer service for technical support. 7. Using the DrivePro Body Toolbox Software DrivePro Body Toolbox is a video file management software which simplifies the settings of the camera. -
Page 20: Status
7-1 Status On the Status page, the basic information of the DrivePro Body is displayed, including device serial number, firmware version, user label and model name. To change the user label, click on To start backing up, click on To play videos and browse photos, click on 7-2 Settings On the Settings page, you can adjust the Device settings or Video settings. - Page 21 Device Settings Time Format: Select the 24-hour or 12-hour AM/PM time format. Available options: 24HR / AM/PM Date Format: Set the date format. Available options: YY/MM/DD or MM/DD/YY or DD/MM/YY Stealth Mode: Turn on/off the stealth mode. When the stealth mode is on, the light indicators, buzzer, and vibrator are disabled.
- Page 22 Light Frequency: Select the appropriate frequency to avoid flashing A/C light. Available options: 50Hz / 60Hz Video Stamp: Display the video label, date/time, watermark, and GPS coordinates, on the photo or video. Available options: On/Off Watermark: Display the Transcend logo watermark on the photo or video Available options: On/Off...
-
Page 23: Tools
7-3 Tools On the Tools page, you can upgrade firmware to the latest version, format disk or reset DrivePro Body to its default status. Note: Formatting the disk and resetting the device will permanently remove all data. Firmware Upgrade: Upgrade your firmware to the latest version available. Password: Set a password to protect the recorded data. - Page 24 Click on to play the video on screen. Click on to enlarge and play the video to full screen. With a GPS receiver, the paths can be displayed along with the recorded video. Click on in the middle of the page to add, delete, or edit the Owner and Category.
-
Page 25: Preference
Click on to classify the Owner and Category of the selected file. 7-5 Preference Click on on top of the page to adjust the settings of the DrivePro Body Toolbox. Check the available options below according to your preference. -
Page 27: Docking Station (Optional)
8. Docking Station (Optional) Transcend’s DPD6N networked docking station is designed specifically for the DrivePro Body 60 and offers a complete charging, data upload, and camera management solution. Ideal for large-scale deployments of DrivePro Body 60 body cameras, it allows for simultaneous charging and network-based data and camera management. - Page 28 3. Connect the other Ethernet cable from the WAN port to an active Internet port. 4. Change IP address to http://10.10.0.100. 5. Open browser and link to http://10.10.0.1. 6. Enter default user name “admin” and password “12345678” to log in. 7.
- Page 29 8. Charge the DrivePro Body and upload data simultaneously.
-
Page 30: Cautions
GPS receiver The GPS system is subject to changes which could affect its accuracy and performance. Transcend does not guarantee the accuracy of GPS data, which should not influence your personal judgment while using the DrivePro Body. GPS signals cannot penetrate buildings and metallic tinted films. The accuracy of GPS data... -
Page 31: Ip67 Protection
depends on the surroundings including the weather and the location it is being used (e.g. high buildings, tunnels, undergrounds and forests). On first use or cold start, please place the DrivePro Body in an outdoor open area for GPS positioning. Adhesive mount usage ... -
Page 32: Package Contents
11. Package Contents DrivePro Body 60 Belt holster Adapter 3.5mm to USB cable... - Page 33 Camera holder Clip & adhesive mounts Quick Start Guide Warranty Card...
-
Page 34: Specifications
12. Specifications Connect Interface USB 2.0 Storage Internal storage Main unit: 95.9 mm (L) × 52.2 mm (W)× 24.9 mm (H) 3.78” (L) x 2.06” (W) x 0.98” (H) Dimensions Camera unit: 61.3 mm x Ø 22 mm 2.41” x Ø 0.87mm 167g Weight 5.9 oz... -
Page 35: Frequently Asked Questions
DrivePro for repair. If you cannot find any ideal solution to your question below, please consult your dealer, service center, or local Transcend branch office for further help. You can also visit Transcend website (http://www.transcend-info.com/) for more FAQs and Technical Support services (http://www.transcend-info.com/Support/contact_form). -
Page 36: Eu Compliance Statement
14. EU Compliance Statement Transcend Information hereby declares that all CE marked Transcend products incorporating radio equipment functionality are in compliance with Directive 2014/53/EU. The full text of the EU declaration of conformity is available at the following internet address: www.transcend-info.com/eu_compliance... -
Page 37: Recycling And Environmental Protection
15. Recycling and Environmental Protection Recycling the Product (WEEE): Your product is designed and manufactured with high quality materials and components, which can be recycled and reused. When you see the crossed-out wheel bin symbol attached to a product, it means that the product is covered by the European Directive 2002/96/EC: Never dispose of your product with other household waste. -
Page 38: Two-Year Limited Warranty
Under special circumstances, Transcend may refund or credit the current value of the product at the time the warranty claim is made. The decision made by Transcend shall be final and binding upon you. Transcend may refuse to provide inspection, repair or replacement service for products that are out of warranty, and will charge fees if these services are provided for out-of-warranty products. -
Page 39: Gnu General Public License (Gpl) Disclosure
18. End-User License Agreement (EULA) Software license terms and conditions 1. Generally. Transcend Information, Inc. ("Transcend") is willing to grant the following license to install or use the software and/or firmware (“Licensed Software”) pursuant to this End-User License Agreement (“Agreement”), whether provided separately or associated with a Transcend product (“Product”), to the original purchaser of the Product upon or with which the Licensed Software was installed or associated as of the time of purchase ("Customer") only if Customer accepts all of the terms and conditions of this Agreement. - Page 40 Licensed Software; (e) remove, alter or obscure any copyright notice or other proprietary rights notice on the Licensed Software or Product; or (f) circumvent or attempt to circumvent any methods employed by Transcend to control access to the components, features or functions of the Product or Licensed Software.
- Page 41 (d) A waiver by either party of any term or condition of this Agreement or any breach thereof, in any one instance, will not waive such term or condition or any subsequent breach thereof. (e) Transcend may assign its rights under this Agreement without condition. (f) This Agreement will be binding upon and will inure...
-
Page 42: Federal Communications Commission (Fcc) Statement
* Any changes or modifications not expressly approved by the party responsible for compliance could void the authority to operate equipment. * This device and its antenna must not be co-located or operating in conjunction with any other antenna or transmitter. Transcend Information Inc (USA) 1645 North Brian Street, Orange, CA 92867, U.S.A TEL: +1-714-921-2000... - Page 43 20. Eurasian Conformity Mark (EAC)
Need help?
Do you have a question about the TS64GDPB60A and is the answer not in the manual?
Questions and answers