
Related Manuals for Asahi/America McELROY SmartFab 125


Summary of Contents for Asahi/America McELROY SmartFab 125
- Page 1 Operator’s Manual Asahi/America, Inc. ® ProWeld Equipment 800-343-3618 Powered by SmartFab™ Manual: 460801 Revision: Rev C 06/19 Original Language: English...
- Page 2 Cancer and Reproductive Harm - www.P65warnings.ca.gov This product and other products could be protected by patents or have patents pending. All the latest patent information is available at patent.mcelroy.com...
- Page 3 TX04887-03-15-16 Asahi/America Training Standards Since 1984, Asahi/America, Inc. has been teaching contractors the benefits of welding thermoplastic piping systems in industrial and high purity applications. Our partnership with McElroy allows us to leverage their state-of-the-art Learning Management System (LMS) using Asahi/America technical standards across all Asahi piping systems.
- Page 4 Read, study, and keep this manual with the machine. Whenever a question arises regarding your machine, or this publication, please contact Asahi/America Technical Services at 1-800-343-3618 or pipe@asahi- america.com.
- Page 5 This serial number required when calling Asahi America with questions for rental tools. REPLACEMENT PARTS Contact Asahi/America for replacement parts on Asahi-owned rental tools. Refer to the McElroy parts finder at www.mcelroy.com to locate parts for purchase. Reference the model number on the nameplate of the machine when using the parts finder.
- Page 6 USED EQUIPMENT WARRANTY Purchase of refurbished/used equipment carries a 90-day warranty. NEW EQUIPMENT WARRANTY Purchase of new Asahi/America versions of McElroy equipment carries a 5-year limited warranty. Details can be found here: https://www.mcelroy.com/warranty.htm ASAHI/AMERICA TOOL DEPARTMENT CONTACTS For technical or tool related questions, please contact: Rental Equipment Manager –...
- Page 7 Equipment Safety Safety Alerts ........................... 1-1 Read and Understand ......................1-1 General Safety ........................1-2 Wear Safety Equipment ....................... 1-2 Heater is Not Explosion Proof ..................... 1-2 Electrical Safety ........................1-3 Pinch Points..........................1-3 Heater is Hot .......................... 1-3 Fusion Procedures ......................... 1-3 Theory of Heat Fusion ......................
- Page 8 Maintenance Preventative Maintenance ..................... 5-1 Cleaning the Machine ......................5-1 Clean Jaws and Inserts ......................5-1 Fasteners Must Be Tight ......................5-2 Installing Socket Fusion Adapters ..................5-2 Clean Heater Surfaces ......................5-2 Adjusting Heater Temperature .................... 5-2 Heater Indicator Light......................5-3 Maintenance Checklist Fusion Machine Checklist ....................
- Page 9 Fusion Equipment Safety This hazard alert sign appears in this manual. When you see this sign, carefully read what it says. YOUR SAFETY IS AT STAKE. You will see the hazard alert sign with these words: DANGER, WARNING, and CAUTION. Indicates an imminently hazardous situation which, if not avoided, will result in death or serious injury.
- Page 10 Fusion Equipment Safety Safety is important. Report anything unusual that you notice during set up or operation. LISTEN for thumps, bumps, rattles, squeals, air leaks, or unusual sounds. SMELL odors like burning insulation, hot metal, burning rubber, hot oil, or natural gas.
- Page 11 Fusion Equipment Safety Always ensure equipment is properly grounded. It is important to remember that you are working in a wet environment with electrical devices. Proper ground connections help to minimize the chances of an electric shock. Frequently inspect electrical cords and unit for damage. Have damaged components replaced and service performed by a qualified electrician.
- Page 12 Theory of Heat Fusion The principle of heat fusion is to heat two surfaces to a designated temperature, and then fuse them together by application of force. This develops pressure which causes flow of the melted materials, which causes mixing and thus fusion. When the thermoplastic material is heated, the molecular structure is transformed from semi-crystalline into an amorphous condition.
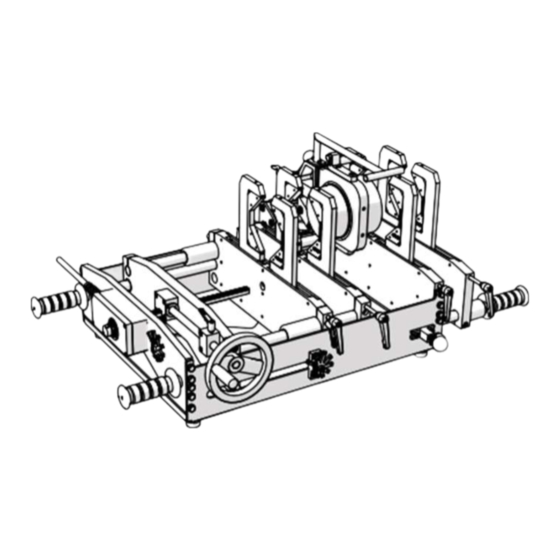
- Page 13 Overview McElroy has created a smarter way to socket fuse pipe and fittings for polypropylene piping systems with the SmartFab™ 125 benchtop machine. Its portable design allows it to be positioned on any flat surface for precise prefabrication, providing versatility in the field as well as the shop. When fusing thermoplastic pipe materials, refer to the pipe manufacturer's fusion procedures or appropriate joining standard.
- Page 14 Overview Heater Heater is not explosion proof. Operation of heater in an explosive atmosphere will result in serious injury or death. The heater has a green indicator light which will flash on and off. This indicates that the controller is operating normally. If the green indicator is not flashing then the controller may not be operating properly.
- Page 15 Overview Each jaw frame has two insert holders and the jaws are opened and closed using the handle at the end of the jaw frame. Inserts are installed into the insert holders on each jaw frame. Inserts are locked into place by a spring detent in the insert holder.
- Page 16 Overview At the end of each jaw frame are adjustable handles for clamping and unclamping of pipe and fittings. By pulling out on the handles, the handle position can be adjusted. Rotating the handle will open and close the jaws on the jaw frame.
- Page 18 Overview Set Up Calibration Install the appropriate type depth star that will match the heater adapters used. Select the appropriate Set Up Gauge for the heater adapters being used and use that gauge for the calibration procedures. Loosen the bolts attaching the setting stop block and depth star block to the frame.
- Page 19 Set Up Set Up Calibration (continued) Open movable jaws to release the setting stop. Set the depth star to 125mm. The 125mm will point to the left toward the bolt of the movable jaws. Close the movable carriage against the inner fixed jaw frame. There should be no gap.
- Page 20 Set Up Set Up Calibration (continued) Slide the depth star block to the left until it contacts the bolt. Tighten the bolts on the depth star block to lock the position. Loosen the set screws for the short heater stop bolts. 3 - 3...
- Page 21 Set Up Set Up Calibration (continued) Short Heater Insert the Set Up Gauge using the fitting side heater stop gauge Stop Bolt and adjust short heater stop bolt until the bolt touches the gauge (from the heater stop mount) in both locations. Tighten the set screws to lock the bolts in position.
- Page 22 Set Up Set Up Calibration (continued) Select a fitting, the appropriate inserts and heater adapters to match. Install the heater adapters on the heater. The pipe heater adapter is installed on the side of the heater with the long heater stops. Install the inserts with the stops on the inner jaw frame.
- Page 24 Fusion Procedure Before operating this machine, please read this manual thoroughly, and keep a copy with the machine for future reference. When fusing thermoplastic pipe materials, refer to the pipe manufacturer's suggested procedures or appropriate joining standard. The pipe and fitting can be fused in either side of the machine removing the need to reposition the machine.
- Page 25 Fusion Procedure Inserts are installed into the insert holders on each jaw frame. Inserts are locked into place by a spring detent in the insert holder. The inserts with the stop tabs are for the fitting and are installed on the inner jaw frame on the same side as the fitting heater adapter on the heater.
- Page 26 Fusion Procedure Set up pipe stands and adjust height so the pipe is in line with the jaws of the machine. TX04864-12-14-15 Insert the heater between fitting and pipe. Close the carriage until the fitting and pipe come close to the heater. Verify the fitting and pipe are in proper alignment to the heater.
- Page 27 Fusion Procedure Close the carriage until the heater stops make contact with the jaw frames. IMPORTANT: Do not force the pipe and fitting onto the heater. Allow the pipe and fitting to melt onto the heater. Forcing the pipe and fitting onto the heater will damage the machine or create a questionable melt pattern.
- Page 28 Fusion Procedure Close the carriage until the carriage stops against the depth star. NOTICE: Be sure to complete the joint in the time allowed by the pipe manufacturer or appropriate joining standard. Lock the carriage. Allow the carriage to stay in place for the total cooling time specified by the pipe manufacturer or appropriate joining standard.
- Page 29 Maintenance To insure optimum performance, the machine must be kept clean and well maintained. With reasonable care, this machine will give years of service. Therefore, it is important that a regular schedule of preventive maintenance be kept. Store machine inside, out of the weather, whenever possible. TX00428-8-10-95 The machine should be cleaned by using compressed air to blow away debris and wiped clean with a clean rag.
- Page 30 Check all nuts, bolts, and snap rings to make certain they are secure and in place. TX00437-9-13-94 The heater body of this assembly is not coated. Coated socket fusion heater adapters are available for all socket fusion applications. Care should be taken to ensure that the socket fusion heater adapters are seated on the heater body, and that there is no foreign matter trapped between these surfaces.
- Page 31 Maintenance The heater has a green indicator light which will flash on and off. This indicates that the controller is operating normally. If the green indicator is not flashing then the controller may not be operating properly. If this occurs, disconnect power and have the heater repaired by an McElroy Authorized Service Center.
- Page 32 Fusion Machine Checklist Item to Check Satisfactory Needs Repair Comments Repair UNIT Machine is clean All nuts and bolts are tight All placards and handles are in place All clamp handles turn freely Cords and plugs are in good condition Hand wheel for movable jaws turns freely Jaws are properly aligned Inserts fit properly...
- Page 33 Fusion Machine Specifications: SmartFab™ 125 Dimensions: Length: 40.1" (1019mm) Width: 30.8" (782mm) with Heater Extended: 38" (965mm) Height: 16" (406mm) with Heater Extended: 20.5" (521mm) Weight: Carriage Assembly: 145 lbs (65.8Kg) Power Requirements: Heater: 1600W, 100-120V, 14.5A, 50/60Hz, 1Ph 1600W, 200-240V, 6.7A, 50/60Hz, 1Ph Plug Type: A) NEMA 5-15P, 15A, 2 Pole, 3 Wire M) DIN 49441, 16A, 2 Pole, 3 Wire...
- Page 34 Tel: 781-321-5409 ● Fax: 800-787-6861 ● Toll Free: 800-343-3618 www.asahi-america.com ● asahi@asahi-america.com Direct Sales: East: 800-232-7244 / Central: 800-442-7244 / West: 800-282-7244...
Need help?
Do you have a question about the McELROY SmartFab 125 and is the answer not in the manual?
Questions and answers