Table of Contents
Advertisement
Quick Links
Please give us a chance to make it right and do better !
Contact our friendly customer service department for help first.
Replacements for missing or damaged parts will be shipped ASAP !
US office: Fontana
UK office: Ipswich
Contact Us !
Do NOT return this item.
AU office: Truganina
US:cs.us@costway.com
UK:cs.uk@costway.com
AU:cs.au@costway.com
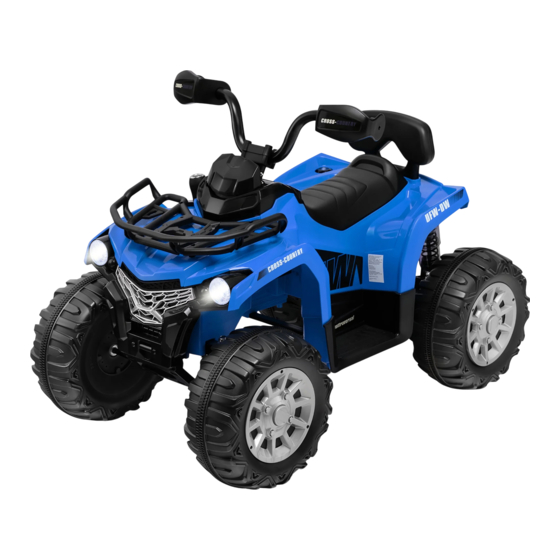
Children's Toy Beach Car
THIS INSTRUCTION BOOKLET CONTAINS IMPORTANT SAFETY INFORMATION. PLEASE READ AND KEEP FOR FUTURE REFERENCE.
USER'S MANUAL
TQ10077US
Advertisement
Table of Contents

Subscribe to Our Youtube Channel
Related Manuals for Costway TQ10077US


Summary of Contents for Costway TQ10077US
- Page 1 US office: Fontana UK office: Ipswich AU office: Truganina USER’S MANUAL Contact Us ! Children’s Toy Beach Car TQ10077US Do NOT return this item. US:cs.us@costway.com UK:cs.uk@costway.com AU:cs.au@costway.com THIS INSTRUCTION BOOKLET CONTAINS IMPORTANT SAFETY INFORMATION. PLEASE READ AND KEEP FOR FUTURE REFERENCE.
-
Page 2: Before You Start
Styles and colo(u)rs may vary. Made in China. The owner’s manual contains important safety information as well as assembly, use and maintenance instructions. The Ride-on Car must be assembled by an adult who has read and understood the instructions in this manual. Keep the package away from children and dispose of properly before use. -
Page 3: User Notice
User Notice │ 2 Parts Diagram │ 3 HINT: Some parts shown are assembled on both sides of vehicle WARNING! • CHOKING HAZARD - Small parts. Not suitable for children under 36 months. The product contains small parts, keep children away when assembling. -
Page 4: Parts List
Parts List │ 4 Attach the Steering Column │ 5 Q’ty (pcs) PART PART NAME REMARKS Vehicle body Rear wheel Front wheel Ø12 washer Lock nut Hubcap Bushing Rear axle Steering column Split pin Basket Ø4x12 screw Dash Seat Back rest Handle bar M5x35 machine Placed on the handle bar... - Page 5 Attach the Front Axle │ 6 Reset the Front Wheels │ 7 Front Bottom View Front Bottom View Snap ring Ø12 washer M5X20 machine screw Remove all the parts from the front axle. Steering column 1. Slide a Ø12 washer onto the front axle. Front axle 2.
- Page 6 Reset the Rear Wheels │ 8 Attach the Dash, Basket & Handle Bar │ 9 Rear Bottom View 1. Fit the tabs on dash into the slots in the vehicle body and push it to click into place. 2. Fit the basket to the bonnet. 3.
- Page 7 Connect the Power Supply & Attach the Seat, Seat Back │ 10 Use Your Ride-on │ 11 Top View Battery connector Vehicle connector 1. Power button: Turns the vehicle on and off. 2. Low speed forward/reverse shifter: Changes the direction that vehicle 1.
- Page 8 Using the High Speed │ 12 Charging │ 13 IMPORTANT WARNING! ● The High Speed Protective cover must be removed by an adult. • ONLY an adult is allowed to charge and recharge the battery! • This product with Charging Protection: when charging, all functions will ●...
-
Page 9: Battery Disposal
Problem Possible Cause Solution Battery Disposal Recharge battery, contact us please. Vehicle runs Battery low on power sluggishly The battery will eventually lose the ability to hold a charge. Depending on the Replace battery, contact us please. amount of use, and varying conditions, the battery should operate for one to Battery is old three years. - Page 10 Maintaining │ 15 Fuse • Parents are responsible for inspecting the main parts of the toy The battery features a thermal fuse with a rest fuse that will before use and regularly checking for potential hazards, such as automatically trip and cut all power to the vehicle if the motor, batteries, the charger, cables or wires, plugs, screws.
Need help?
Do you have a question about the TQ10077US and is the answer not in the manual?
Questions and answers