Advertisement
Quick Links
Advertisement

Related Manuals for OVIS 32115


Summary of Contents for OVIS 32115
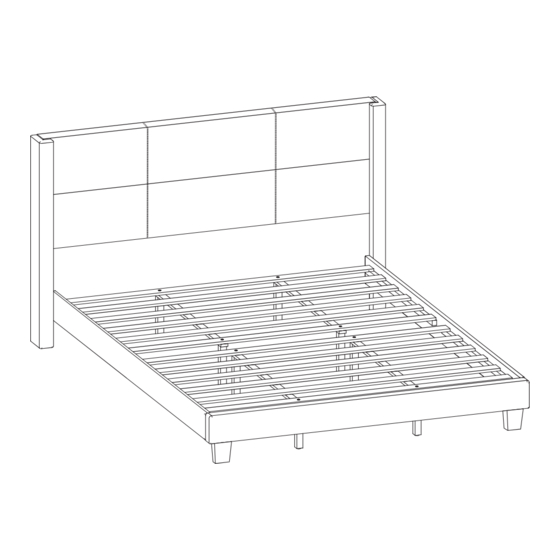
- Page 1 REV 05 32115 King Bed...
- Page 2 PLEASE CONTACT US FOR QUESTIONS Email our support team: help@ovis.co CAUTION: Do not a empt to slide the bed once it is fully assembled. To avoid structural damage while moving your assembled bed, any ma ress and bedding should be removed from the bedframe. Then the bedframe should be li ed and carried (not slid) to your desired loca on.
- Page 3 Estimated Time for Assembly 25:00 - 35:00 Weight Limitation 600 lbs Additional Tools Needed – Phillips Screwdriver.
- Page 4 PLEASE CONTACT US FOR QUESTIONS Email our support team: help@ovis.co Re m ove p a r t s f ro m h e a d b o a rd c o m p a r t m e n t...
-
Page 5: Package Content
PACKAGE CONTENT CAUTION: DO NOT SLIDE BED AFTER ASSEMBLY. LIFT THE BED FRAME INTO ITS FINAL POSITION. ( L ) ( R ) KING BED Components Hardware 1 pc 1 pc M8X20 M6X50 M6X60 M8X60 M6X30 ( L ) 2 sets 4 pcs 4 pcs 8 pcs... - Page 6 M6X30 4 pcs A ach “O” washers to the “K” bolts. Use the assembled “K” bolts to connect the three parts of the headboard A1, A2 together. Take special care to place A1, A2 in the order show in the illustra on below. Headboard will not assemble properly if A1, A2 are in incorrect order.
- Page 7 M6X30 8 pcs A ach “O” washer to “K” bolt. Use the “K” bolts to connect the wing “W” to the ends of the headboard A1 and A2. Tighten the “K” bolts. ( R ) ( L )
- Page 8 4 pcs M6X50...
- Page 9 M8X20 4 pcs Thread “J” bolts into the holes in the headboard and footboard. Do not ghten. These will be ghtened in later steps.
- Page 10 Hang the hooks at the ends of the side rails onto the “J” bolts in the footboard. Tighten the “J” bolt so the rails are secure. ( L ) ( R )
- Page 11 6 pcs M8X60 ( R ) ( L ) A ach “Oa” washer to “ V” bolt. Use the “V” bolts to connect the ends of the side rails to the wings “W”. Tighten the “V” bolts. NOTE: Do not a empt to slide the bed once it is fully assembled.
- Page 12 8 pcs M6X60 Assemble the slat system by a aching the slats “G” to the “I” supports and “H” legs. First, extend the slats. Then, line up the holes in the slats with the holes in the “I” supports and the holes in the tops of the “H”...
-
Page 13: Need Additional Help
Sliding the bed with Floor Glide weight upon it can compromise the integrity of the center support legs. Finally, use screwdriver to install“N” screws into side rail cleat NEED ADDITIONAL HELP? Email our support team: help@ovis.co...
Need help?
Do you have a question about the 32115 and is the answer not in the manual?
Questions and answers