Graco SaniForce 24E836 Instructions And Parts
6:1 sanitary pumps
Hide thumbs
Also See for SaniForce 24E836:
- Instructions and parts (26 pages) ,
- Instructions and parts (26 pages)
Table of Contents
Advertisement
Quick Links
Instructions and Parts
SaniForce™ 6:1 Sanitary Pumps
For use in sanitary applications to transfer medium to high viscosity fluids. For professional use only.
Important Safety Instructions
Read all warnings and instructions in this manual.
Save these instructions.
PROVEN QUALITY. LEADING TECHNOLOGY.
3A0733C
Model 24G740
ti15637a
ti15721a
ENG
Advertisement
Table of Contents

Subscribe to Our Youtube Channel
Related Manuals for Graco SaniForce 24E836


Summary of Contents for Graco SaniForce 24E836
- Page 1 Instructions and Parts SaniForce™ 6:1 Sanitary Pumps 3A0733C For use in sanitary applications to transfer medium to high viscosity fluids. For professional use only. Important Safety Instructions Read all warnings and instructions in this manual. Save these instructions. Model 24G740 ti15637a ti15721a PROVEN QUALITY.
-
Page 2: Table Of Contents
Flushing Procedure ........9 Notes ............... 24 Cleaning............9 Product Dimensions..........25 Tighten Threaded Connections ..... 9 Performance chart ..........26 Notes ............... 10 Technical Data ........... 27 Troubleshooting..........11 Priming Piston Service ........12 Graco Standard Warranty........28 3A0733C... -
Page 3: Models
Models Models Models Maximum Maximum Maximum Air Air Inlet Inlet Pressure: Inlet Pressure: 100 Pressure: 100 psi psi (0.7 (0.7 MPa, (0.7 MPa, MPa, 6.9 6.9 bar) bar) bar) Maximum Maximum Maximum Fluid Fluid Working Fluid Working Pressure: Working Pressure: Pressure: 650 650 psi psi (4.5... -
Page 4: Warnings
Warnings Warnings Warnings The following warnings are for the setup, use, grounding, maintenance and repair of this equipment. The exclamation point symbol alerts you to a general warning and the hazard symbol refers to procedure-specific risks. When these symbols appear in the body of this manual refer back to these Warnings. Product-specific hazard symbols and warnings not covered in this section may appear throughout the body of this manual where applicable. - Page 5 WARNING WARNING WARNING EQUIPMENT MISUSE MISUSE HAZARD HAZARD EQUIPMENT EQUIPMENT MISUSE HAZARD Misuse can cause death or serious injury. • Do not operate the unit when fatigued or under the influence of drugs or alcohol. • Do not exceed the maximum working pressure or temperature rating of the lowest rated system component.
-
Page 6: Installation
Reference numbers and letters in circuit. parentheses in the text refer to the callouts in the figures and the parts drawings Pump: Connect a ground wire (Graco PN 238909) Pump: Pump: to the ground screw on the bottom cover of the air Accessories are available from Graco. - Page 7 Main Air Line G M H TI15638B Figure 1 Typical Installation Pump Pump Components Pump Components (Included) Components (Included) (Included) System System System Components/Accessories Components/Accessories Components/Accessories (sold (sold separately) (sold separately) separately) Bung-Mounted Sanitary Pump Air Line Filter/Regulator Air Exhaust Muffler (may alternately be mounted Bleed-Type Master Air Valve (required) remotely, using exhaust hose) 3/4 npt Exhaust Air Outlet...
-
Page 8: Operation
Operation Operation Operation water. Flush the pump thoroughly with an appropriate cleaning solution or disassemble and sanitize the parts before using the pump. See Flushing Procedure, page 9 . Check national, state, Topics Covered in this Chapter and local codes for specific limitations. ♦... -
Page 9: Maintenance
Maintenance Maintenance Maintenance 2. Flush the system thoroughly with an appropriate cleaning solution. See Flushing Procedure, page 9 Topics Covered in this Chapter 3. Follow the Pressure Relief Procedure, page 8 ♦ Flushing Procedure 4. Remove the air and fluid hoses and fittings from ♦... -
Page 10: Notes
Notes Notes Notes 3A0733C... -
Page 11: Troubleshooting
Troubleshooting Troubleshooting Troubleshooting 1. Follow Pressure Relief Procedure, page 8 2. Check all possible remedies in the Troubleshooting Chart before disassembling the pump. Problem Problem Problem Cause Cause Cause Solution Solution Solution Pump fails to operate. Restricted air line or inadequate air Clear air line or increase air supply. -
Page 12: Priming Piston Service
Priming Piston Piston Service Service Priming Priming Piston Service 5. Release the upper clamp (123) holding the displacement pump to the tie rod plate (122). 6. Slide the pump down from the air motor. Pull the displacement rod (117) out of the coupler (C). Topics Covered in this Chapter Remove the gasket (102). -
Page 13: Reassemble After Cleaning
Reassemble After After Cleaning Cleaning Reassemble Reassemble After Cleaning Note: Any damaged parts must must be replaced. Note: Note: must 115 107 Note: Note: Note: Lubricate the o-rings, throat packings, and piston seals with waterproof appropriate sanitary lubricant. 1. Install the v-block packing (105*) and bearing (106*) in the packing housing (103). -
Page 14: Double Ball Service
Double Ball Ball Service Service Double Double Ball Service 5. Release the clamp (123) holding the displacement pump to the tie rod plate (122). 6. Slide the pump down from the air motor. Pull the displacement rod (117) out of the coupler (C). Topics Covered in this Chapter Remove the gasket (102). -
Page 15: Disassemble The Pump
Disassemble the the Pump Pump Reassemble After After Cleaning Cleaning Disassemble Disassemble Pump Reassemble Reassemble After Cleaning Note: Pump Repair Kits are available. Purchase Note: Any damaged rubber parts must must be replaced Note: Note: Note: Note: must the kit separately. See the Parts list for your as they could harbor microorganisms that can displacement pump on pages 18 and 20 to select contaminate the fluid. -
Page 16: Parts
Parts Parts Parts Complete Pump Models 24E836, 24E837, 24E838 24E839, 24E840, 24F942, 21 3 24G739, and 24G740 Apply PTFE tape to threads. Hand tighten only. Apply sanitary lubricant to ease assembly. ti16015a 3A0733C... -
Page 17: Kits
Complete Pump Pump Models Models 24E836, 24E836, 24E837, 24E837, 24E838, 24E838, 24E839, 24E839, 24E840, 24E840, 24F942, 24F942, Complete Complete Pump Models 24E836, 24E837, 24E838, 24E839, 24E840, 24F942, 24G739, and and 24G740 24G740 24G739, 24G739, 24G740 Qty. Qty. Ref. Part Description Description Description Qty. -
Page 18: 24G747 And 24G746
Priming Piston Piston Displacement Displacement Pump Pump Models Models 24G747 24G747 and and 24G746 24G746 Priming Priming Piston Displacement Pump Models 24G747 24G746 *102 *106 119* *105 *104 120* *113 112* *115 102* ti16157a 3A0733C... - Page 19 Priming Piston Piston Displacement Displacement Pump Pump Models Models 24G747 24G747 and and 24G746 24G746 Priming Priming Piston Displacement Pump Models 24G747 24G746 Ref. Part Description Description Description Qty. Qty. Qty. Ref. Part Description Description Description Qty. Qty. Qty. Ref. Ref.
-
Page 20: 24G750
Double-Ball Displacement Displacement Pump Pump Models Models 24G748, 24G748, 24G749, 24G749, 24G753, 24G753, Double-Ball Double-Ball Displacement Pump Models 24G748, 24G749, 24G753, and 24G750 24G750 24G750 *102 *106 *105 *104 (24G748) (24G749, 24G750, 24G753) Piston Piston Assy Flange for Assy (24G753) Ram Mounting (24G748, 24G749,... - Page 21 Double-Ball Displacement Displacement Pump Pump Models Models 24G748, 24G748, 24G749, 24G749, and Double-Ball Double-Ball Displacement Pump Models 24G748, 24G749, 24G750 24G750 24G750 Part Part Part Description Description Description Part Part Part Description Description Description CYLINDER, pump 120* 167971 SEAL, piston, neoprene 16G481 Model 24G748...
-
Page 22: 24G752 And 24G751
Double-Ball Displacement Displacement Pump Pump Models Models 24G752 24G752 and and 24G751 24G751 Double-Ball Double-Ball Displacement Pump Models 24G752 24G751 Piston Piston Assy Assy (24G752) *102 (24G751) *106 *120 120* *105 128* *104 119* 104* 102* ti16160a 3A0733C... - Page 23 Double-Ball Displacement Displacement Pump Pump Models Models 24G752 24G752 Double-Ball Double-Ball Displacement Pump Models 24G752 Part Description Part Description Part Part Description Description Part Part Description Description 902980 CYLINDER, pump 120* 622142 SEAL, piston, UHMWPE 166117 166129 102* GASKET, 2.5 in. (64 SHIELD, drip 16A945 PLATE, tie rod 180918...
-
Page 24: Notes
Notes Notes Notes 3A0733C... -
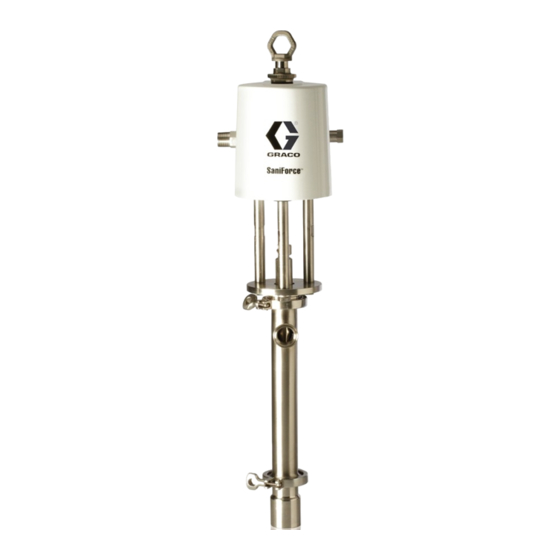
Page 25: Product Dimensions
Product Dimensions Dimensions Product Product Dimensions Stubby Length Drum and Bin Length ti15637a ti15721a Model Weight Pump Style Style A A A B B B C C C D D D Model Model Weight Weight Pump Pump Style lb (kg) in. -
Page 26: Performance Chart
Performance chart chart Performance Performance chart Cycles per Minute (1.0) (4.8, 48) (0.85) (4.1, 41) (0.71) (3.4, 34) (2.8, 28) (0.57) (2.1, 21) (0.42) (1.4, 14) (0.28) (0.7, 7) (0.14) (3.8) (7.6) (11.4) (15.1) Fluid Flow gpm (lpm) tested in No. 10 weight oil A = 100 psi (0.7 MPa, 7 bar) B = 70 psi (0.5 MPa, 5 bar) C = 40 psi (0.3 MPa, 3 bar) -
Page 27: Technical Data
Technical Data Data Technical Technical Data Maximum Fluid Working Pressure 650 psi (4.5 MPa, 44.8 bar) Maximum Air Inlet Pressure 100 psi (0.7 MPa, 6.9 bar) Maximum Recommended Pump Speed 60 cycles/min, 4 gpm (15 liters/min) delivery Air Consumption See Performance Chart Pump Cycles per Gallon (3.8 Liters) 13.3 Ratio... -
Page 28: Graco Standard Warranty
Graco to be defective. This warranty applies only when the equipment is installed, operated and maintained in accordance with Graco’s written recommendations. This warranty does not cover, and Graco shall not be liable for general wear and tear, or any malfunction, damage or wear caused by faulty installation, misapplication, abrasion, corrosion, inadequate or improper maintenance, negligence, accident, tampering, or substitution of non-Graco component parts.
Need help?
Do you have a question about the SaniForce 24E836 and is the answer not in the manual?
Questions and answers