
Subscribe to Our Youtube Channel
Related Manuals for AML Oceanographic RTS Series


Summary of Contents for AML Oceanographic RTS Series
- Page 1 AML-3 and AML-6 RTS: User Manual Multiparameter Real Time Streaming Instrument For more information visit AMLoceanographic.com or call +1 250-656-0771...
- Page 2 Revision History Revision Date Description Aug 31, 2022 Document Created 1.09 Mar 31, 2023 Addition of monitoring display/format settings AML Oceanographic Ltd. 2 / 39...
-
Page 3: Table Of Contents
3.2.1 Baud Rate 3.2.2 Sampling Settings Burst Mode and Single Mode Sampling Burst Averaging Sleep Mode 3.2.3 Monitor Modes 3.2.4 Derived Parameters 3.2.5 UV Antifouling 3.2.6 Data Logging 3.2.7 Help 4 Contact AML Service Sales AML Oceanographic Ltd. 3 / 39... - Page 4 8 Appendix D - Equipping an Instrument 8.1 Sensor Cage 8.2 X2Change™ Sensors 8.2.1 Removing Sensors 8.2.2 Installing Sensors 8.3 Seals and Plugs 9 Appendix E - Warranty Statement AML Warranty Policy: New Product (Instrumentation) AML Oceanographic Ltd. 4 / 39...
-
Page 5: Introduction
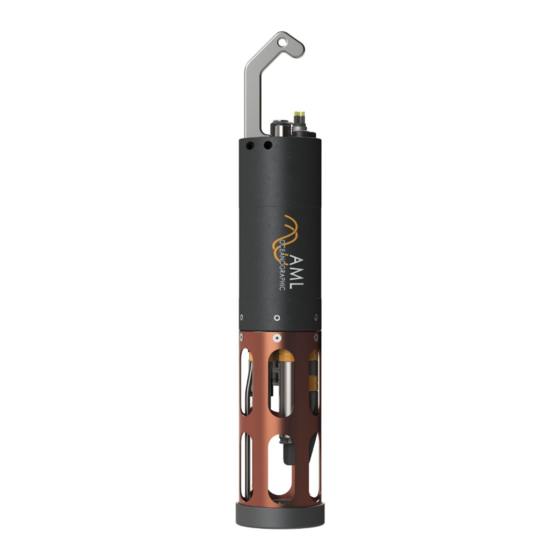
1 Introduction The AML RTS series is a highly configurable family of multiparameter sondes designed for a wide range of data collection applications. This series includes both the AML-3 RTS and the AML-6 RTS, where the ‘3’ and ‘6’ designations refer to the number of sensors that may be simultaneously installed on the instrument’s endcap. - Page 6 Figure 1 depicts a typical AML-3 RTS. Figure 1: A typical AML-3 RTS. At left, the 6000m, at right, the 500m. The instrument shown here is representative only and may differ from the Reader’s instrument. AML Oceanographic Ltd. 6 / 39...
- Page 7 It is recommended the instruments be deployed vertically with the shackle end up. The AML-6 RTS shackle is also hook shaped to provide secure handling by a user. AML Oceanographic Ltd. 7 / 39...
- Page 8 15.66 in (CTD set up) Long Cage: 46.4 cm / Long Cage: 46.4 cm / 18.26 18.26 in (UV Protected) in (UV Protected) Weight*: Weight*: 1.36 kg / 3.00 lb (air) 2.5 kg / 5.6 lb (air) AML Oceanographic Ltd. 8 / 39...
-
Page 9: Connectors And Cables
MCBH series connector at one end, and a serial DB9 connector with flying power leads at the other end. This cable provides a means to communicate serially with the instrument and apply external power in bench top settings. AML Oceanographic Ltd. 9 / 39... -
Page 10: Auxiliary Sensors
UV-equipped instruments are factory-set to emit UV-C light on a pre-programmed duty cycle immediately on instrument powerup. Do not expose bare skin or eyes to the emitted light. For most applications, AML RTS instruments are shipped from the factory with all sensors pre-installed and configured. AML Oceanographic Ltd. 10 / 39... -
Page 11: Indicator Led Flash Patterns
500 m depth or less. The instrument pressure rating is identified on the end of the instrument, adjacent to the shackle. Typical ratings for AML RTS instruments are 500m and 6000m. AML Oceanographic Ltd. 11 / 39... -
Page 12: Getting Started
Sailfish; a user-friendly GUI-based platform which allows users to easily configure an instrument, observe live sensor measurements (live data streaming), and download logged data. Sailfish may be downloaded from the AML Oceanographic website www.AMLoceanographic.com Sailfish provides the easiest means of adjusting the instrument’s configuration. Advanced commands not accessible via the GUI exist and can be applied via command line. - Page 13 Devices tab. Select the corresponding tile, then press ‘Connect’ at the bottom of the tab to establish a connection. 7. Click the gear icon on the instrument tile (top left corner of the tile) to open the Configuration page. Follow the on-screen instructions to configure the instrument. AML Oceanographic Ltd. 13 / 39...
-
Page 14: Getting Started With A Serial Terminal
Sending a carriage return (enter key) will land the instrument at prompt. 2.3.1 Basic Command Line Functionality The commands described in this section are intended to provide an overview of basic functionality in order to familiarize the user. There are many commands available, however, and AML Oceanographic Ltd. 14 / 39... - Page 15 The Measurement Meta Data section provides information on how to interpret the columns of measurements when the instrument is streaming data. Streaming live data (MONITORING) Live data streaming is referred to as monitoring. To commence monitoring, issue the command >MONITOR 2022-01-19,03:14:07.00,51.281,20.867,0.23,-1.19,1526.593,6.31,1526.677,10.000,0,0.23 2022-01-19,03:14:07.00,51.280,20.867,0.23,-1.17,1526.595,6.31,1526.677,10.000,0,0.23 AML Oceanographic Ltd. 15 / 39...
- Page 16 While columns of data are easy to read by humans, in instances where the streaming data will be interpreted by machines (ie. other logging devices, software, telemetry modules, etc), users are strongly encouraged to utilize AML’s extensible format, referred to as AMLx. Refer to Appendix B for more information. AML Oceanographic Ltd. 16 / 39...
-
Page 17: Configuration
Mode, the instrument will output single samples at a configured interval. Burst Mode, in contrast, provides groups of samples at configured intervals. For example, an instrument in burst mode may be configured to output 6 samples at a rate of 2 samples/sec on 30 seconds intervals. AML Oceanographic Ltd. 17 / 39... - Page 18 For the configuration of a Burst Mode to be valid, the Sample Duration of a given burst must be less than or equal to the burst interval, B.I. This is described in the following equation. AML Oceanographic Ltd. 18 / 39...
-
Page 19: Burst Averaging
The instrument can be configured to enter a low power state in between taking samples. The instrument will only enter sleep mode if the sleep and sampling settings are configured so that the sample period is longer than the minimum sleep time. By default the minimum time the AML Oceanographic Ltd. 19 / 39... -
Page 20: Sleep Mode
It is not recommended to change this. Default: 40 seconds Min: 20 seconds set scan sleepdelay <seconds> Set the number of seconds the instrument will wait to sleep after taking a sample. Default: 5 seconds AML Oceanographic Ltd. 20 / 39... -
Page 21: Monitor Modes
“*”. >mon 1450.132,14.543 * 2B 1451.122,15.133 * 29 Note that checksum does not appear in log files. display monitor Display the current monitor settings. Additional monitor commands are described in 5.2 Monitor commands AML Oceanographic Ltd. 21 / 39... -
Page 22: Derived Parameters
Note: Setting UV time to 0 0 will disable light emission. 3.2.6 Data Logging Data logging is not supported with the AML RTS instrument series. If logging is required, please contact AML and inquire about our AML LGR or AML XC instrument series. AML Oceanographic Ltd. 22 / 39... -
Page 23: Help
The AML-3 RTS has a built-in help menu containing a complete list of all user commands. Command Description display options Display a list of all configurable settings and their current values. help Display a menu of all user commands. AML Oceanographic Ltd. 23 / 39... -
Page 24: Contact Aml
4 Contact AML Service To request an RMA or technical support Email: service@AMLoceanographic.com Phone: 1-250-656-0771 Phone: 1-800-663-8721 (NA) http://www.AMLoceanographic.com Sales For all general sales inquiries Email: sales@AMLoceanographic.com Phone: 1-250-656-0771 Phone : 1-800-663-8721 (NA) http://www.AMLoceanographic.com AML Oceanographic Ltd. 24 / 39... -
Page 25: Appendix A - Full Command List
Set the sampling trigger to sample by time, sound velocity increment or pressure increment. Sampling by sound or pressure increment is not supported in burst mode. set sound inc <value> Set sound velocity increment. set pressure inc <value> Set pressure increment. AML Oceanographic Ltd. 25 / 39... -
Page 26: Monitor Configurations And Commands
Enable/disable a 8 bit XOR checksum in the monitor output. The checkum is appended to each scan preceded by a “*”. >mon 1450.132,14.543 * 2B 1451.122,15.133 * 29 set monitor format [columns | amlx] Set the monitor output format. See Appendix AML Oceanographic Ltd. 26 / 39... -
Page 27: Monitor Output
(Serial Number) dep (Calculated Depth) sal (Calculated Salinity) den (Calculated Density) sound (Calculated Sound Velocity) raw (Raw Values) Note: Calculated parameters will output -99.9999 if outside of the valid range of the calculation formula. AML Oceanographic Ltd. 27 / 39... -
Page 28: Uv Antifouling
Description display uv Print the current UV settings. set uv time <ontime> <offtime> Set the duty cycle of the UV lantern in seconds. Note: Setting UV time to 0 0 will disable light emission. AML Oceanographic Ltd. 28 / 39... -
Page 29: Help
SD card. secure on Enables the user to send “secure” commands. Secure mode is not persistent through multiple telnet sessions or a power cycle. AML Oceanographic Ltd. 29 / 39... - Page 30 Set the instrument’s idle timeout in minutes. If there is no user interaction and the instrument is idling, i.e. not streaming data, the instrument will power down after the set timeout. Setting the timeout to 0 disables this feature. AML Oceanographic Ltd. 30 / 39...
-
Page 31: Appendix B - Output Formats
6 Appendix B - Output Formats AML RTS series instruments support two monitoring formats: a column-based format whereby all transmitted data is organized into vertical columns, and a proprietary self-describing format referred to as AMLx. The commands to adjust monitor formats are described in 5.2 Monitor commands... - Page 32 Turbidity Dissolved Oxygen Dissolved Oxygen CDOM/FDOM Chloro-blue Chlorophyll, blue excitation Chloro-red Chlorophyll, red excitation Fluorescein Fluorescein dye Oil-crude Crude oil Oil-fine Fine oil Brighteners Optical brighteners Phycocyanin Phycocyanin (freshwater cyanobacteria) Phycoerythrin Phycoerythrin (marine cyanobacteria) AML Oceanographic Ltd. 32 / 39...
- Page 33 PTSA PTSA Rhodamine Rhodamine Tryptophan Tryptophan AML Oceanographic Ltd. 33 / 39...
-
Page 34: Appendix C - Calculated Parameters
C - conductivity, T- temperature, SV - sound velocity, P- pressure 1 - Instrument will report 0-90 PSU, however PSS-78 equation is valid only from 2-50 PSU. *Calculated salinity must be enabled for the calculated Sound Velocity to operate correctly AML Oceanographic Ltd. 34 / 39... -
Page 35: Appendix D - Equipping An Instrument
All AML-6 instruments come with either a stainless steel or copper sensor cage which is held in place by 6 screws. To remove the cage, use a 1/8” hex tool to remove the 6 screws holding the AML Oceanographic Ltd. 35 / 39... -
Page 36: X2Change™ Sensors
UV Antifouling system). Sensors are installed or removed by hand with no special tools required. Most combinations of X2Change™ sensors are permitted ( See notes on installing sensors ). The image below is the depiction of an AML-6 sensor end cap with the optional UV Antifouling port. AML Oceanographic Ltd. 36 / 39... -
Page 37: Removing Sensors
6. Screw down the orange locking sleeve until it stops. The bottom of the sleeve should be within 1 mm of the instrument end cap. Notes: ● X2Change™ sensors are identified by their orange locking sleeve matching AML-3 and AML-6's orange sensor ports. AML Oceanographic Ltd. 37 / 39... -
Page 38: Seals And Plugs
Before deployment, ensure that every empty X2Change™ sensor port is sealed with the X2Change™ Blanking Plug, and each MCBH is plugged with its dummy plug or cable. Contact AML Support to replace lost plugs or caps. AML Oceanographic Ltd. 38 / 39... -
Page 39: Appendix E - Warranty Statement
The warranty applies only to the original purchaser of the instruments and only to instruments and sensors manufactured by AML Oceanographic. The warranty of third party sensors will apply as per the specific vendor’s warranty policy. The warranty does not apply if the instrument has been damaged, by accident or misuse, and is void if repairs or modifications are made by other than authorized personnel.
Need help?
Do you have a question about the RTS Series and is the answer not in the manual?
Questions and answers