
Related Manuals for COMAC CS60 2016 B


Summary of Contents for COMAC CS60 2016 B
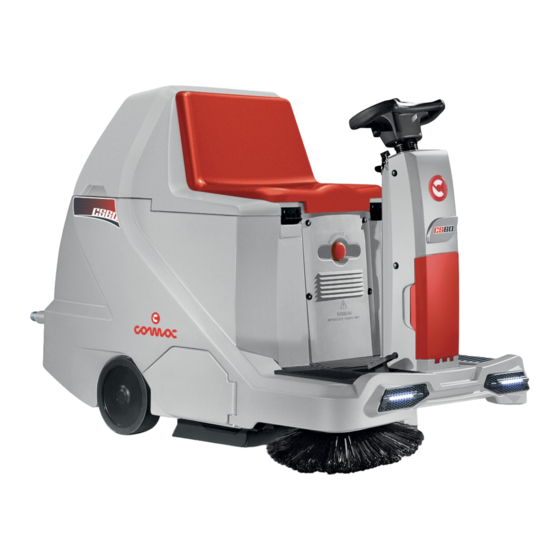
- Page 1 USE AND MAINTENANCE MANUAL CS60 2016 B CS60 2016 HYBRID ED. 07-2021 TRANSLATION OF THE ORIGINAL INSTRUCTIONS Doc. 10059344 Ver.
- Page 3 The descriptions contained in this document are not binding. The company therefore reserves the right to make any modifications at any time to parts, details or accessory supply, as considered necessary for reasons of improvement or for manufacturing/commercial requirements. The reproduction, even partial, of the text and drawings contained in this document is prohibited by law. The company reserves the right to make any technical and/or supply modifications.
-
Page 4: Table Of Contents
ONTENTS ON CONSIGNMENT OF THE MACHINE ............................................6 INTRODUCTORY COMMENT ................................................ 6 IDENTIFICATION DATA ................................................. 6 TECHNICAL DESCRIPTION ................................................6 INTENDED USE ....................................................6 SERIAL NUMBER PLATE ................................................6 TECHNICAL DESCRIPTION ................................................7 SYMBOLS USED ON THE MACHINE ............................................8 GENERAL SAFETY REGULATIONS ............................................ - Page 5 40. CENTRAL BRUSH FLAP ADJUSTMENT ..........................................41 41. CENTRAL BRUSH REPLACEMENT ............................................. 42 42. REPLACING THE SIDE BRUSH ............................................. 43 MAINTENANCE OF THE COMBUSTION ENGINE ....................................44 TROUBLESHOOTING ............................................45 43. THE MACHINE DOES NOT START ............................................45 44. THE COMBUSTION ENGINE DOES NOT START ......................................45 45.
-
Page 6: On Consignment Of The Machine
The CS60 2016 B is only suitable for use in closed, or at least covered, places. The CS60 2016 B and Cs60 2016 Hybrid machines are not suitable for use in rain or under jets of water. -
Page 7: Technical Description
CS60 2016 CS60 2016 B TECHNICAL DESCRIPTION HYBRID Working width without side brush Working width with right side brush Working width with left and right side brush 1000 1000 Working capacity, up to (2SL version with two side brushes) 5100 4600 ... -
Page 8: Symbols Used On The Machine
SYMBOLS USED ON THE MACHINE Main switch symbol (version B). Used on the steering column to indicate the key switch for machine operation on (I) or off (0). Main switch symbol (Hybrid version). Used on the steering column to indicate the key switch that manages the type of power supply of the machine. Alternator fault symbol (Hybrid version). - Page 9 SYMBOLS USED ON THE MACHINE Side brush/es movement symbol (idle position). Used on the rear of the steering column to indicate the movement lever of the side brush/es. Side brush/es movement symbol (working position). Used on the rear of the steering column to indicate the movement lever of the side brush/es. Combustion engine pull start symbol.
-
Page 10: General Safety Regulations
GENERAL SAFETY REGULATIONS Before using the machine, please read the following document carefully and follow the instructions contained herein, along with the instructions in the document supplied with the machine itself, "GENERAL SAFETY REGULATIONS" (document code 10083659). -
Page 11: Preparation Of Machine
The packages CANNOT be placed on top of each other. The total weight of the machine with its packaging is 210 kg (for CS60 2016 B versions) The total weight of the machine with its packaging is 290 kg (for CS60 2016 HYBRID versions) -
Page 12: Handlebar Control Components
PREPARATION OF MACHINE ATTENTION: With regard to the transport of a hybrid version machine, follow the instructions given in the user manual of the combustion engine (supplied with the machine). 4. HANDLEBAR CONTROL COMPONENTS The handlebar control components are identified as follows: Level indicator for battery/hour meter. -
Page 13: Front Components
PREPARATION OF MACHINE 8. FRONT COMPONENTS The front components of the machine are identified as follows: Storage compartment. Headlights. 9. SIDE COMPONENTS The components on the side of the machine are identified as follows: Left side panel central brush engage/adjustment. Seat unit lifting handle. -
Page 14: Battery Type (Hybrid Versions)
PREPARATION OF MACHINE 12. BATTERY TYPE (HYBRID VERSIONS) To power the machine, “double application” sealed batteries must be used, starter and total discharge OPTIMA BT DC 4.2 12 V 55 Ah. OTHER TYPES MUST NOT BE USED. The batteries must meet the requirements laid out in the norms: CEI EN 60254-1:2005-12 (CEI 21-5) + CEI EN 60254-2:2008-06 (CEI 21-7) The battery compartment can house two 12 V - 55 Ah batteries 13. -
Page 15: Fitting The Batteries Into The Machine (Hybrid Versions)
PREPARATION OF MACHINE Grasp the handle located on the side of the operator seat unit. Lift the operator seat unit until the safety clamp (3) is hooked. ATTENTION: Before installing the battery, clean the battery compartment with a damp cloth. Check that the connectors on the cables supplied are functioning correctly. ATTENTION: check that the characteristics of the battery that you are looking to use are appropriate for the type of work to be performed. -
Page 16: Connecting Batteries And Battery Connectors (B Versions)
PREPARATION OF MACHINE Grasp the handle located on the side of the operator seat unit. Lift the operator seat unit until the safety clamp (3) is hooked. Check that the motor switch is in the “0” position, if this is not the case, turn the handle by a quarter of a turn to the left, and remove the key from the instrument panel. -
Page 17: Connecting The Batteries And Battery Connector (Hybrid Versions)
PREPARATION OF MACHINE 17. CONNECTING THE BATTERIES AND BATTERY CONNECTOR (HYBRID VERSIONS) To connect the batteries proceed as follows: Using the appropriate tools, remove the screws (1) securing the plate (2) of the control board support. Remove the control board unit. Connect the batteries in series to the “+”... -
Page 18: Battery Charger Connection (B Versions With Bc)
PREPARATION OF MACHINE Connect the battery charger cable (6) to the battery connector (5). ATTENTION: Keep the seat unit open for the duration of the battery recharging cycle to allow gas fumes to escape. ATTENTION: the room used to recharge the batteries must be adequately ventilated to prevent the accumulation of gases that leak from batteries. - Page 19 PREPARATION OF MACHINE To connect the battery charger you must: Move the machine to the place used for maintenance or recharging the batteries. Make sure the electric brake is engaged, otherwise engage it using the lever (1) located at the left rear of the machine (working direction).
-
Page 20: Connecting The Battery Charger (Hybrid Versions)
PREPARATION OF MACHINE 20. CONNECTING THE BATTERY CHARGER (HYBRID VERSIONS) In order not to cause permanent damage to the batteries, it is essential they are fully charged using a suitable battery charger, after the non-use of the machine for a long period or after ten complete discharge cycles of the batteries. -
Page 21: Charge Level Indicator Of The Batteries (B Versions)
PREPARATION OF MACHINE ATTENTION: Danger of gas exhalation and leakage of corrosive liquids. ATTENTION: Danger of fire: keep naked flames at a safe distance. 10. After the recharge cycle has completed, disconnect the battery charger connector from the external battery charger. 11. -
Page 22: Blinking Light (Optional)
PREPARATION OF MACHINE 24. BLINKING LIGHT (OPTIONAL) The machine can be equipped with a blinking light that turns on automatically when the key in the main switch is turned on. 25. FILLING THE FUEL TANK (HYBRID VERSIONS) The machine is supplied without any fuel in the tank of the endothermic engine. To fill the tank, proceed as follows: Make sure the electric brake is engaged, otherwise engage it using the lever (1) located at the left rear of the machine (working direction). -
Page 23: Preparing To Work
PREPARING TO WORK 27. PREPARING TO WORK (B VERSIONS) Before beginning to work, it is necessary to: Ensure that the debris hopper is empty, otherwise empty it completely (see paragraph “EMPTYING THE DEBRIS HOPPER”). Check that the condition of the central brush is suitable for the work, otherwise arrange for its maintenance (see paragraph “CLEANING THE BRUSH CENTRAL”... -
Page 24: Preparing To Work (Hybrid Versions)
PREPARING TO WORK 28. PREPARING TO WORK (HYBRID VERSIONS) Before beginning to work, it is necessary to: Ensure that the debris hopper is empty, otherwise empty it completely (see paragraph “EMPTYING THE DEBRIS HOPPER”). Check that the condition of the central brush is suitable for the work, otherwise arrange for its maintenance (see paragraph “CLEANING THE BRUSH CENTRAL”... -
Page 25: Work
WORK 29. STARTING WORK (B VERSIONS) To start working, do as follows: Carry out all controls indicated in paragraph “PREPARING TO WORK (B VERSIONS)”. Sit on the driver’s seat. Turn the main switch key (1) clockwise by a quarter of a turn to position “I”. The control display on the instrument panel will immediately comes on. - Page 26 WORK If the machine does not move and the control display shows “ELECTRO-BRAKE?” the electric brake has to be engaged, using the lever on the rear left of the machine (work direction). To lower the right side brush (1SL versions) or both side brushes (2SL versions) simply turn the lever (4) clockwise.
-
Page 27: Starting Work (Hybrid Versions)
WORK 30. STARTING WORK (HYBRID VERSIONS) To start working in battery mode, proceed as follows: Carry out all controls indicated in paragraph “PREPARING TO WORK (HYBRID VERSIONS)”. Sit on the driver’s seat. Turn the key (1) of the main switch until it is in position “I”, in this case the type of power supply of the machine is battery-powered. - Page 28 WORK If the machine does not move and the control display shows “ELECTRO-BRAKE?” the lever on the rear left of the machine (work direction) is used to activate it. To lower the right side brush (1SL versions) or both side brushes (2SL versions) simply turn the lever (4) clockwise.
- Page 29 WORK ATTENTION: Use the machine until the battery is complete discharged. ATTENTION: Never leave the batteries completely discharged, even if the machine is not being used. ATTENTION: If the machine is not used for a long period of time, perform a complete charging cycle of batteries.
- Page 30 WORK Lower the central brush until it is in contact with the ground, rotating the lever (2) clockwise. Pressing the forward pedal (3), the machine will begin to move. As soon the forward pedal is pushed, the motor of the central brush and the vacuum motor will start working.
-
Page 31: Emergency Button
WORK In order to achieve a correct vacuum action, clean the filter every 10 minutes and always before any discharge of the debris hopper. To do this, proceed as follows: Lift the central brush by turning the left lever (2) clockwise. Lift the side brush if lowered, by rotating the right lever (4) clockwise. -
Page 32: Emptying The Debris Hopper
WORK 33. EMPTYING THE DEBRIS HOPPER The machine is NOT equipped with a device to warn you when the debris hopper is full, so it is a good idea to empty it frequently while working. In order to empty the debris hopper, proceed as follows: Stop the machine close to the place where the debris hopper is emptied. - Page 33 WORK 10. Turn the latches (5) to secure the debris hopper to the body, turn the left latch clockwise and the right latch counter-clockwise.
-
Page 34: At The End Of The Work
AT THE END OF THE WORK At the end of the work, and before carrying out any type of maintenance, perform the following operations: Stop the machine close to the place where the debris hopper is emptied. Lift the central brush by turning the lever (1) anti-clockwise. Lift the side brush if lowered, by rotating the lever (2) clockwise. - Page 35 AT THE END OF THE WORK 10. Turn the latches (5) to secure the debris hopper to the body, turn the left latch clockwise and the right latch counter-clockwise. 11. Turn the key (4) of the main switch to “I” or “II”, depending on the type of power source you want to use.
-
Page 36: Daily Maintenance
DAILY MAINTENANCE PERFORM ALL MAINTENANCE OPERATIONS IN SEQUENCE 34. CLEANING THE CENTRAL BRUSH Proceed as follows in order to clean the central brush: Make sure the electric brake is engaged, otherwise engage it using the lever located at the left rear of the machine (working direction). -
Page 37: Cleaning The Side Brush
DAILY MAINTENANCE 35. CLEANING THE SIDE BRUSH Proceed as follows in order to clean the side brush: Make sure the electric brake is engaged, otherwise engage it using the lever located at the left rear of the machine (working direction). Check the main switch (1) is in the “0”... -
Page 38: Weekly Maintenance
WEEKLY MAINTENANCE 36. CLEANING THE PANEL FILTER Whenever the vacuum action seems to be unsatisfactory, check that the vacuum filter is not obstructed. If necessary clean with an air jet as follows: Make sure the electric brake is engaged, otherwise engage it using the lever located at the left rear of the machine (working direction). -
Page 39: Cleaning The Fabric Filter (Optional)
WEEKLY MAINTENANCE 37. CLEANING THE FABRIC FILTER (OPTIONAL) Whenever the vacuum action seems to be unsatisfactory, check that the vacuum filter is not obstructed. If necessary clean with an air jet as follows: Make sure the electric brake is engaged, otherwise engage it using the lever located at the left rear of the machine (working direction). -
Page 40: Cleaning The Debris Hopper
WEEKLY MAINTENANCE 38.CLEANING THE DEBRIS HOPPER Clean the debris hopper every week as follows: Make sure the electric brake is engaged, otherwise engage it using the lever located at the left rear of the machine (working direction). Check the main switch (1) is in the “0” position, if this is not the case, turn the key by a quarter of a turn to the left, and remove the key from the instrument panel. -
Page 41: Emergency Maintenance
EMERGENCY MAINTENANCE 39. SIDE BRUSH ADJUSTMENT If the side brush does not channel the dirt efficiently towards the centre of the machine, you must adjust its height in relation to the ground, as follows: Make sure the electric brake is engaged, otherwise engage it using the lever located at the left rear of the machine (working direction). -
Page 42: Central Brush Replacement
EMERGENCY MAINTENANCE Open the left cover (3) (depending on the direction of travel). Make sure there is about 2 mm between the left flap (4) and the ground, otherwise loosen the nuts (5) and make the adjustment using the proper tool. ATTENTION: For the correct operation of the machine the distance of the flap from the ground must be even throughout its length. -
Page 43: Replacing The Side Brush
EMERGENCY MAINTENANCE Remove the knob (5) that secures the lifting arm of the brush, by turning it counter-clockwise. Remove the lifting arm (6) and the left side casing (7) of the brush. Remove the brush from the tunnel and replace it with the new one. Repeat the operations in reverse order to reassemble all the parts. -
Page 44: Maintenance Of The Combustion Engine
MAINTENANCE OF THE COMBUSTION ENGINE Good maintenance of the combustion engine is essential for the safe use of the machine, to do so proceed as follows: Make sure the electric brake is engaged, otherwise engage it using the lever located at the left rear of the machine (working direction). -
Page 45: Troubleshooting
TROUBLESHOOTING 43. THE MACHINE DOES NOT START Make sure that the key switch is turned to “I” or “II”, depending on the type of power source you want to use. Make sure the battery connector is connected to the connector of the machine system. Check that batteries are charged. -
Page 46: Disposal
DISPOSAL Dispose of the machine in accordance with the waste disposal regulations in force in the country in which the machine is being used. -
Page 47: Choosing And Using The Brushes
Type of bristles Bristles Br. Length Notes 437902 PPL + PPL + BRONZE 0.7 + 1.1 + // CENTRAL BRUSH CS60 2016 B – HYBRID 438621 TAMPICO BASSINE CENTRAL BRUSH 437874 SIDE BRUSH 437902 PPL + PPL + BRONZE 0.7 + 1.1 + //... -
Page 48: Ec Declaration Of Conformity
Comac S.p.A. Via Maestri del Lavoro, 13 37059 Santa Maria di Zevio (VR) declares under its sole responsibility that the products SWEEPING MACHINES mod. CS60 2016 B comply with the requirements of the following Directives: • 2006/42/EC: Machinery Directive. •... - Page 49 Comac S.p.A. Via Maestri del Lavoro, 13 37059 Santa Maria di Zevio (VR) declares under its sole responsibility that the products SWEEPING MACHINES mod. CS60 2016 B CB comply with the requirements of the following Directives: • 2006/42/EC: Machinery Directive. •...
- Page 50 The undersigned company: Comac S.p.A. Via Maestri del Lavoro, 13 37059 Santa Maria di Zevio (VR) declares under its sole responsibility that the products SWEEPING MACHINES mod. Cs60 2016 Hybrid comply with the provisions of Directives: • 2006/42 / EC: Machinery Directive.
- Page 51 Via Maestri del Lavoro, 13 37059 Santa Maria di Zevio (VR) declares under its sole responsibility that the products SWEEPING MACHINES mod. CS60 2016 B comply with the requirements of the following Directives: • Supply of Machinery (Safety) Regulations 2008.
- Page 52 Via Maestri del Lavoro, 13 37059 Santa Maria di Zevio (VR) declares under its sole responsibility that the products SWEEPING MACHINES mod. CS60 2016 B CB comply with the requirements of the following Directives: • Supply of Machinery (Safety) Regulations 2008.
- Page 53 The undersigned company: Comac S.p.A. Via Maestri del Lavoro, 13 37059 Santa Maria di Zevio (VR) declares under its sole responsibility that the products SWEEPING MACHINES mod. Cs60 2016 Hybrid comply with the provisions of Directives: • Supply of Machinery (Safety) Regulations 2008.
- Page 56 COMAC S.p.A. Via Maestri del Lavoro, n°13 37059 - S. Maria di Zevio (VR) - Verona - Italia Tel. 0039 045 8774222 Fax. 0039 045 8750303 E-mail: com@comac.it Web: www.comac.it...
Need help?
Do you have a question about the CS60 2016 B and is the answer not in the manual?
Questions and answers