Table of Contents
Advertisement
Quick Links
HUB USER MANUAL
Welcome to the RAINPOINT family! Please read the manual before
using to learn about the features and functions.
Have Questions?
Email: service@rainpointus.com
WEB: www.rainpointonline.com
WhatsApp: +1 626-780-5952
US Free Hotline(English): +1 833-381-5659
(MON-FRI 9:30 AM-5:30 PM PST)
EU Free Hotline(English Deutsch): +44 800-808-5337
(MON-FRI 9:00 AM-5:00 PM CET )
Smart Garden Irrigation System
SMART IRRIGATION HUB
HWG004
+
Advertisement
Table of Contents

Related Manuals for RainPoint HWG004


Summary of Contents for RainPoint HWG004
- Page 1 Smart Garden Irrigation System HUB USER MANUAL SMART IRRIGATION HUB HWG004 Welcome to the RAINPOINT family! Please read the manual before using to learn about the features and functions. Have Questions? Email: service@rainpointus.com WEB: www.rainpointonline.com WhatsApp: +1 626-780-5952 US Free Hotline(English): +1 833-381-5659...
-
Page 2: Table Of Contents
Contents 1. SMART SOCKET HUB HWG004 1.1 Product overview 1.2 Button Introduction 1.3 Specification 2. WORK ON APP 2.1 Download APP 2.1.1 Download 2.1.2 Before Connection 2.2 Connection 2.2.1 Smart WiFi Connection 2.2.2 AP Connection 2.3 APP Overview 2.3.1 APP Home Page 2.3.2 Plan Page... - Page 3 3.5 HCS021FRF Soil Moisture Sensor 3.6 HCS008FRF Water Flow Meter 4. TROUBLESHOOTING 5. NOTICE 6. WARRANTY POLICY 7. FCC STATEMENT 8. CUSTOMER SUPPORT...
-
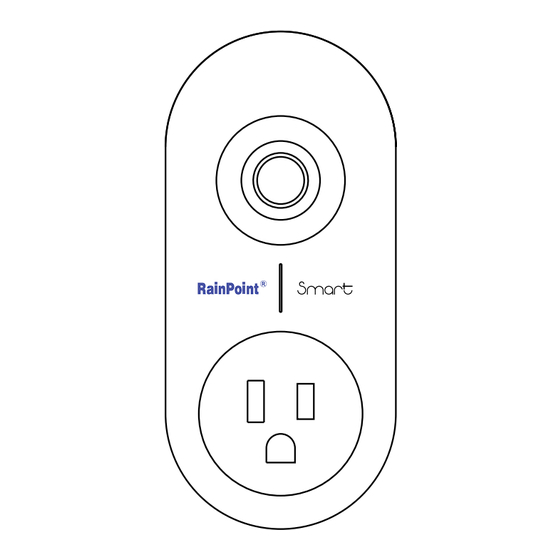
Page 4: Smart Socket Hub Hwg004
1. SMART SOCKET HUB HWG004 1.1 Product Overview Control Button Smart Socket 1.2 Button Introduction Control Button Hold the button for 5 sec to start Wi-Fi connection mode. Short press the button once to switch to AP connection mode, when the device is already in the connecting mode. -
Page 5: Specification
1.3 Specification Range Between WiFi Hub and Router: 160 ft in the open area without interference Temperature Operating Range: 3°C - 40°C (37°F-104°F ) WiFi Frequency Band: 2.4GHz Only Input: 100-240V ~ 50Hz 16A -02-... -
Page 6: Work On App
2. WORK ON APP 2.1 Download APP 2.1.1 Download HOMGAR APP downloads: or scan the QR code to download: Create an account and log in: Follow the instructions to sign up for your account or log in with your existing account and start matching devices! -03-... -
Page 7: Before Connection
2.1.2 Before Connection To assure your smart socket hub to connect to Wi-Fi, it will need to meet the following requirements: Please make sure your mobile device is connecting with 2.4GHz Wi-Fi before using HOMGAR app. The hub has to keep staying under 2.4GHz Wi-Fi to work normally. -
Page 8: Connection
2.2 Connection 2.2.1 Smart WiFi Connection Plug on the socket hub near the router and follow the steps below to connect: After register account and get " " into the APP page, find button on the top right corner of the APP’s Home Page. "... - Page 9 Follow the guide on the APP to press and hold the button on the socket hub for about 5 seconds until it quickly blinks. Select the check box and go " " Next to start searching devices. -06-...
- Page 10 When device found, please click “+” to add the device and edit the device name as your like. Congratulations! Now you successfully add the device to your APP. Tips: If you can't connect to the hub through the smart WiFi connection mode, please try the next AP connection mode or contact the customer support team.
-
Page 11: Ap Connection
2.2.2 AP Connection Plug on the socket hub near the router and follow the steps below to connect: After register account and get " " into the APP page, find button on the top right corner of the APP’s Home Page. "... - Page 12 • Click Switch Mode in the upper right corner to switch to AP Connection. Follow the guide on the APP to press and hold the button on the hub for about 5 seconds until it quickly blinks. And then short press the button again.
- Page 13 • Back to the app and click "Next" to continue adding devices automatically. •Congratulations! Now you successfully add the device to your APP. -10-...
-
Page 14: App Overview
2.3 APP Overview 2.3.1 APP Home Page Home Management: Set home name, location and other information to manage your home environment monitoring system more intelligent and accurate. All Devices: All added devices will be displayed here. Room Management: Related devices list of each room will be displayed here. -
Page 15: Plan Page
2.3.2 Plan Page List all of your irrigation plans that set on water timers. You can manually turn on or off the plan by the button on the right. There is also a manual Rain Delay button in each plan. It is available to check and edit the plans on the specific device plan page. -
Page 16: Me And Basic Settings
2.3.4 Me and Basic Settings Manage your account, home, basic settings, and other options. You can also find unit format and notification button in these settings. Notes: After the hub and sub-devices are connected, the selection of the sub-devices will be displayed on both the APP home page and the hub’s device page. -
Page 17: Device Settings
2.3.6 Device Settings In the device settings, there are any basic information of the socket hub and some default settings. Power On State: The socket default status when just plug on. Timing Settings: Auto and manual timing calibration. 2.3.7 Timer Setting Add a schedule to turn ON/OFF the smart socket with conditions like start time, repeat day, and... -
Page 18: Manual Switch
2.3.8 Manual Switch Manual switch for turn ON/OFF the smart socket. If you need more detail information about the operation, please scan the QR code or search the link to access the video to check the device quickly and easily. Setup Video:http://bit.ly/3kUaX9F -15-... -
Page 19: Basic Sub-Devices
3. BASIC SUB-DEVICES 3.1 How to Connect There are two ways you can connect the sub-devices: " " Add Device button on the top right corner of the APP home page "Sub-device" management in the hub’s device page -16-... -
Page 20: Htv113Frf
3.2 HTV113FRF Smart 1-Zone Water Timer Operation Button Battery Cover " " 1. Find 1-ZONE Water Timer or the icon to add HTV113FRF Smart 1-Zone Water Timer when adding sub-devices. 2. Inset the batteries, and then the indicator will quickly blink in "... -
Page 21: Htv213Frf
3.3 HTV213FRF Smart 2-Zone Water Timer Operation Button Battery Cover " " 1. Find 2-ZONE Water Timer or the icon to add HTV213FRF Smart 2-Zone Water Timer when adding sub-devices. 2. Inset the batteries, and then the indicator will quickly blink in red. At the same time, select "NEXT"... - Page 22 3.4 HCS014ARF Outdoor Thermo-Hygrometer Sensor " " 1. Find Air Humidity Sensor or the icon to add HCS014ARF Outdoor Thermo-Hygrometer Sensor when adding sub-devices. " " 2. Select Next and start searching devices. At the same time, insert the batteries, and then the red indicator will quickly blink once. Please make sure the APP is already in searching before power on the sensor.
-
Page 23: Hcs021Frf Soil Moisture Sensor
3.5 HCS021FRF Soil Moisture Sensor 1. Find"Soil Moisture Sensor"or the icon to add the sensor. 2. Inset the batteries, and then the indicator will quickly blink in red. At the same time, select"NEXT"on the APP and start searching devices. 3. Keep the sensor and the hub close to each other to connect automatically. ... -
Page 24: Hcs008Frf Water Flow Meter
3.6 HCS008FRF Water Flow Meter 1. Find"Flow Meter"or the icon to add the sensor. 2. Insert the batteries and the flow meter will get into the pairing mode automatically. At the same time, select"NEXT "on the APP and start searching devices. 3. -
Page 25: Troubleshooting
4. TROUBLESHOOTING Problems Solution 1. Please check if the router works normally. 2. If there is a power shot down and then recovery, and the router is back to work again, please reconnect the socket hub disconnection following the connection part of this manual. or offline 3. -
Page 26: Notice
Please clean the filter regularly and replace it if worn to prolong the timer's working life. 6. WARRANTY POLICY RAINPOINT provides a 3-year limited warranty on this product against manufacturing defects in materials and workmanship. -23-... -
Page 27: Fcc Statement
7. FCC STATEMENT (2AWDBHWG004WRF) This device complies with Part 15 of the FCC Rules. Operation is subject to the following two conditions: (1) This device may not cause harmful interference, and (2) this device must accept any interference received, including interference that may cause undesired operation. - Page 28 • Connect the equipment into an outlet on a circuit different from that to which the receiver is connected. • Consult the dealer or an experienced radio/TV technician for help. Note: The manufacturer is not responsible for any radio or TV interference caused by unauthorized modifications to this equip- ment.
-
Page 29: Customer Support
If you find it difficult to set up and want to watch the setting tutorial video, please subscribe to our channel: Rainpoint on YouTube. Please scan the QR code to visit the RainPoint channel on YouTube quickly. If the app and the user manual don’t have what you’re looking for, and you need some help, please prepare the Model NO.
Need help?
Do you have a question about the HWG004 and is the answer not in the manual?
Questions and answers