Advertisement
INTRODUCTION
Product Overview

Specification
- Waterproof Level: IPX5.
- Temperature Range: -4ºF-140ºF(-20ºC-60ºC).
- Humidity Range: 0%-100% RH
- Light Intensity: 0-200,000 lux
- Communicated by WI-FI 2.4GHz.
- Up to 60m depending on obstacle between hub and timer.
- Powered by 3* AA batteries (Not included).
Product Features
- Measures soil moisture (%) and surface temperature (℃/℉).
- Built in light sensor at the top to monitor light intensity.
- App remote controlled, easy to set up and operate.
- Pair with water timers, efficient and accurate irrigation.
- Appropriate and modern mold design, accurate measurement.
- Use for outdoor gardening, learn more about areas of soil information.
CONNECTION AND INSTALLATION
Tips:
Please scan the QR code or search the link to access the video to connect the device quickly and easily.
Set Video:
https://www.youtube.com/watch?v=dWm60HTqo4M

Sensor Connection
This device is a sub-device, please connect the hub of Rainpoint Smart+ series before connecting this device.
- Select the
![]() button on the top right corner of the APP home page to add device, or you can go to the hub's home page and use "Sub-devices" to add devices.
button on the top right corner of the APP home page to add device, or you can go to the hub's home page and use "Sub-devices" to add devices.
![]()
![]()
- Find "Soil Moisture Sensor" or the icon
![]() to add the sensor.
to add the sensor.
![]()
- Inset the batteries, and then the indicator will quickly blink in red
Tips: Use the tool to unscrew the four screws of the back cover

- Keep the sensor and the hub close to each other to connect automatically.
![]()
- Besides that, you can also hold the button to reset and reconnect if you fail to connect for the first time.
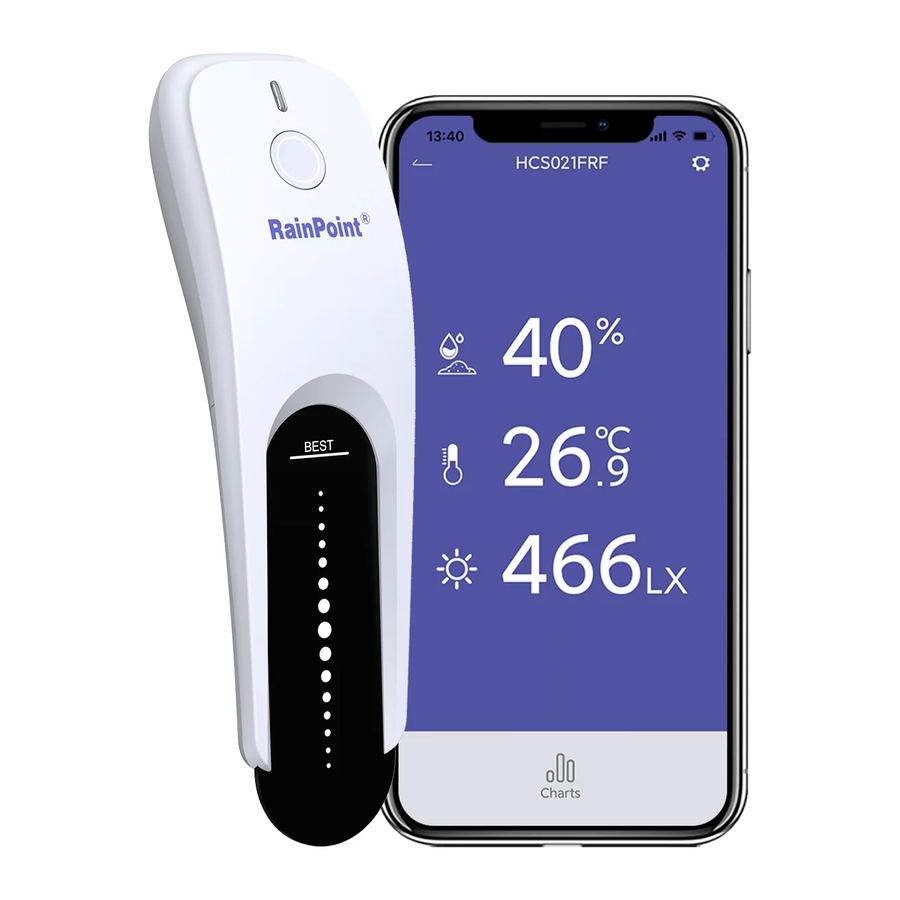
- After successfully connecting, the real-time surface temperature, soil moisture, and light intensity will display on the device home page.
![]()


 to add the sensor.


Sensor Installation
- Insert the batteries and tighten the screw.

- Dig an appropriate hole that can completely bury the soil probe.

- Bury the sensor in the soil and ensure that the sensor is vertically downward.

Tip: For accuracy, make sure that the part of the soil probe marked below "BEST" is buried in the soil.


APP FEATURES AND FUNCTIONS
Device Home Page

- Surface Temperature
- Soil Moisture
- Light Intensity
- Setting: Basic settings for the sensor.
- Charts: Check the past 24 hours, and 10 days' historical temperature, moisture, and light intensity.
Basic Setting
Find the icon ![]() on the top right corner of the APP home page to"Settings"page. In the basic settings, you can check and manage the device information, such as name, interface and description.
on the top right corner of the APP home page to"Settings"page. In the basic settings, you can check and manage the device information, such as name, interface and description.

Charts
Select Charts to review your soil moisture, surface temperature, and light intensity in the past 24 hours, and 10 days in a line graph. Press the top right corner to switch moisture, temperature, and light intensity.

If you need more detail information about the operation, please scan the QR code or search the link to access the video to check the device quickly and easily.
Setup Video: http://bit.ly/3jlwZle

TROUBLESHOOTING
| Problem | Possible Factors | Solution may help |
| Fail to connect with the hub |
|
|
| Lose connection or get offline on the APP |
|
|
| Data inaccurate or incorrect | Stones around the sensor. | Please make sure no stones around the sensor while bury it to avoid stones affect accuracy. |
| If you need more help about the product or anything from us, please contact us by US: 1-833-381-5659 (EN)(MON-FRI 9:30 AM-5:30 PM PST) EU: +44 800-808-5337 (EN DE)(MON-FRI 9:00 AM-5:00 PM CET) Email: service@rainpointus.com | ||
 Web: www.rainpointonline.com
 Email: service@rainpointus.com
 WhatsApp: +1 626-780-5952
 US Free Hotline(English): +1 833-381-5659 (MON-FRI 9:30 AM-5:30 PM PST)
EU Free Hotline(English Deutsch): +44 800-808-5337 (MON-FRI 9:00 AM-5:00 PM CET )

Documents / Resources
References
![www.youtube.com]() #RainPoint | How to setup the Smart Garden Soil Moisture Sensor .#MoreThanWaterSaving - YouTube
#RainPoint | How to setup the Smart Garden Soil Moisture Sensor .#MoreThanWaterSaving - YouTube![bit.ly]() 【HCS021】Soil & Sunlight Sensor Setup Guideline - YouTube
【HCS021】Soil & Sunlight Sensor Setup Guideline - YouTube![www.rainpointonline.com]() Smart Watering, Sprinkler & Drip Systems
Smart Watering, Sprinkler & Drip Systems
Download manual
Here you can download full pdf version of manual, it may contain additional safety instructions, warranty information, FCC rules, etc.
Download RainPoint Smart+ HCS021 - Soil Moisture Sensor Manual
Advertisement


Need help?
Do you have a question about the Smart+ HCS021 and is the answer not in the manual?
Questions and answers