Advertisement
CONTENTS
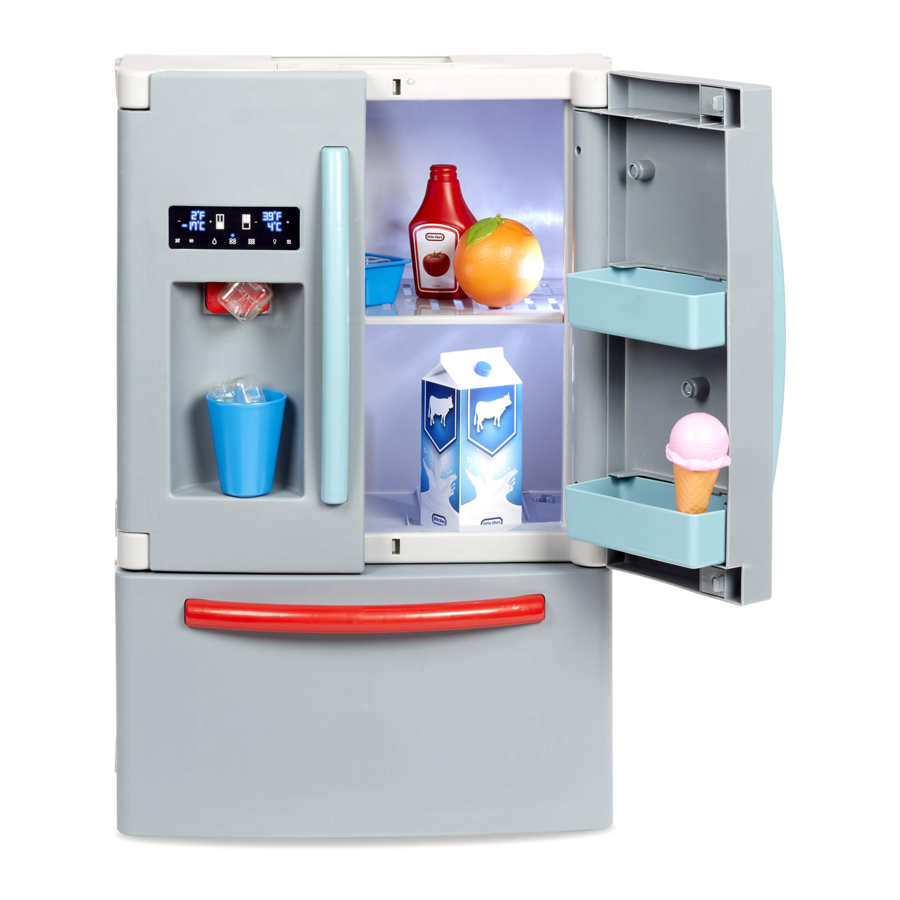
- 1 Little Tikes® First Fridge
![]()
- 1 Bottom Freezer (2 Parts)
![]()
- 1 Shelf
![]()
- 2 Trays
![]()


- 1 Cup
![]()
- 1 Orange
![]()
- 1 Ice Cube Tray
![]()


- 4 Ice Cubes
![]()
- 1 Ice Cream Cone
![]()
- 1 Milk Carton
![]()


- 1 Ketchup Bottle
![]()
- 16 Screws
![]()
- 2 Round Connectors
![]()
- 2 Square Connectors
![]()


NOTES:
- Make sure to remove and discard all tape and packaging material before beginning.
- The unit comes with 16 screws, but only 15 are needed for assembly.
Illustrations are for reference only. Styles may vary from actual contents.
REPLACING THE BATTERIES
The batteries included are for in-store demonstration. It is recommended that, prior to playing, an adult installs fresh alkaline batteries. Here's how:

- Using a Phillips screwdriver (not included) remove the screw and battery compartment cover on top of the fridge.
- Install three (3) 1.5V AA (LR6) alkaline batteries (not included) making sure the (+) and (-) ends face the proper direction as indicated inside the battery compartment.
- Replace the compartment cover and tighten the screw.
ASSEMBLY
- Open the fridge's doors and push in the back wall.
![]()
- Align the openings on the sides.

- Insert three screws on each side. Make sure the screw enters both openings. Then, turn the screw to lock in place.

- Angle the shelf and, using some force, slide it into the fridge. Then, straighten it and place on top of the brackets. For best results, make sure the corner of the shelf is as close as possible to the corner of the fridge and the shelf is above the brackets.

- Pull out the drawer from the bottom freezer and set aside. Then, push in the back wall until the openings on the side and the one on the bottom align. Insert ve screws through the openings and turn to lock in place.

- Snap the connectors into the openings on top of the bottom freezer.

- Attach the fridge to the bottom freezer by inserting the connectors into the openings under the fridge.
Assembly Tip: Open the fridge's doors for a better view of the openings' locations.

- Pull out the back wall of the drawer and align the openings. Insert four screws and turn to lock in place.

- Insert the drawer into the bottom freezer.

- Slide the trays into the brackets on the fridge's door. Trays will snap in place.

- Display your own notes or photos. Pinch the top of clips to open and insert a note or photo into the clip.


USING THE FRIDGE
- Before beginning, move the switch on top of the fridge from Try Me (X) to the ON (I) position (Fig. 1). The unit will make refrigerator sounds. Always turn the unit OFF (O) after use to conserve battery power.

- Open the fridge's doors. The light inside will turn on when the refrigerator is open. Insert the ice cubes into the slot on the back of the door (Fig. 2). Then, close the door.
![]()
- Use the cup to press and hold the red button on the front of the door and the ice cubes will fall (Fig. 3). The unit will make ice sounds.
![]()


- Clean accessories thoroughly before use. Only use a damp cloth to clean the unit. Keep water away from the battery compartment.
- Product will go into sleep mode after 30 seconds of no activity. Press the button on the front or open the door to turn it back on.
- Only use the items included. Do not use real food or real ice cubes with the fridge or accessories.
- If the fridge's doors detach from the hinges, replace it into the hinges and close the door.
BATTERY SAFETY INFORMATION
- Use only size "AA" (LR6) alkaline batteries (3 required).
- Charging of rechargeable batteries should only be done under adult supervision.
- Remove rechargeable batteries from the product before recharging.
- Do not mix old and new batteries.
- Do not mix alkaline, standard (carbon-zinc), or rechargeable batteries.
- Be sure to insert the batteries correctly and follow the toy and battery manufacturer's instruction.
- Always remove exhausted or dead batteries from the product.
- Dispose of dead batteries properly: do not burn or bury them.
- Do not attempt to recharge non-rechargeable batteries.
- Avoid short-circuiting battery terminals.
- Remove batteries before placing the unit into storage for a prolonged period of time.
Please keep this manual as it contains important information.
© The Little Tikes Company, an MGA Entertainment company. LITTLE TIKES® is a trademark of Little Tikes in the U.S. and other countries. All logos, names, characters, likenesses, images, slogans, and packaging appearance are the property of Little Tikes.
www.littletikes.com
www.littletikes.co.uk
www.littletikes.com.au
Little Tikes Consumer Service
2180 Barlow Road Hudson, Ohio 44236 U.S.A.
1-800-321-0183
MGA Entertainment UK Ltd.
50 Presley Way, Crownhill, Milton Keynes, MK8 0ES, Bucks, UK
0800 521 558
MGA Entertainment (Netherlands) B.V.
Baronie 68-70, 2404XG Alphen a/d Rijn, The Netherlands
Tel: +31 (0) 172 758038
E-mail: klantenservice@mgae.com
Imported by MGA Entertainment Australia Pty Ltd
Suite 2.02, 32 Delhi Road
Macquarie Park NSW 2113
1300 059 676

Documents / Resources
References
![www.littletikes.com]() Official Little Tikes Website | Parent Trusted for Over 50 Years
Official Little Tikes Website | Parent Trusted for Over 50 Years![www.littletikes.co.uk]() Official Home of Little Tikes UK
Official Home of Little Tikes UK![www.littletikes.com.au]() Little Tikes | Fun & Learning Toys For All Ages - Australia
Little Tikes | Fun & Learning Toys For All Ages - Australia
Download manual
Here you can download full pdf version of manual, it may contain additional safety instructions, warranty information, FCC rules, etc.
Download Little Tikes First FRIDGE - Realistic Refrigerator Toy Instructions Manual
Advertisement


Need help?
Do you have a question about the First FRIDGE and is the answer not in the manual?
Questions and answers