
Related Manuals for XFit STUDIO


Summary of Contents for XFit STUDIO
- Page 1 Magnetic Bike User’s Manual * Product specifications may differ from the photo and are subject to change without notice.
- Page 3 Precautions Read all the instructions in this manual and do warm up exercises before using this equipment. This upright bike is home stationary fitness equipment and aerobic training equipment that can help you to develop your cardiovascular function. Please make sure all parts are not damaged and well fixed before use. The equipment should be placed on a flat surface when using.
-
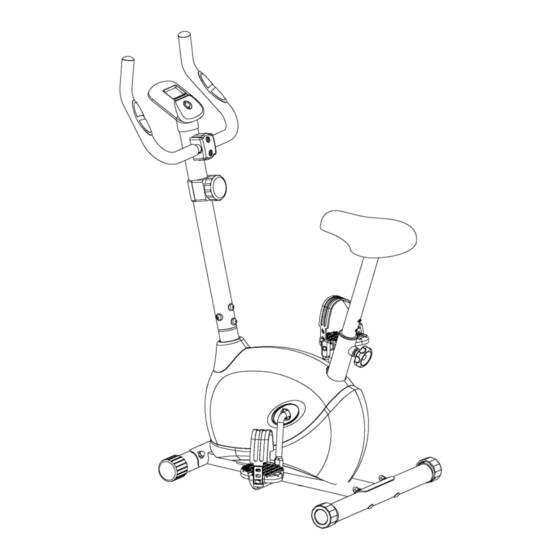
Page 4: Exploded Diagram
Exploded Diagram... -
Page 5: Parts List
Parts List Description Description Main frame Connective wire Front stabilizer Allen bolt Rear stabilizer Tension control Handlebar post Tension control cover Handlebar Washer Saddle post Screw Saddle Pulse wire Computer Spring washer 9L/R Pedal 1 each Bolt Crank Handlebar clamp Front stabilizer end cap Foam grip Rear stabilizer end cap... - Page 6 Assembly Instructions Note: Assembly requires 2 people. Attention: Please follow these assembly instructions step by step to assemble this upright bike. 1. Install the Front and Rear Stabilizers Fix the front stabilizer (2) and rear stabilizer (3) to the main frame (1) with the carriage bolt (13), arc washer (14) and cap nut (15).
- Page 7 4. Install the computer Open the battery cover and install two "AA" or "UM-3" batteries into the battery compartment on the back of Computer (8). Put the connective wire (18) and pulse wire (24) through the computer bracket (30). Connect the pulse wires (24) and connective wire (18) to the wires that come from the computer (8), and then fix the computer bracket (30) on the handlebar post (4).
-
Page 8: Maintenance And Treatment
6. Install the Right and Left Pedals Attach the right and left pedals (9L/R) to the crank (10) respectively. The right pedal (9R) should be threaded clockwise. The left pedal (9L) should be threaded counterclockwise. NOTE: The right and left Pedals (9L/R) are marked “R” for right & “L” for left. Maintenance and Treatment Verify that all the bolts and nuts are locked properly, and the turning parts should be turned freely without damaged parts. -
Page 9: Console Instructions
Console Instructions FUNCTION MARK: A: Auto Scan O: Odometer S: Current Speed C: Calorie Consumption D: Trip Distance ♥ : Pulse Rate T: Elapsed Time HOW TO REMOVE BATTERY: 1. Pull off the battery cover and place two of SIZE-AA or UM-3 or SIZE-AAA (UM-4) batteries into battery housing on back of monitor, please refer to below illustrations. -
Page 10: Specifications
palms of your hands on both of your current heartbeat rate in beats per minute (BPM) on the LCD after 4-5 seconds. Reset Pressing the button for more than 3 seconds will reset all functional values to zero except Odometer. SPECIFICATIONS: Auto Scan Every 6 seconds... -
Page 11: Warm-Up Phase
Using your bike Using your bike will provide you with several benefits. It will improve your physical fitness, tone your muscles and in conjunction with a calorie-controlled diet, help you lose weight. WARM-UP PHASE The purpose of warming up is to prepare your body for exercise and to minimize injuries. Warm up for two to five minutes before strength-training or aerobic exercising. -
Page 12: Exercise Phase
EXERCISE PHASE This is the stage where you put the effort in. After regular use, the muscles in your legs will become more flexible. Work at your own pace and be sure to maintain a steady tempo throughout. The rate of work should be sufficient to raise your heartbeat into the target zone shown on the graph below. -
Page 13: Terms Of Warranty
TERMS OF WARRANTY • Warranty period is 1 years for mechanical, electrical / electronic parts and 5 years for the metal frame. • X-TREME STORES S.A. undertakes to repair the machine free of charge in the event of damage due solely to a manufacturing fault. The warranty covers the cost of the spare parts. Replacement of spare parts or not is up to the company technicians. - Page 14 NOTES...
- Page 16 34 koupi Avenue, Koropi P.C.:19441 - P.O. Box 6201 Tel.: 210 66 20 921 -2 - Fax: 210 66 20 923 E-mail: info@xtr.gr • f/xtrstores • /@xtr.gr Tel. for all of Greece: 801.11.15.100 www.xtr.gr...
Need help?
Do you have a question about the STUDIO and is the answer not in the manual?
Questions and answers