
Related Manuals for XFit DIAMOND


Summary of Contents for XFit DIAMOND
- Page 1 MAGNETIC BIKE Owner’s Manual *The specifications of this product may vary slightly from the illustrations and are subject to change without notice.
- Page 2 - 1 -...
-
Page 3: Important Safety Notice
IMPORTANT SAFETY NOTICE 1) Read all the instructions in this manual and do warm up exercises before using this equipment. 2) This upright bike is home stationary fitness equipment, and aerobic training equipment that can help you to develop your cardiovascular function. 3) Please make sure all parts are not damaged and fixed well before use. -
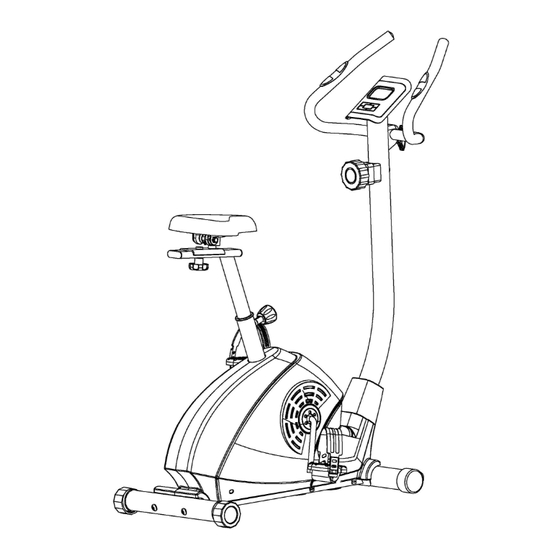
Page 4: Exploded Diagram
EXPLODED DIAGRAM SPECIFICATIONS Maximum user weight: 100 kg Machine weight: 26 kg Disc weight: 6 kg Dimensions: L: 102 cm x W: 47 cm x H: 131 cm Maximum user weight: On handles - 3 -... -
Page 5: Parts List
PARTS LIST Part No. Description Part No. Description Main frame Front stabilizer Screw M5×10 Crank Extension sensor wire 22L/R Pedal 1pr. Pulse sensor wire Saddle post bushing Saddle Flat washer D5 Adjustable plate Flat washer D10 Handlebar Rear end cap Flat washer D8 Rear stabilizer Spacer bush... - Page 6 STEP 1 Respectively fix the Front stabilizer (20) and Rear stabilizer (27) onto the main frame (1) with the Screws (28) and Arc washers (19). STEP 2 Attach the pedals (22L/R) to the crank (21) respectively. Tighten left pedal (22L) Note: COUNTERCLOCKWISE direction and right pedal (22R) in the CLOCKWISE direction.
- Page 7 STEP 4 1. Put the Protective guard (15) into the Handlebar post (12). 2. Connect the Extension sensor wire (3) and Sensor wire (16) well, and then connect the Tension control cable (37) and Tension control (36) as figure A shown. Finally, fix the handlebar post (12) onto the post of main frame (1) with Screw (14) and Arc washer (13).
- Page 8 STEP 5 Put the pulse sensor wires (4) through the handlebar post (12) and out of the computer bracket on the top. Then put Screw (11) through the Handlebar clamp (10), Spacer bush (9) and Flat washer (8) to fix the handlebar (7) onto the handlebar post (12). STEP 6 First, respectively connect the Extension sensor wire (3) and Pulse sensor wire (4) to the wires from the meter (17), and then install the meter (17) onto the meter bracket on the top...
-
Page 9: Maintenance And Treatment
MAINTENANCE AND TREATMENT Verify that all the bolts and nuts are locked properly, and the turning parts should be turned freely without damaged parts. Clean the equipment with soap and slightly damp cloth only. Please do not use any solvent to clean the equipment. Check and tighten the screws at regular intervals, as they may loosen due to vibrations. - Page 10 MONITOR INSTRUCTIOS WITH BODYFAT & PULSE RECOVERY INSTRUCTION BUTTONS 1. MODE Press this button to changeover display or choose the window needs to be set. 2. RECOVERY / UP TIME, DIST, CAL and TEMP (℃ or ℉) In setting status, press this button to increase setting value in relevant flashing window for In non-exercise or non-setting status, press this button to enter/exit pulse recovery function.
- Page 11 5. PULSE Hold the pulse sensor and read your heart rate per minute. The range is 40 ~ 240bpm. It will display “P” to pause the pulse test if there is no pulse signal over 60 seconds. You can press UP or DOWN to enter the pulse test again. WHEEL DIAMETER The wheel perimeter has been set according to client’s requirements.
-
Page 12: Warm-Up And Cool-Down
BODYFAT CONTRAST Gender/Age Underweight Healthy Slightly Overweight Overweight Obese Male/ ≤ 30 < 14% 14%~20% 20.1%~25% 25.1%~35% > 35% Male/ > 30 < 17% 17%~23% 23.1%~28% 28.1%~38% > 38% Female/≤ 30 < 17% 17%~24% 24.1%~30% 30.1%~40% > 40% Female/ > 30 <... - Page 13 Head Roll Rotate your head to the right for one count, feeling the stretch up the left side of your neck. Next, rotate your head back for one count, stretching your chin to the ceiling and letting your mouth open. Rotate your head to the left for one count, and finally, drop your head to your chest for one count.
- Page 14 TERMS OF WARRANTY • Warranty period is 2 years for mechanical, electrical / electronic parts and 5 years for the metal frame. • X-TREME STORES S.A. undertakes to repair the machine free of charge in the event of damage due solely to a manufacturing fault.
- Page 15 - 14 -...
- Page 16 34 koupi Avenue, Koropi P.C.:19441 - P.O. Box 6201 Tel.: 210 66 20 921 -2 - Fax: 210 66 20 923 E-mail: info@xtr.gr • f/xtrstores • /@xtr.gr Tel. for all of Greece: 801.11.15.100 www.xtr.gr - 15 -...
Need help?
Do you have a question about the DIAMOND and is the answer not in the manual?
Questions and answers