
Related Manuals for XFit MOUNTAIN


Summary of Contents for XFit MOUNTAIN
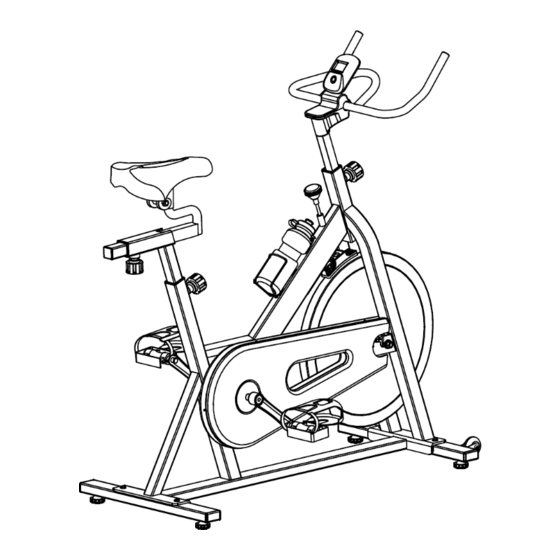
- Page 1 Speeding Bike User’s Manual The specifications of this product may vary from this photo and are subject to change without notice.
-
Page 3: Important Safety Notice
IMPORTANT SAFETY NOTICE Note the following precautions before assembling and operating the machine. 1. Once fully assembled, please check that all hardware parts such as bolts, nuts and washers are positioned and secured firmly. 2. Please check regularly that the safety chain guard that protects the moving parts of the machine is secured and in good order. - Page 4 EXPLOSIVE DIAGRAM...
-
Page 5: Parts List
PARTS LIST Part Part Description Description Hex nut Main frame Front Computer stabilizer bracket Water Rear bottle stabilizer holder Handlebar Foam grip Seat post Seat slider Allen bolt Spring Saddle washer Pop-pin Handleba knob r cover Handleba Pedal r post 10L/ Phillips Crank... - Page 6 All Hardware is attached to the bike. NOTE: Most of the listed assembly hardware has been packaged separately, but some hardware items have been preinstalled in the identified assembly parts. In these instances, simply remove and reinstall the hardware as assembly is required.
- Page 7 Step B: Attach the Handlebar (4) to the Handlebar post (26), secured with Allen bolts (23) , Spring washers (24) ,Computer bracket (19) and Flat washer(13). Slide the Lower cover (25B) to the Handlebar post(26), use Phillips screw (27) to fit the Upper cover (25A) between handlebar(4) and handlebar post(26), Turn and loosen the Knob (8), pull the pin, and then insert...
- Page 8 Step C: Fix Saddle (7) to Seat slider (6) with multifunctional wrench tightly . Adjust the Seat slider (6) to a proper position and then lock it on Seat post (5) with Pop-pin knob (8). Insert Seat post (5) to Main frame(1) in a proper high position and then tighten with Pop-pin knob (8).
- Page 9 Step D: Attach the Pedals (9L/R) to the Cranks (10L/R) respectively, viewed from the rider’s seated position. Note: Both pedals are labeled L FOR LEFT and R FOR RIGHT. Turn left pedal COUNTERCLOCKWISE right pedal CLOCKWISE. Before exercising, the paddle should be tighten or the thread of paddle will be damaged easily.
- Page 10 Step E: Insert sensor wire (17) to Computer (31), then insert Computer (31) to computer bracket (19). Attach the Water bottle holder (20) to the main frame(1) with the Screws (32) and Flat washer (33) and then put on t Water bottle (34).
- Page 13 TERMS OF WARRANTY Warranty period is 2 years for mechanical, electrical / electronic parts and 5 years for the • metal frame. • X-TREME STORES S.A. undertakes to repair the machine free of charge in the event of damage due solely to a manufacturing fault. The warranty covers the cost of the spare parts.
- Page 14 CAUTION! The company does not have no responsibility for causing damage due to misuse of the product and non-compliance with the instructions for use. THE WARRANTY IS NOT VALID IF: The machine is placed outdoors or exposed to sun and dust CAUTION! During exercise, heavy sweating can cause mechanical and electrical damage to the machine.
- Page 16 34 koupi Avenue, Koropi P.C.:19441 - P.O. Box 6201 Tel.: 210 66 20 921 -2 - Fax: 210 66 20 923 E-mail: info@xtr.gr • f/xtrstores • /@xtr.gr Tel. for all of Greece: 801.11.15.100 www.xtr.gr...
Need help?
Do you have a question about the MOUNTAIN and is the answer not in the manual?
Questions and answers