Advertisement
Apex 400 Hydraulic Press
Quick Set Up Guide
To begin, make sure the Apex 400 set up correctly and the entire manual is
available. You can scan the QR code to access our detailed guide or following the
link:
https:/ /specac.com/apex-400-manual
Dimensions:
CAUTION! The Apex 400 press weighs 120kg, so care must be taken to transport it correctly. Please keep all press
packing materials for future transportation, if needed. This will protect you and the press from accident or injury
1
Unpacking and installation:
The Apex 400 press is shipped in a wooden crate with
a special pallet base.
•
Loosen the screws and lift away the top and sides of the crate.
•
Locate the lifting "eye bolt (p1)" which is affixed to the bottom
of the pallet and screw it into the hole on the top of the press.
•
After removing the top and sides of the crate, use a crane or
hoist fitted with a lifting hook to lift the press from the pallet
(p2). For example, an Engine Hoist or Powered hand truck can
be used. Either transfer directly to the workbench or onto a
scissor lift trolley for transportation to the work site.
CAUTION: DO NOT ATTEMPT TO LIFT THE PRESS BY ANY OTHER METHOD. DO NOT USE A PIPE OR BAR THROUGH THE
LIFTING EYE. DO NOT USE THE HANDLE ON THE FRONT TO LIFT THE PRESS.
•
The press should be installed on a stable and level bench worktop, with a minimum thickness of 25m. An ordinary
electrical consumer outlet is required nearby to provide power to the press.
2
Initial Setup
•
Connect the supplier mains lead and flip the switch on the rear to its "on" position - red ring on the power button (p3).
•
Then press the power on/off button on the lower right of the front panel to power up the press.
•
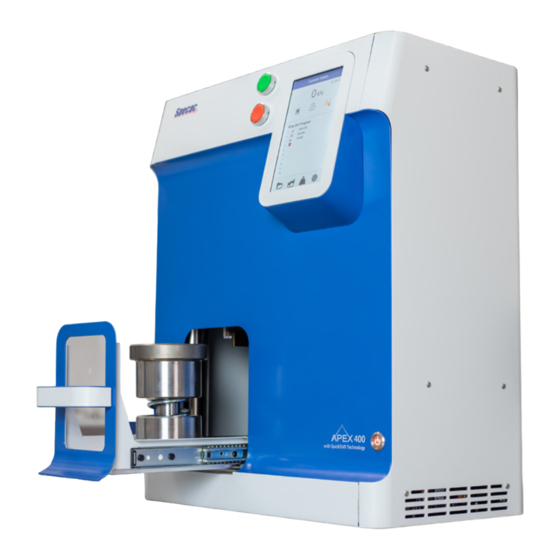
Open the drawer and insert the pellet die (p4). The pellet die can be stored inside the press and does not need to be removed
unless for cleaning.
Start Bu�on
Stop Bu�on
Touchscreen Display
Sample Die Drawer
Power - On/Off bu�on
https:/ /specac.com/product/apex-400-press/
W 462 mm x D 346 mm x H 573 mm (W 18.2" x D 13.6" x H 22.5")
Appliance Label and
Serial Number
Lifting Eye Bolt
Screw into top
of press
p1
Cooling Vent
Dust Flap
USB A – for so�ware updates
Power Lead
Fuse Box
Connec�on
p3: power on
Rear Power
switch
p2: example tools
Die Cap (10)
p4: pellet die
Die Holder (6)
Advertisement
Table of Contents

Subscribe to Our Youtube Channel
Related Manuals for Specac Apex 400


Summary of Contents for Specac Apex 400
- Page 1 W 462 mm x D 346 mm x H 573 mm (W 18.2" x D 13.6" x H 22.5") CAUTION! The Apex 400 press weighs 120kg, so care must be taken to transport it correctly. Please keep all press packing materials for future transportation, if needed. This will protect you and the press from accident or injury...
- Page 2 7. Remove cap 6. Open drawer The Apex 400 press can apply a load by running program which can be loaded from the Directory. The press is configured with a couple of starter programs, but more can be added by the user.
Need help?
Do you have a question about the Apex 400 and is the answer not in the manual?
Questions and answers