Table of Contents
Advertisement
Advertisement
Table of Contents

Related Manuals for Specac Atlas Automatic 40 Ton


Summary of Contents for Specac Atlas Automatic 40 Ton
- Page 1 Atlas™ Automatic 40 Ton (40T) Hydraulic Press User Manual 2I-25470-4...
- Page 3 Atlas™ Automatic 40 Ton (40T) Hydraulic Press User Manual 2I-25470-4...
- Page 4 User Manual Specac manufactures and stocks a full range of IR sampling accessories for solids, liquids and gases and optical components. We design and manufacture fully integrated sampling solutions for the laboratory, at line and in-line process measurement, to cope with extremes of temperature from –190ºC to +800ºC, pressures...
-
Page 5: Table Of Contents
......62 PECIFICATIONS OF TLAS RESS 13. EC D ..........63 ECLARATION ONFORMITY © April 2016 Specac Ltd. All rights reserved. Brilliant Spectroscopy is a trademark of Specac Ltd. Other product names mentioned herein may be trademarks of their respective owners. -
Page 6: Introduction
40 tons maximum. The press is specifically suited to the preparation of solid sample discs using Specac evacuable pellet die assemblies, but it may also be adapted to provide heated pressing surfaces by installation of Specac Atlas™... - Page 7 The symbol (above) on the back of the press indicates that this product complies with the Waste Electrical and Electronic Equipment Directive (WEEE). If this product is in use and was purchased within the European Union, please contact your local sales agent or Specac to make arrangements for disposal of this equipment.
-
Page 8: And Installation
User Manual 2. Unpacking, Checking and Installation Beware: The Atlas™ Auto 40T press is very heavy and care must be taken to transport it correctly. Please keep the press packing materials for future transportation by reversing the following procedure. This will protect you and the press from accident or injury. - Page 9 Atlas™ Auto 40T Hydraulic Press Remove the 8 coach bolt (nuts & washers) and blocks securing the 2 retaining timber ribs. Take out the 2 ribs. Remove the 4 screws securing the 50mm x 50mm timber on the inside. Remove the 50mm x 50mm timber by “knocking”...
- Page 10 User Manual the handle to gain access to the internal pressing area. Remove the packing inside. Using a suitable bar and appropriate spanner undo the eye bolt from the eye bolt assembly of parts. Some force may be needed initially to overcome the thread-locking sealant that is used to ensure the parts do not undo in transit.
- Page 11 Replacing an Atlas™ Auto 40T press in its packaging is the reverse of the procedure described previously. For any inquiries to Specac regarding the Atlas™ Auto 40T press, the serial number must be quoted. The serial number is a five digit number...
-
Page 12: Unpacking Checking
User Manual 3. General Safety Specac recommends that certain safety precautions should be followed for any operational procedure of the Atlas™ Auto T40 press. The press is very heavy and it should only be lifted using suitable equipment and moved in a safe manner. -
Page 13: Electrical Safety
Atlas™ Auto 40T Hydraulic Press Electrical Safety • Check that the input voltage (230v, 110v or 100v) and frequency 50Hz or 60Hz) printed on the appliance label at the back of your press is compatible with your AC mains voltage. •... - Page 14 If the safety guard shows any visible signs of damage (marks, scratches etc), these may impair its effective performance for safe containment. Specac recommends that the safety guard is replaced if damaged to conform to the correct safety standards.
- Page 15 Atlas™ Auto 40T Hydraulic Press Other possible operational risks may be due to the specific samples, work or accessories (e.g. Specac Evacuable Pellet Dies and the Atlas™ Heated Platens P/N GS15515) that are being used with the Atlas™ Auto 40T press. You should take note of the specific safety considerations involved with these items if they are being used.
-
Page 16: Diagrams O F Thea
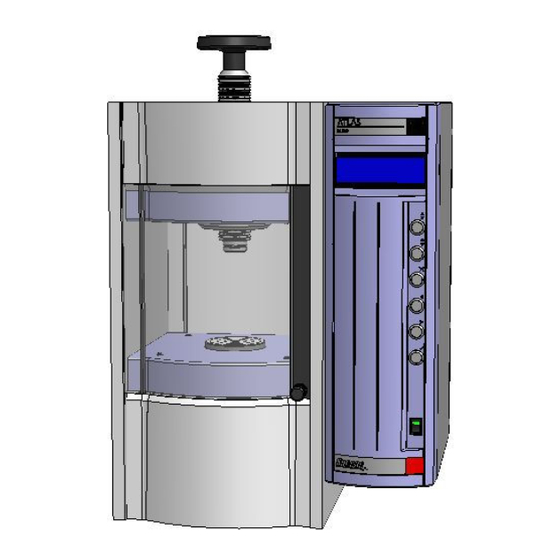
User Manual 4. Diagrams Of The Atlas™ Auto 40T Press Front View (Front Safety Guard Closed) - Page 17 Atlas™ Auto 40T Hydraulic Press Back View (Front Safety Guard Raised)
- Page 18 User Manual Detail Of Electronic Front Control Panel...
-
Page 19: Ress
Atlas™ Auto 40T Hydraulic Press 5. Operation of the Atlas™ Auto 40T Press General Procedure The Atlas™ Auto 40T press is used to apply a constant load to a sample contained within the pressing area. The sample will usually take the form of a particular size evacuable pellet die loaded with a sample powder for compaction. - Page 20 User Manual The five Display Screens are: 1) Operations Screen 2) Directory Screen 3) Programming Screen 4) Edit Screen 5) Options Screen Function Buttons Movement between the screens and interaction with the various screen displays is achieved by depression of the appropriate function button on the front panel (2).
- Page 21 Atlas™ Auto 40T Hydraulic Press Operation Symbols The five Display Screens have various operating symbols that are illuminated to show in simple terms the status of the Atlas™ Auto 40T press for a particular stage or process that is being carried out. The complete list of symbols that are used for operation of the press are as follows: SYMBOL...
- Page 22 User Manual Can use left button in a programming sequence. Can use right button in a programming sequence. Can use accept button in a programming sequence. Can use reject button in a programming sequence. To select Programming Display Screen operation. To select Directory Display Screen operation.
-
Page 23: Operation
Atlas™ Auto 40T Hydraulic Press Illuminates when a program sequence is running. End program step. Operation Powering up the Atlas™ Auto 40T Press Note: Before switching on the Atlas™ Auto 40T press ensure that the Safety Guard (5) is in its safe/down position. When operating the Atlas™... - Page 24 User Manual Note: The Simple Operation Program PZ in Section 6 forms the basis of the instructions for the Operation Procedure and can be used as a form of Quickstart Guide. At initial startup the Set Tons indicator will read 4.0 on the Auto 40T press.
- Page 25 Atlas™ Auto 40T Hydraulic Press Rotate the lead screw (8) via the handle (9) to raise or lower the top bolster anvil pressing face (10) until there is a gap of no more than 2 to 3mm between it and the top surface of the sample to be compressed. Now close the front safety guard (5) to its down/safe position.
- Page 26 User Manual To apply the “Pump up to” load selected, press the start button (11). The press motor will start and the Display Screen (4) will show a status of “Load Rising” and a RUN status symbol is illuminated. The Applied Tons indicator (top left side of the screen) will change from 0.0 and rise in value as the “Pump up to”...
- Page 27 Atlas™ Auto 40T Hydraulic Press indicator in place of the RUN status symbol. The Increase/Set Load symbol on the Menu Bar will also be illuminated. The “Rdy” or “RDY” status means that the “Pump up to” load could be re-applied at this point by pressing the start button (11) again. However, if a different “Pump up to”...
- Page 28 The Pressing Area The Atlas™ Auto 40T press has a sample compartment that allows for the use of the entire range of Specac Evacuable Pellet Dies. The maximum distance between the pressing faces is 140mm and the minimum distance is 60mm. The maximum area of a sample that can be accommodated is 240mm wide by 220mm deep.
- Page 29 Atlas™ Auto 40T Hydraulic Press From the back view diagram of the pressing area (6), there is protective rear safety guard (17) which is curved in profile. The rear guard is fixed and cannot be raise or lowered similarly to the front guard (5).
- Page 30 User Manual Piston Travel There is a maximum piston travel of 38mm and the press will automatically stop when this is reached. An error message “Reached Piston Limit!“ will be momentarily illuminated as an indicator. When using highly compressible samples it is possible for the maximum travel to be reached before the desired “Pump up to”...
-
Page 31: Display Screens - O
Atlas™ Auto 40T Hydraulic Press 6. Display Screens – Operation, Directory, Programming, Editing And Options The Different Screen Environments 1) Operation Screen As stated from Section 5 (Operation Of The Atlas™ Auto 40T Press), when the Atlas™ Auto 40T press is switched on at the mains, power to the press will also be indicated by illumination of the Electronic Display (4). - Page 32 User Manual...
- Page 33 Atlas™ Auto 40T Hydraulic Press The sequence of the Display Screens (4) for the Simple Operation Program PZ and the steps between are as follows. OS# = Operating Screen Number (proposed sequence of events). This is the Display Screen that will be shown when the press is switched on and the Simple Operation Program PZ has been stored from the Def.
- Page 34 User Manual The safety guard (5) has been raised and a sample is placed into the press. When correctly positioned, close the safety guard (5). The safety guard (5) has been closed and the press has reverted to the status as at OS1 (“Rdy”) or OS2 (“RDY”).
- Page 35 Atlas™ Auto 40T Hydraulic Press From the OS4 Display Screen the accept button (16) has been pressed to enter the change of “Pump up to” load Display Screen OS5. Press the left (14) and right (15) buttons to move the slider display cursor to the appropriate load setting.
- Page 36 User Manual The “Pump up to” load has been reached and the Hold Time symbol (the Maintain Load Hold Time function with auto “top up”) illuminates. A Maintaining Load message is shown. The load will be held until the release button (12) is pressed. Note: At this stage (OS8) the tick symbol is also illuminated.
- Page 37 Atlas™ Auto 40T Hydraulic Press The release button (12) has been pressed. The Fast Release symbol function illuminates and the press releases to a load of 0.0 Tons. Note, that the symbols for the PZ program have scrolled up the screen. The “Pump up to”...
-
Page 38: Directory Screen
User Manual Fail Safe Operation During the actual running of any program (PZ or a user created program), if the release button (12) is pressed once, this action will:- A) Abort a program if the load is actually rising or releasing. B) Step on to the next segment of a program if a Hold Time function (up to 99.9 minutes) or Infinite Hold is operating. - Page 39 Atlas™ Auto 40T Hydraulic Press The last program that was stored and used is presented to the screen. From the example DIR1, program number 4 is shown displayed for 7 segments that have been used in this program. The P# symbol is illuminated ready for acceptance by pressing the accept button (16) to scroll through the programs that are stored via the slider bar function.
- Page 40 User Manual From DIR3 the program number P1 has been selected and accepting of the EXIT symbol will allow for operation of this example program. Pressing the accept button (16) will take you to the Operation Screen. The selected P# will be installed and displayed and is ready to run. If any programs are suitable for a similar application sequence of events, but loads and hold times need to be modified, then an existing program may by modified through the Edit Screen.
- Page 41 Atlas™ Auto 40T Hydraulic Press From DIR5, program number P4 has been selected. The PGM symbol has been illuminated and acceptance of this, by pressing the accept button (16), will take you to the Programming Display Screen. The P# selected will be loaded as the program number to create in the programming environment.
- Page 42 User Manual Under a program that you can create, a Hold Time function for no “top- up” of the load can be included as a segment. In the standard PZ Simple Operation Program, the Hold Time is subject to an automatic “top-up”...
- Page 43 Atlas™ Auto 40T Hydraulic Press PGM1 If you access the Programming Screen directly from the Operation Screen, then the next available free P# will be displayed for you to create a new program. (See PGM2 – e.g. P5 is the next free program). If all program registers (P1 to P6) are full, then the current operating program will be displayed with the slider bar in the main Menu Bar.
- Page 44 User Manual PGM3 In the example for PGM3, S4 has been illuminated to show a Maintain Load (auto “top up” function) for 2.0 minutes. In the example this segment could possibly be edited for a different maintain hold time or a hold load (no auto “top up”) function.
- Page 45 Atlas™ Auto 40T Hydraulic Press The P# P4 would need to be selected to register as the program to be created. You can only direct the specific P# to be created via the Directory Screen Display route. Step A – Apply Load of 15 tons From the main Operation Screen illuminate the DIR symbol by using the left (14) or right (15) button and accept by pressing the accept button (16).
- Page 46 User Manual Step B – Hold Load for 2 minutes When the S0 segment has been set the next logical step is to either apply a Hold Time or a Release function. In our example the Set Hold Time symbol without auto “top up” has been selected. When S0 has been set (accepted) from the previous step A, on the Menu Bar S# is illuminated.
- Page 47 Atlas™ Auto 40T Hydraulic Press Use the left (14) or right (15) button to illuminate the General Release Rate symbol and then press the accept button (16). A sub menu of the three different release rate symbols appear. (Fast, Medium and Slow). Use the left (14) or right (15) buttons to select the Medium release rate symbol and press the accept button (16).
- Page 48 User Manual Step E – Maintain Load for 2 minutes When the S3 segment has been set for a “Pump up to” load, for our example program the next step is to either apply a Hold Time or a Release rate to a lower tonnage load. In our example a Maintain Load Hold Time with auto “top up”...
- Page 49 Atlas™ Auto 40T Hydraulic Press accept button (16). The various programming symbols will appear in the Menu Bar. Use the left (14) or right (15) button to illuminate the General Release Rate symbol and then press the accept button (16). A sub menu of the three different release rate symbols appear.
-
Page 50: Programming Screen
User Manual Abort/Reject button (13) at this stage. Either action will return you to the main Operation Screen. The new program number created via the EXIT, EXIT route will be loaded into the press for operation. The appropriate P# and the first S# will now register in the Operation Screen display. - Page 51 Atlas™ Auto 40T Hydraulic Press Select the EDIT screen from the DIR screen and illuminate the S# symbol by use of the left (14) or right (15) button, then press the accept button (16). The slider bar will show in the Menu Bar for the segment range from 1 to 10.
-
Page 52: Options Screen
If the press pump continues to overheat, please contact Specac for advice. 8) Software version information. - (This is a display parameter only and cannot be changed). -
Page 53: Non -Routinep
Atlas™ Auto 40T Hydraulic Press Along the Menu Bar status line are prompts to suggest how to change any of the parameters from the Options Screen. The left (14) and right (15) buttons are used to move between the options. Press the accept button (16) to allow for access to a particular option to change. - Page 54 (8) with a suitable bolster block of metal in place of a sample and then applying and releasing a load. However, Specac would always recommend that the piston is allowed to retract under its own weight or with an Evacuable Pellet Die in position acting as the additional weight.
- Page 55 However, some faults that may develop can be identified and fixed without the potential need for return of the press to Specac. The following information is provided to identify some faults and carry out the necessary repairs and adjustments should you decide to do so.
- Page 56 (possible piston cylinder assembly problem). If there is an oil leak contact Specac and give serial number of press. Replace the main piston assembly from Atlas™ Power Press using the Piston Assembly Kit of parts P/N GS25491 –...
- Page 57 Service Procedure 2S-25490-1. Cause D: There is a leak pass the “Dowty” seal on the manifold block. Remedy: Contact Specac and give serial number of press. Replace the Dowty seal for the Atlas Power Press using the Dowty Seal Kit of parts P/N GS25493 – Press Service Procedure 2S-25493-1.
- Page 58 Service Procedure 2S-25490-1. Cause D: There is a leak pass the “Dowty” seal on the manifold block. Remedy: Contact Specac and give serial number of press. Replace the Dowty seal for the Atlas Power Press using the Dowty Seal Kit of parts P/N GS25493 – Press Service Procedure 2S-25493-1.
- Page 59 Fault 9: Damage has occurred to the lead screw assembly and it cannot be removed from the press. Cause: Incorrect pressing of a sample. Remedy: Contact Specac and give serial number of press. Replace the damaged lead screw assembly for the Atlas Power Press from the Replacement Lead Screw Assembly Kit P/N GS25496 –...
-
Page 60: Presses
Depending on a typical suspected usage of the press (circa 50 pressings per day at maximum tonnage loads), Specac would recommend that the oil in the pressing system is changed every year. - Page 61 Atlas™ Auto 40T Hydraulic Press desirable to have the press returned to Specac or a local supplier to carry out this service. Change of the oil requires use of an Oil Bleed Kit of parts P/N GS25490 to carry out this procedure correctly and within...
- Page 62 Lead Screw Assembly Lubrication Periodically, Specac would recommended to lubricate the lead screw assembly threading as it passes when raising or lowering it through the central threaded boss housing part. This helps prevent the risk of seizure and trapping of the lead screw assembly in use and turning by hand.
-
Page 63: Automatic Control Connectivity
This can be used to connect the press to a personal computer for automatic operation if desired. Please contact Specac Ltd for details of how you might wish to use this function. 11. Accessories for Atlas™ Auto Presses... -
Page 64: Ress
User Manual 12. Specifications of Atlas™ Auto 40T Press UK/EURO (230v,50Hz) version part number P/N GS25470 USA (110v,60Hz) version part number P/N GS25471 JAPAN (100v,50/60Hz) version part number P/N GS25472 CHINA (230v,50Hz) version part number P/N GS25473 KOREA (230v,60Hz) version part number P/N GS25474 Max. -
Page 65: Ec Declaration Of Conformity
Atlas™ Auto 40T Hydraulic Press EC Declaration of Conformity... - Page 66 Legend for Atlas™ Auto 40T Press Diagrams (1) On/off power switch. (2) Front panel. (3) Rear power mains socket connection. (4) Electronic display screen. (5) Front raisable safety guard. (6) Pressing area. (7) Lower piston pressing face. (8) Lead screw. (9) Handle of lead screw.
- Page 67 Tel: 215 793 4044 Systems Engineering Inc. -Tokyo Fax: 215 793 4011 Tel: 03 3946 4993 Fax: 03 3946 4983 United Kingdom email:systems-eng@systems-eng.co.jp Specac Ltd. - London Website: www.systems-eng.co.jp River House, 97 Cray Avenue, Orpington Spain Kent BR5 4HE Teknokroma S.Coop C. Ltda...
- Page 68 Brilliant Spectroscopy™ www.specac.com SPECAC INC. SPECAC LTD. 414 Commerce Drive River House, 97 Cray Avenue, Suite 175, Orpington Fort Washington, Kent BR5 4HE PA 19034, USA Tel: +44 (0) 1689 873134 Tel: 215 793 4044 Fax: +44 (0) 1689 878527 Fax: 215 793 4011 Registered No.
Need help?
Do you have a question about the Atlas Automatic 40 Ton and is the answer not in the manual?
Questions and answers