Advertisement
Quick Links
Advertisement

Related Manuals for Specac GS03940


Summary of Contents for Specac GS03940
- Page 1 Mini-Pellet Press User Manual 2I-03940-6...
- Page 3 Mini-Pellet Press User Manual 2I-03940-6...
- Page 4 ARTS FOR THE ELLET RESS 5. L ..........15 EGEND FOR THE ELLET RESS © April 2016 Specac Ltd. All rights reserved. Brilliant Spectroscopy™ is a trademark of Specac Ltd. Other product names mentioned herein may be trademarks of their respective owners.
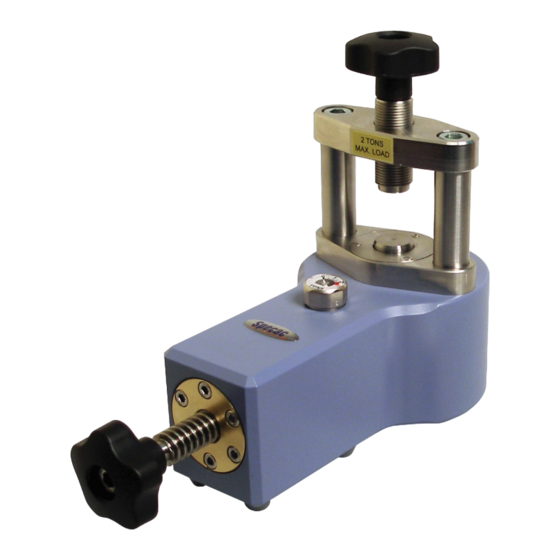
- Page 5 1. Introduction Thank you for buying a product from Specac. The Specac Mini-Pellet Press P/N GS03940 has been designed to produce a maximum 2 tons load and when used with the 7mm Pellet Die assembly P/N GS03950, provides a sufficient load for the formation of excellent quality KBr pellets with a 7mm diameter, prior to solid sample analysis by FTIR spectroscopy.
- Page 6 Check that the following items have been supplied against P/N GS03940: Mini-Pellet Press - P/N GS03940. If a 7mm Pellet Die assembly P/N GS03950 has been ordered too check that the following items have been included. 7mm Pellet Die assembly P/N GS03950...
- Page 7 Mini-Pellet Press 3. Operation of the Mini-Pellet Press Pressing a sample in the Mini-Pellet Press is simple and quick. Taking the 7mm pellet die assembly (P/N GS03950) (1) as an example die to use, it is easily located within the pressing area of the Mini-Pellet Press (2).
- Page 8 User Manual Preparation of the 7mm Pellet Die Assembly Prior to placing the 7mm pellet die assembly (1) into the Mini-Pellet Press pressing area (2), a potassium bromide (KBr) powder mixture with a solid sample is prepared. A suitable quantity of the solid sample with an amount of KBr powder (P/N GS03610) in the usual ratio of 1 part sample to 300 parts KBr can be ground together using the agate pestle and mortar (P/N GS03600) or an automatic grinding mill such as...
- Page 9 Mini-Pellet Press Fill the aperture hole of the 7mm pellet die ring holder (6) with sufficient KBr powder mixture to reach the top. Using a flat blade or the edge of the spatula, level off the powder mixture such the top of the powder mixture in the hole is flush with the 7mm pellet die ring holder’s (6) top surface.
- Page 10 User Manual Pressing the 7mm Pellet Die in the Mini-Pellet Press Prepare the Mini Pellet Press to accept the 7mm pellet assembly (1) as formed at the stage shown to Fig 4. The lead screw (3) on the Mini-Pellet Press is retracted (turned anticlockwise) so there is sufficient “daylight”...
- Page 11 Mini-Pellet Press should be fully unwound to its start position. Turn the pressure knob (4) anticlockwise until it will turn no further such that the screw assembly has reached its end stop. When the pressure screw hand knob assembly (4) is fully retracted, the pressing piston (11) will be at its correct start position for pressing.
- Page 12 User Manual Before turning the pressure screw knob assembly (4) to apply a load, tighten the lead screw handle assembly (3) a little further clockwise to continue the initial compaction of the KBr powder mixture contained within the die. When the lead screw (3) can no longer be hand tightened, the KBr powder mixture is ready to be fully compressed by application of a load provided by turning of the pressure knob screw assembly (4).
- Page 13 Mini-Pellet Press Positioning the KBr Pellet Die Ring Holder in the Spectrometer Having removed the compressed 7mm pellet die assembly (1) from the Mini-Pellet Press, the top anvil (8) and bottom anvil (9) are separated/removed from the die ring holder (6). Hold the knurled outer edge of the die ring holder (6) with one hand and twist/turn the anvils (8 and 9) by holding their knurled edges with the other hand.
- Page 14 KBr sample. When the KBr sample has been washed away from inside the holder, the die ring holder (6) part can be further washed/rinsed with methanol and then dried with tissues. Specac would also then recommend that this part could be stored in dry environment or placed on a heated surface (circa 30°C to 35°C) prior...
- Page 15 Mini-Pellet Press Fig 8. 7mm Pellet Die Ring Holder, Top Anvil and Extractor Cap Assembly in Position for KBr Pellet Extraction Loosely hold the components together by turning the lead screw assembly (3) clockwise and then continue turning the lead screw assembly (3) to allow the top anvil (8) to push the KBr pellet out of the die ring holder (6) and into the space created by the Perspex extractor cap (10).When the KBr pellet has been pushed out of the die ring...
- Page 16 User Manual 4. Spare Parts for the Mini-Pellet Press P/N GS03940 – Mini-Pellet Press. P/N GS03950 - 7mm Pellet die assembly complete. P/N GS03951 - 7mm Pellet die ring holder (body). P/N GS03952 - 7mm Pellet die top anvil (long plunger).
- Page 17 Mini-Pellet Press 5. Legend for the Mini-Pellet Press (1) 7mm Pellet die assembly. (2) Pressing area of Mini-Pellet Press. (3) Lead screw assembly. (4) Pressure screw knob assembly. (5) Pressure screw knob assembly. (6) Pellet die ring holder (body). (7) 3” x 2” slide mount. (8) Top anvil (long plunger).
- Page 18 User Manual Blank Page - Notes for Use of Mini-Pellet Press...
- Page 19 Systems Engineering Inc. -Tokyo Fax: 215 793 4011 Tel: 03 3946 4993 Fax: 03 3946 4983 United Kingdom email:systems-eng@systems-eng.co.jp Specac Ltd. - London Website: www.systems-eng.co.jp Unit 12, Science & Innovation Centre Halo Business Park Spain Orpington Teknokroma S.Coop C. Ltda...
- Page 20 Brilliant Spectroscopy™ www.specac.com SPECAC INC. SPECAC LTD. 414 Commerce Drive Unit 12, Science & Innovation Centre Suite 175, Halo Business Park Fort Washington, Orpington PA 19034, USA Kent BR5 3FQ Tel: 215 793 4044 Tel: +44 (0) 1689 873134 Fax: 215 793 4011...
Need help?
Do you have a question about the GS03940 and is the answer not in the manual?
Questions and answers