Table of Contents
Advertisement
Quick Links
Advertisement
Table of Contents

Related Manuals for RBR RBRquartz3 Q


Summary of Contents for RBR RBRquartz3 Q
- Page 1 INSTRUMENT GUIDE rbr-global.com...
-
Page 2: Table Of Contents
Calibrating the instrument ................19 Pressure sensor maintenance ................20 Removing the antifouling mesh assembly.............20 Filling the syringe and de-gassing the buffer oil..........21 Cleaning the buffer tube .................22 Refilling the buffer oil..................23 External pressure adaptor ................. 26 Repairs ........................ 27 Revision history....................28 RBR#0008818revC... -
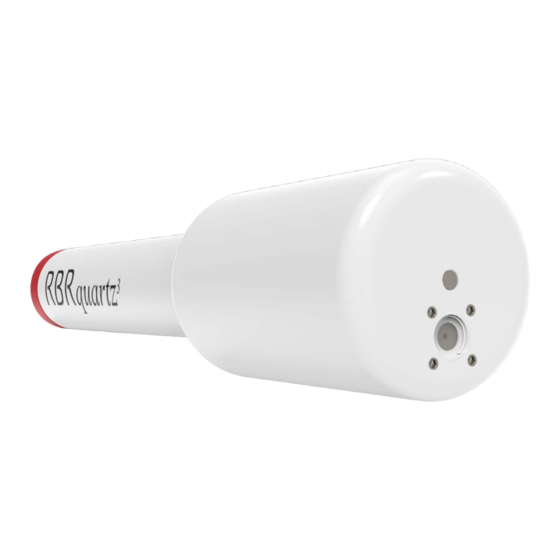
Page 3: Rbrquartz³ Q
USB-C or Wi-Fi download for large data files. RBRquartz The RBRquartz Q features: • High accuracy • Internal USB-C connector • Large memory • Quartz stability Temperature sensor Pressure sensor For a detailed description of wave and tide measurements, see Ruskin User Guide: Standard Instruments RBR#0008818revC... -
Page 4: Specifications
Resolution 0.00005°C Typical stability ±0.002°C/year Time constant <30s (embedded) *A wider temperature range is available upon request. Contact RBR for more information. Pressure Specification Description Range 20 / 55 / 125 / 190 / 260dbar Initial accuracy ±0.01% full scale... - Page 5 ~4 years . External MCBH-6-MP connector pinout Pin No. RS-232 RS-485 Ground Power +4.5 to +30V From the From the instrument (Tx) instrument (Tx-) Into the Into the instrument (Rx) instrument (Rx+) Into the instrument (Rx-) From the instrument (Tx+) RBR#0008818revC...
-
Page 6: Hardware
Plug the mini-display port connector into the instrument as shown. Twist the end-cap counterclockwise two full rotations to unwind the umbilical cable. Open instrument with a connectorised end-cap Twist the end-cap clockwise back on the instrument until aligned with PAUSE. RBR#0008818revC... -
Page 7: Rbrquartz³ Q Interface
A USB-C desktop cable is supplied in the instrument support kit. Use this cable to download data from the instrument to your computer. Mini-display port The mini-display port is located next to the USB-C port. This is the port to use for the umbilical cable from the connectorised end-cap. RBR#0008818revC... - Page 8 End-cap types RBR standard instruments are compatible with three different end-caps. These end-caps are interchangeable between instruments. Standard end-cap Connectorised end-cap Right-angle connectorised end-cap MCBH connectors Only connectorised battery end-caps have the external MCBH-6-MP connector. Depending on your needs, they may be wired to support the USB, RS-232, or RS-485 communication (selected at the time of order).
-
Page 9: Orientation And Datum Location
3.3 Orientation and datum location Vertical deployment (recommended) RBR performs an offset adjustment with the pressure sensor facing downwards, as shown in the first image. It is recommended to deploy the instrument vertically to match the way it was calibrated. ... -
Page 10: Twist Activation
3.4 Twist activation All RBR Generation standard instruments are equipped with twist activation as a standard feature. See Ruskin User Guide: Standard Instruments . Sampling Twist activation allows you to start or pause the instrument without the need to connect to a computer. -
Page 11: Wi-Fi Module
Your device will switch to this network and connect to the instrument. If set to Auto-download, Ruskin will start downloading the data. There are two ways to activate the Wi-Fi on RBR instruments: twist activation and pressure switch. Twist activation Activate the Wi-Fi by twisting the end-cap in either direction. - Page 12 The nominal Wi-Fi range is 30m for instruments in plastic housing, but it may be shorter in real life due to challenging physical environments. If the Wi-Fi connection is lost in the middle of the download, Ruskin will continue from where it left off next time it detects the instrument again, appending the original RSK file. RBR#0008818revC ...
-
Page 13: General Maintenance
4 General maintenance 4.1 Support kit RBR support kit RBR provides one support kit per every three instruments ordered. If you need more units, contact RBR. The RBR support kit contains an assortment of basic accessories and spare parts, as presented below. RBRquartz... -
Page 14: Replacing The O-Ring
Care for the O-ring is the single most important item of maintenance on any submersible RBR instrument. A water leak can damage the circuit board beyond repair and cause complete data loss. Every instrument's seal depends upon its O- ring, not the end-cap tightness. -
Page 15: Replacing The Batteries
Opening and closing the instrument for details on accessing the batteries. RBR ships new instruments with fresh, highest capacity batteries included. Replace the batteries before each deployment to maximise the operational time and prevent data loss. Ruskin software estimates the remaining battery life during deployment by tracking power consumption in mAh. When setting up your deployment on Ruskin, check "Fresh"... -
Page 16: Replacing The Desiccant Capsules
Fresh desiccant will keep the instrument compartment dry and prevent malfunction. Water damage may occur if condensation forms inside the instrument. As a preventative measure, RBR recommends servicing the instrument in a cool, dry place (when possible). Replacing desiccant capsules Remove the battery end-cap. - Page 17 All instruments ship with fresh reusable desiccant capsules. They use a cobalt-free colour changing indicator dye. Orange indicates fresh desiccant, while green indicates it is saturated (about 15% water by weight). Once exhausted, the capsules can be replaced with new ones (available from RBR), or refreshed. Fresh (orange) and saturated (green) desiccant capsules Refreshing the desiccant Follow the steps below to refresh the desiccant.
-
Page 18: Cables And Connectors
4.5 Cables and connectors Cable bend radius The smallest bend radius for RBR supplied cables is 15cm. Lubricating the connectors Lubrication improves watertight sealing, prevents corrosion, and reduces the force required to de-mate the connector. Use the silicone compound provided with your instrument. -
Page 19: Cleaning The Instrument
RBR recommends calibrating your instrument before any critical deployment, periodically once a year, or if you suspect the readings to be out of specifications. Discuss your calibration requirements with RBR. In some cases, the instrument will need to be returned to RBR to have it checked and recalibrated. -
Page 20: Pressure Sensor Maintenance
The upper mesh insulator disk, nickel-copper mesh, and the lower mesh insulator disk will come out easily once the retaining ring is removed. Item No. Description Part image Assembled Buffer tube antifouling mesh interface assembly Lower mesh insulator disk Nickel-copper mesh Upper mesh insulator disk Retaining ring Replacement parts are available in the support kit. RBR#0008818revC... -
Page 21: Filling The Syringe And De-Gassing The Buffer Oil
Leave the syringe in the reverse position for about an hour. Remove the kickstand. Invert the syringe so that the tip is facing up. Remove the stopper. Purge any air from the syringe RBR#0008818revC... -
Page 22: Cleaning The Buffer Tube
Insert the needle into the buffer tube assembly, all the way Depress the plunger and flush the buffer tube assembly With the syringe still in the pressure port, stand the instrument with the port up While depressing the plunger, remove the syringe Refill the buffer tube assembly RBR#0008818revC... -
Page 23: Refilling The Buffer Oil
Remove the four set screws around the pressure port using the 3mm hex key Prepare the refill adaptor Apply a thin film of silicone compound to the O-ring of the refill adaptor Install the O-ring into the refill adaptor as shown in the image RBR#0008818revC... - Page 24 Mate the refill adaptor to the pressure port Install the four cap screws with the 5mm hex key Do not apply pressure to the plunger when the syringe is installed on the pressure port! Doing so may exceed the pressure rating of the sensor. RBR#0008818revC...
- Page 25 Open the split on the retaining ring and ease its middle into the sensor end-cap recession Hold the retaining ring in place with one finger and feed the the rest of the ring into the sensor end-cap recession RBR#0008818revC...
-
Page 26: External Pressure Adaptor
Paroscientific Digiquartz® pressure sensor. RBR provides the RBRquartz³ pressure adaptor kit with each instrument. It is not included in the RBR support kit and needs to be ordered separately. You can choose to receive this separate kit at the same time as the instrument, or to request it separately at a later date. ... -
Page 27: Repairs
Please have the model and the serial number of the unit ready. Our support team will work to resolve the issue remotely. In some cases, you may have to return your instrument to RBR for further servicing. ... -
Page 28: Revision History
Updated Specifications, Hardware, General maintenance, Pressure sensor maintenance, and Repair sections. Added information on external pressure adaptor kit. Removed the Warranty section (available on the RBR website) and Appendices. Minor updates throughout the document. 11-August-2023 Updated images on the introduction page.
Need help?
Do you have a question about the RBRquartz3 Q and is the answer not in the manual?
Questions and answers