Advertisement
IMPORTANT SAFEGUARDS
When operating this electric appliance, basic safety instructions should always be followed. Refer to the following for these instructions.
- READ ALL SAFETY & USAGE INSTRUCTIONS BEFORE USING THE CAKE MAKER.
![]()
Do not allow liquids of any kind to touch the interior of Cake Maker. Use caution when moving Removable Baking Pan into or off of the Baking Base to ensure that liquids or foods DO NOT spill into the Base. Spills may cause electrical shock or injury.- Before using, ALWAYS place the Cake Maker on a heat-resistant glass, wood or stone surface. Do not place on any counter or table that may be affected by high heat.
![shock hazard]() AVOID ELECTRICAL SHOCK. DO NOT immerse cord, plugs or the Cake Maker in water or other liquid.
AVOID ELECTRICAL SHOCK. DO NOT immerse cord, plugs or the Cake Maker in water or other liquid. - DO NOT touch the surface of the Cake Maker Base or Removable Baking Pan when HOT. Use pot holders or oven mitts when handling the Removable Baking Pan or holding the wire handle of the Pan.
- Allow sufficient space around the Cake Maker for proper air flow and opening of the Lid when cooking.
- UNPLUG Cake Maker from outlet when not in use or before cleaning. Do not let cord hang over edge of table or counter or touch hot surfaces, including the Cake Maker.
- DO NOT add or remove parts or accessories while HOT.
- Children should never use the Cake Maker; close supervision is required when appliance is used near children.
- Do not obstruct the Heat Release Vent on the Lid during operation. Hot or warm steam may escape while cooking.
- Operate the Cake Maker on a level surface well away from any hot gas or electrical burner, heat source, combustible spray cans or pressurized items.
- Do not operate the Cake Maker outdoors.
- Never operate the Cake Maker with a damaged cord or plug or one that has malfunctioned or been damaged in any way. Immediately contact Customer Service for analysis.
![burn hazard]()
![shock hazard]()
DO NOT add unauthorized accessory attachments. Such use may result in electric shock, injury or fire.- Use only factory cord supplied; NEVER add extension cords. When done using, switch control to OFF then pull plug from outlet.
- DO NOT operate the Cake Maker when empty.
- Do not use the Cake Maker for any use other than intended. Do not attempt to fry in the Removable Baking Pan. Do not use Removable Baking Pan on a stovetop or another heat source.

 AVOID ELECTRICAL SHOCK. DO NOT immerse cord, plugs or the Cake Maker in water or other liquid.
SAVE THESE INSTRUCTIONS
FOR HOUSEHOLD USE ONLY
3-conductor Cord Set: This Cake Maker is equipped with a 3-conductor cord set that has a 3 prong grounding-type plug. It should be properly connected to a grounding-type outlet. The plug is designed to fit ONLY a 3-grounding outlet unit, and as such, the grounding prong should never be removed. If needed, purchase a 2-prong adaptor and ground it to the outlet. Consult a qualified electrician if in doubt. Do not use an adaptor unless you are confident it is grounded. Do not modify this plug. If the plug does not fit the outlet securely, call a qualified electrician for assistance.


This product contains a chemical known to the State of California to cause cancer.
This product contains a chemical known to the State of California to cause birth defects or other reproductive harm.
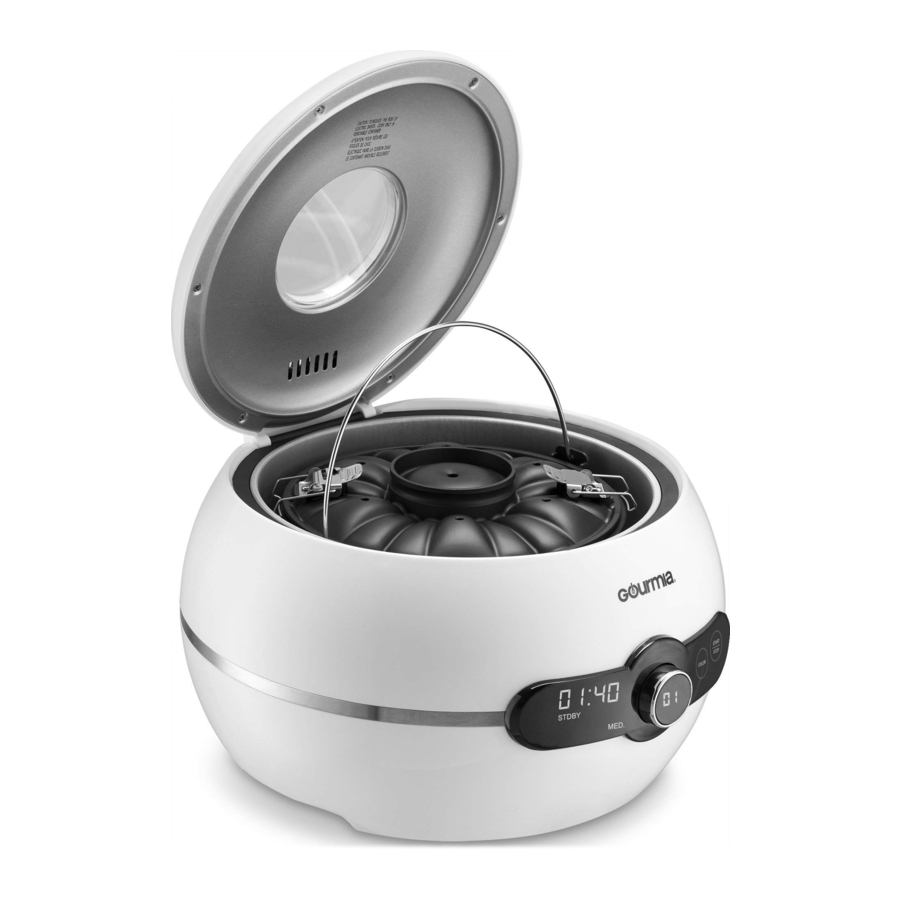
FEATURES & FUNCTIONS

- Removable Baking Pan with Lid- The Removable Baking Pan has a nonstick interior, metal open/close locking clasps and a wire handle to assist with movement and cleanup. The Baking Pan and Lid must always be used when baking or cooking in any Mode in the Cake Maker and the Lid must always be securely locked with the locking clasps while using.
The Baking Pan is designed to hold batters, doughs and other semi-soft ingredients, however, the Cake Maker is not designed to slow cook, braise, or cook foods, other than yogurt, in a long-low heat method. See Step-by-Step Instructions for baking foods in this Cake Maker.
The Removable Baking Pan holds the Automatic Spatula in the center drive shaft of the Pan. The Automatic Spatula turns and mixes doughs, batters, and other baked goods. Align the Spatula in the Pan as indicated in the Step by Step Instructions. Not all Modes use the Auto Spatula, as can be noted in the Step by Step Instructions.
The Removable Baking Pan will accommodate a generous 4½ cups of cake batter or pastry dough. However, as leavening agents act differently, you should not fill the Pan more than one-half to two-thirds full to ensure there is enough room in the Pan for your cake or bakery goods to rise without overflowing the Pan. Always use pot holders or oven mitts when handling or removing the hot Removable Baking Pan from the Cake Maker. - The Cake Maker Base- The Cake Maker Base holds the Removable Baking Pan and contains the following features:
- Lid with Baking Mode Menu
- Pre-programmed LED Control Panel with Mode Dial, Preset Time and Baking options
- Interior Drive that securely holds the Removable Baking Pan
- Secure-Hold Feet on the bottom of the Base to add non-slip protection
- Heating element and baking system pre-programmed for each type of Mode usage
- Cake Maker Lid- The easy-open Lid of the Cake Maker offers complete access to the Removable Baking Pan and the interior of the Base. Use pot holders or oven mitts when removing foods after baking, as the exterior, interior of the Base, and the Pan become hot.
The Cake Maker Lid contains the Baking Mode Menu, an easy-reference list of options for the 13 cycles available in the Cake Maker.
The vent on top of the Lid may release a small amount of warm air as foods are baked. Avoid placing your face or hands over the vent. - Accessories-
Handle & Spatula Pin – Included in your package is a special Pin, created for lifting the handle of the Pan when baking is complete. Use the small tip to easily lift the wire handle, grasp it with a pot holder and lift the Pan from the oven. The Pin is also designed to remove the Auto Spatula from the bottom of the cake after baking and cooling, if needed. Simply insert the small tip of the Pin under the Auto Spatula and lift it out.
Measuring Cup & Spoon – These handy tools make baking even easier. Use the measuring cup for liquids such as water, milk or oil and use the measuring spoon for dry spices such as baking powder or baking soda.
PRE-PROGRAMMED LED CONTROL PANEL

The Pre-Programmed Control Panel houses the LED Display and electronic platform for the Baking Modes and specialty options, including such features as making yogurt, mixing ingredients or proofing and rising yeast breads. Within many of the pre-programmed Modes, there are options to adjust the baking times and/or change the color of the bakery goods from Light to Medium or Dark. The following instructions will help you get started:
- Baking with Auto Bake Modes
- Specialty Bake/Prep Modes
- Making Adjustments & Changing Mode Cycles
Baking with Auto Bake Modes
Plug the Cake Maker into the wall outlet.
The Control Panel will display the pre-programmed "01" (Baking Mode 1) on the Mode Dial. The pre-programmed color will be "Medium."
The Timer will indicate "01:25" as the length of time in Mode 1.
The "Start" indicator will illuminate, as will the Color indicator.
Rotating the Mode Dial will move the Cake Maker through Modes 1-13. Each is pre-programmed with various times and finished colors.
To change the finished color, press the "Color" icon on the Display Panel to select "Light" "Medium" or "Dark" options.
To Start Baking in Modes 1-7: Press Start/Stop Button once.
To Start Specialty Bake/Prep in Modes 8-13: Press Start/Stop Button twice.
To Pause the Cycle: Pause the Baking cycle for up to 2 minutes by pressing the Start/Stop button. Press Start/Stop again to re-start. If not manually started within 2 minutes, the Mode must be reset and will start over again on the Timer.
To Stop Baking Process: Press and hold Start/Stop button for 2 seconds. The Cake Maker will return to Mode 1.
Specialty Bake/Prep Modes
Modes 8-13 are pre-programmed, but offer options beyond baking. Choose Stir, Defrost, Ferment, Stir-Fry or other options to operate in various tasks. Refer to Step-by-Step Instructions for specific information.
Modes 8-13 can be adjusted within Time ranges for various functions. Check the individual Mode in Step-by-Step Instructions for time ranges and details.
Making Adjustments & Changing Mode Cycles
To adjust the Color in selected Baking Modes:
Press the "Color" icon on the Display Panel to select "Light" "Medium" or "Dark" options.
To change the Baking Time for Modes 8, 9, 10, 11, 12, 13:
BEFORE starting a pre-programmed Mode, press Start button once, rotate Mode Dial to select the desired time. Press the Start button again. This will start the baking process with the new time.
NOTE: The Baking Time for Modes 1-7 are preset and not adjustable.
BEFORE FIRST USE & ASSEMBLY
- Clean the exterior and interior of the Cake Maker with a damp cloth and dry thoroughly.
- Clean the Removable Baking Pan and Lid with a damp, sudsy cloth, rinse and dry.
- Clean the Auto Spatula with a damp cloth and dry.
- Place the Cake Maker onto a level surface that is heat-resistant.
Removable Baking Pan:
- Open the Cake Maker Lid
- If the Removable Baking Pan is not installed, hold it by the wire Handle and position the Pan into the drive in the Base. Press down on the Pan to ensure that it is fully seated and secured in the drive.
![]()
- Place the Auto Spatula on top of the Pin in the middle of the Removable Baking Pan with the Kneading Pattern facing UP and press down until it is firmly installed.
NOTE: The Spatula will not rest on the bottom of the Pan, but operates just above it.
![]()
- Fill the Removable Baking Pan with recipe ingredients and place the Lid on top of the Pan with the locking clasps in the open position.
![]()
- Align the notches in the Lid with the handle anchors on the Pan.
![]()
- Rotate the Handle to the UP position. Secure the locking clasps to the Pan.
![]()
- Rotate the Handle down before closing the Cake Maker Lid.
![]()
- Select Mode per recipe or Mode Menu as specified in Control Panel instructions or Step-by-Step Instructions.


STEP-BY-STEP INSTRUCTIONS
Hints & Tips for Making Delicious Cakes
- Lightly coat the Removable Cake Pan and Lid before adding ingredients. This will assist in removing your cake or other bakery goods from the Pan when done.
- When preparing cakes and other bakery goods, first add liquid ingredients, such as water and oil, then add eggs or other items. Add dry ingredients last. There is no need to mix the ingredients in the Pan before baking unless you choose to. The Auto Spatula will mix everything to perfection during the mixing process.
- Use a pot holder or oven mitt to grasp the handle of the Pan when removing hot foods. Or, use the Pin provided to lift the handle up, then grasp with a pot holder to remove. Lift the Pan straight up and out when removing it from the Cake Maker.
- Ensure that the Pan does not become over-filled with ingredients. The Pan holds 4½ fluid cups of cake batter or dough, however some foods with active leavening agents may overfill the Pan. If the Pan is more than two-thirds full, remove some batter and refrigerate to make a second cake.
- Make brownies in your Cake Maker in a flash! Place the Auto Spatula in the Pan and, using a brownie mix designed for 9 x 9 pan, first add liquid ingredients, eggs and oil. Add dry ingredients after the liquid. Bake on the Basic cycle. As the batter bakes, one giant brownie is formed. Remove when done and top with scoops of ice cream. A treat for the entire family!
CAKE BAKING CHART
The following 13 Modes are for specific types of Cakes, Bakery Goods, as well as options for Cooking and Preparing foods:
MODE: BASIC
| AUTO SPATULA | TIME | FINISH COLOR |
| Yes | 1:40 | Med |
Use the Basic Mode as a one-step method to prepare your favorite cake mixes. It doesn't get easier than this!
MODE: LOW GLUTEN
| AUTO SPATULA | TIME | FINISH COLOR |
| Yes | 2:00 | Med |
Low gluten cakes and breads require careful measuring and exact proportions. Follow your recipe carefully for flavorful and satisfying results.
MODE: SUGAR FREE
| AUTO SPATULA | TIME | FINISH COLOR |
| Yes | 1:55 | Med |
"Sugar Free" doesn't have to mean "flavor-free". Enjoy many varieties of fruit-laden cakes with natural sweet goodness. Use spreads such as prune or plum lekvar or other sugar-free fruit spreads to carry sweet flavors into your dessert world.
MODE: RAPID
| AUTO SPATULA | TIME | FINISH COLOR |
| Yes | 0:50 | Med |
Try this handy Mode when time is short. Use rapid-rise yeast and bread flour to make super-fast and delicious pan rolls or bread.
MODE: FRUITCAKE
| AUTO SPATULA | TIME | FINISH COLOR |
| Yes | 1:30 | Med |
Dense and moist, loaded with dried fruit and nuts, this is a timeless cake. When made in the Cake Maker, it is also an effortless preparation and bake time. Use your favorite recipe and sit back to enjoy the results.
MODE: CHIFFON CAKE
| AUTO SPATULA | TIME | FINISH COLOR |
| Yes | 1:45 | Med |
A chiffon cake is made light and airy by virtue of the eggs that whip into light sweetness. The Auto Spatula helps interject air into the batter as it mixes the cake ingredients together.
MODE: CLASSIQUE AU CHOCOLAT
| AUTO SPATULA | TIME | FINISH COLOR |
| Yes | 1:30 | Med |
Use your favorite rich and elegant flourless chocolate cake recipe for this specialty cake Mode.
MODE: STIR
| AUTO SPATULA | TIME | FINISH COLOR |
| Yes | 0:30 | N/A |
When life is busy, but your recipe calls for constant stirring, use this simple 30-minute continuous Stir Mode.
MODE: YOGURT
| AUTO SPATULA | TIME | FINISH COLOR |
| No | 8:00 | N/A |
Prepare your favorite yogurt-making recipe and spoon into the Cake Maker. Assemble and in a brief 8-hour period, you will have fresh, homemade yogurt for your family. Always refrigerate your yogurt until use.
MODE: DEFROST
| AUTO SPATULA | TIME | FINISH COLOR |
| No | 0:30 | N/A |
Easily defrost foods in your Cake Maker with this handy timed, low and gentle heat.
MODE: STIR FRY
| AUTO SPATULA | TIME | FINISH COLOR |
| Yes | 0:40 | N/A |
Love Asian stir fries, but have no time for babysitting the ingredients as they quickly cook? Use the handy Stir Fry Mode here for a hands-free meal! Add ingredients, sauces, meat and more; the food cooks perfectly in the short time needed.
MODE: FERMENT
| AUTO SPATULA | TIME | FINISH COLOR |
| No | 1:00 | N/A |
Your perfect Mode when using active yeast and rising is required. Simply add your yeast dough to the Pan and set the Mode. In one hour, you will have dough ready for shaping and baking. Try pizza dough or puffy breadsticks – rise in one hour and bake for a simple, delicious treat.
MODE: BAKE
| AUTO SPATULA | TIME | FINISH COLOR |
| No | 0:45 | N/A |
Prep any batter, dough or mixed ingredient dish and bake easily in this Mode. This is your go-to, no-fuss Mode for everything that can effortlessly bake without needing constant attention.
MAINTENANCE
ALWAYS allow the Cake Maker to cool completely before cleaning.
Unplug the Cake Maker before cleaning.
After each use, clean and dry the Cake Maker. Use a damp, soapy cloth to clean the Cake Maker and Lid. DO NOT immerse the Base or Lid in water. Use nonabrasive soap only.
After each use, the Removable Baking Pan and Auto Spatula may be placed in the dishwasher or washed by hand with the other accessories.
SERVICE
This Limited Warranty is for one full year from the date of purchase. It is applicable to the original purchaser only and is not transferable to a third party user. Repair or replacement of defective parts is solely at the seller's discretion. In the event that repair isn't possible, the seller will replace the product/part. If product repair/replacement won't suffice, the seller has the option of refunding the cash value of the product or component returned.
Product defects not covered under the Warranty provisions include normal wear and damage incurred from use or accidental negligence, misuse of instruction specifications or repair by unauthorized parties. The manufacturing company is not liable for any incidental or consequential damages incurred by such circumstances.
For Customer Service or Questions, Please call: 888-552-0033
www.gourmia.com
© 2016 Gourmia
www.Gourmia.com
The Steelstone Group
Brooklyn, NY
All rights reserved. No portion of this manual may be reproduced by any means whatsoever without written permission from The Steelstone Group, except for the inclusion of quotations in a media review.

Documents / Resources
References
Download manual
Here you can download full pdf version of manual, it may contain additional safety instructions, warranty information, FCC rules, etc.
Advertisement


Need help?
Do you have a question about the GCM3150 and is the answer not in the manual?
Questions and answers