Table of Contents
Advertisement
Quick Links
Advertisement
Table of Contents

Related Manuals for Targus ExpressCard ACP60US


Summary of Contents for Targus ExpressCard ACP60US
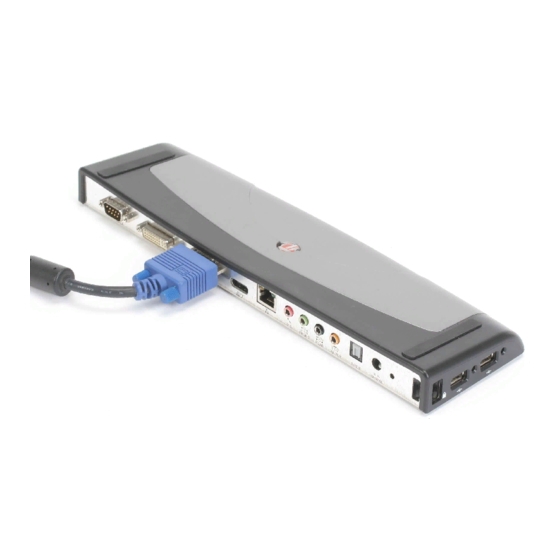
- Page 1 ExpressCard Notebook Docking Station with Digital Video and Audio USER GUIDE...
- Page 2 S/PDIF, and a serial port for legacy devices. The docking station also features Targus Always On technology, Targus USB Power Ports that provide twice as much power as standard USB specification and widely spaced ports to accommodate larger adapters. Targus Always On provides...
-
Page 3: Ergonomic Design
• ExpressCard Cable and Card (with spacer card) • AC Adapter (required to operate the dock) • Driver CD NOTE: TARGUS RECOMMENDS THAT YOU VISIT THE BELOW WEBPAGE TO ENSURE THAT YOU HAVE THE LATEST DRIVER VERSION INSTALLED: http://www.targus.com/us/support_downloads.asp TO DOWNLOAD THE FREE DRIVER, FOLLOW THE DOWNLOAD INSTRUCTIONS... -
Page 4: System Requirements
Targus ExpressCard Notebook Docking Station with Digital Video and Audio System Requirements Hardware • PC with an Intel • CD-ROM drive • ExpressCard 34mm or 54mm slot Operating System • Windows Vista • Windows XP Service Pack 2 or greater ®... - Page 5 About the ExpressCard Connector Card The ExpressCard dock comes with a cable, a spacer (see “Using the Spacer Connector” for additional instructions) and a 34mm card to connect to an ExpressCard slot in your notebook. The cable is removable from the card. The card can be left in your notebook when not in use.
- Page 6 Targus ExpressCard Notebook Docking Station with Digital Video and Audio Using the Spacer Connector A spacer is supplied to ensure the proper fitting of the 34mm ExpressCard into a 54mm slot. This spacer has no functionality other than to prevent any movement of the card once it is inserted into the 54mm slot.
- Page 7 Connecting the spacer to the ExpressCard Before beginning, make sure the spacer and the PC card are aligned as below. 1. When attaching the spacer, ensure the spacer is at a 45 degree angle to the PC card. Please make sure the hook on the spacer is sitting in the slot on the PC Card (Fig.
- Page 8 Targus ExpressCard Notebook Docking Station with Digital Video and Audio Installing the Docking Station Driver Installing the docking station driver enables your operating system to recognize the docking station and its ports once it’s connected. To install the docking station driver: 1.
- Page 9 Targus ExpressCard Notebook Docking Station with Digital Video and Audio 2. Insert the pin section into the base section as shown. 3. Press and hold the button located on the pin section. 4. While holding on to the pins, rotate the pin section clockwise until it clicks into place.
- Page 10 Targus ExpressCard Notebook Docking Station with Digital Video and Audio 1. Press and hold the button located on the pin section. 2. While holding on to the pins, rotate the pin section counter- clockwise. 3. Remove the pin section from the base section.
-
Page 11: Connecting The Docking Station To Your Computer
Computer 1. Connect one end of the assembled AC power adapter to the AC power jack on the docking station and the other end to a power outlet. 2. Connect one end of the ExpressCard cable to the docking station and the other end into the ExpressCard card. - Page 12 INSTALL PROPERLY. IT MIGHT TAKE UP TO 5 MINUTES OR MORE DEPENDING ON YOUR COMPUTER’S CONFIGURATION. 6. You will see a Targus Display logo icon located on the system tray. The monitor mode selection can be set by right clicking on this icon.
-
Page 13: Led Status Indicator Lights
LED Status Indicator Lights Once all device drivers are installed, the USB LED status indicator lights on on each side of the docking station glow when you connect devices to the docking station. • Green Tx light illuminates when connected to a network and the yellow Rx light flashes when data is transmitting to or from the network. -
Page 14: Connecting New Devices
Targus ExpressCard Notebook Docking Station with Digital Video and Audio Connecting New Devices To avoid possible damage when connecting a new device, do not force the cable connector into the port on the docking station. If the cable connector does not attach smoothly, turn the connector over and try attaching it again. -
Page 15: Connecting To A Local Area Network
480Mbps transfer rate and a minimum of 500mA of power. Note that 2 out of the 4 USB ports are designed to provide 1000mA, twice as much as standard USB specifications. See “Targus Always On” and “Using USB Devices That Require More Power”... - Page 16 Targus ExpressCard Notebook Docking Station with Digital Video and Audio Connecting and Configuring an Audio Device This docking station comes with a 5.1 audio support. The back of the device has 5 ports dedicated to audio. NOTE: IF YOU ARE HAVING PROBLEMS WITH YOUR SPEAKERS AFTER ATTACHING THE DOCKING STATION, PLEASE SEE THE TROUBLESHOOTING SECTION FOR MORE INFORMATION.
- Page 17 2. To connect a microphone, plug it into the pink 3.5mm port. 3. To enable your headphones or speakers, you must first choose C-Media USB Sound Device in the Properties Settings. 4. For Windows XP, go to the Control Panel and choose Sound and Audio.
- Page 18 Targus ExpressCard Notebook Docking Station with Digital Video and Audio Installing and Configuring a S/PDIF (Sony/ Philips Digital Interface) Device 1. In order to enable S/PDIF, you have to turn it on. This can be done by opening the USB 3D Sound Configuration applet located in your system tray (click on the USB icon to open up the Configuration Screen).
-
Page 19: Video Menu Options
4. Click “OK” to close the “Display properties” screen To change the resolution and modes using the Targus Display icon: 1. Position the cursor on the top of the Targus Icon and right click on it. 2. From this screen, you can change the resolution and modes that the dock operates in (see the following explanation of the video modes supported). - Page 20 Targus ExpressCard Notebook Docking Station with Digital Video and Audio Primary: You are using a monitor or LCD (not your notebook screen) as your primary screen. Extended: You are using your notebook screen as your primary display and your monitor or LCD is a secondary screen, extending your desktop to span both screens.
-
Page 21: Global Suspend Mode
Using USB Devices that Require More Power This docking station is designed with 4 USB High Power Ports 2 of which, providing up to 1000mA of power each. They can be used to connect to peripherals that requires more power such as printers, scanners, optical drives, and others. -
Page 22: Troubleshooting
Targus ExpressCard Notebook Docking Station with Digital Video and Audio Troubleshooting Device Not Working • Make sure that the device is fully inserted into the correct port on the docking station. • Plug the device into a different port on the docking station. If it still doesn’t work, test the device by connecting it directly to your... - Page 23 Right-click My Computer, Properties, then click the Hardware tab, and then the Device Manager button. From the Device Manager window, expand the following: • Display Adapters — Targus ExpressCard w/ video • Human Interface Devices — displays keyboards and pointing devices: mice, trackballs, and joysticks •...
- Page 24 Targus ExpressCard Notebook Docking Station with Digital Video and Audio Video Can I get a higher resolution on my monitor? • The highest resolution is 1600 x 1200, 32-bit color. Movie playback is not smooth when played at 1600x1200x32 bit resolution. It is worse when playing a media clip in full screen.
- Page 25 I cannot hear anything through my notebook’s speakers. Some notebooks default to the ExpressCard docking station’s onboard USB Audio device when the docking station is connected, disabling your notebook’s built in speakers. To enable your notebook’s speakers, do the following: 1.
-
Page 26: Technical Support
You will need to provide your full name, email address, country of residence and product information. Warranty Targus warrants this product to be free from defects in materials and workmanship for one year. If your Targus accessory is found to be defective within that time, we will promptly repair or replace it. -
Page 27: Regulatory Compliance
Microsoft Corporation in the United States and/or other countries. All trademarks and registered trademarks are the properties of their respective owners. All rights reserved. © 2008, Targus Group International, Inc. and Targus, Inc., Anaheim, CA 92806 USA. - Page 28 Visit our website at www.targus.com Features and specifications are subject to change without notice. © 2008 Targus Group International, Inc. and Targus, Inc. ACP60US / 410-0493-001D...
Need help?
Do you have a question about the ExpressCard ACP60US and is the answer not in the manual?
Questions and answers