Elite Gourmet ETO4510B - 45L French Door Convection Toaster Oven Manual
- Instruction manual (24 pages)
Advertisement
IMPORTANT SAFEGUARDS
READ ALL INSTRUCTIONS BEFORE USE AND SAVE FOR FUTURE REFERENCE

When using electrical appliances, basic safety precautions should always be followed as below:
- FOR HOUSEHOLD USE ONLY. Do not use this appliance for other than its intended use.
- Remove all packaging materials and labels before first use. Please dispose of the packaging materials via the appropriate recycling system, in an environmentally friendly manner.
- Wash all removable parts before first use. See Cleaning & Maintenance.
- A short cord is provided to reduce the hazards resulting from entanglement or tripping. Do not drape the cord over the counter or tabletop, where it can be pulled on or tripped over.
- We do not recommend using an extension cord with this appliance. However, if an extension cord is used, the marked electrical rating should be at least as great as the electrical rating of this appliance.
- A fire may occur if this appliance is used near flammable materials, including curtains, towels, walls, etc. Do not place any paper, plastic, or other non-food items in the appliance. Do not place the appliance or its cord on or near a heated surface, or in a heated oven.
- This appliance should always be used on a stable, dry, heat-resistant surface. Do not use near water.
- Do not use outdoors.
- Close supervision is necessary when using this appliance near children.
- Do not use an accessory or attachment not recommended by Ginny's, as this may cause injury, or damage the appliance.
- Keep hands, hair and clothing away from all MOVING PARTS.
- Always use OVEN MITTS when handling hot food or appliances. Do not attempt to move an appliance when it is hot or has hot contents.
- Turn OFF AND UNPLUG this appliance when not in use.
- NO SERVICEABLE PARTS INSIDE THIS APPLIANCE.
- DO NOT USE AN APPLIANCE WITH A DAMAGED CORD OR PLUG, OR
- AFTER THE APPLIANCE MALFUNCTIONS, OR HAS BEEN DAMAGED IN ANY MANNER.
- Keep at least five inches of space on all sides of the oven to allow for adequate air circulation.
- Some countertop and table surfaces, such as Corian®, wood and/or laminates, are not designed to withstand prolonged heat generated by certain appliances. It is recommended by countertop manufacturers that a hot pad or trivet be placed under your appliance to prevent possible damage to the surface.
SAVE THESE INSTRUCTIONS.
THIS PRODUCT IS FOR HOUSEHOLD USE ONLY.
SHORT CORD PURPOSE
 Note: A short power cord is provided to reduce the risk of personal injury resulting from becoming entangled in or tripping over a long cord.
Longer power-supply cords or extension cords are available and may be used if care is exercised in their use.
If an extension cord is used:
- the marked electrical rating of the extension cord should be at least as great as the electrical rating of the product;
- the extension cord should be arranged so that it will not drape over the counter top or tabletop where it can unintentionally be pulled on or tripped over by children or pets.
POLARIZED PLUG
If this appliance is equipped with a polarized plug (one blade is wider than the other), please follow the below instructions:
To reduce the risk of electrical shock, this plug is intended to fit into a polarized outlet only one way. If you are unable to fit the plug into the electrical outlet, try reversing the plug.
If the plug still does not fit, contact a qualified electrician. Never use the plug with an extension cord unless the plug can be fully inserted into the extension cord. Do not alter the plug of the product or any extension cord being used with this product. Do not attempt to defeat the safety purpose of the polarized plug.
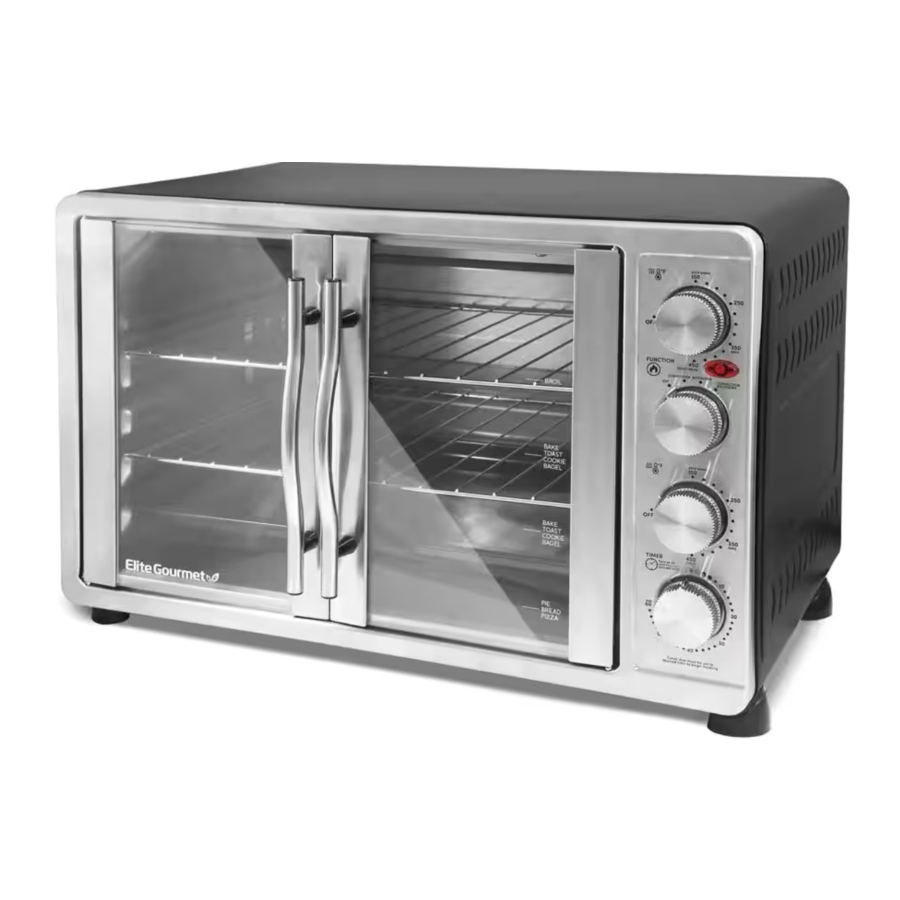
PARTS IDENTIFICATION

- Tempered Glass Doors (2)
- Upper Element Temperature Dial
- Function Dial
- Lower Element Temperature Dial
- Timer Dial
- Removable Racks (2) are for broiling/grilling/toasting
- Bake Tray for baking or as drip tray when grilling or using rotisserie
- Removable Crumb Tray sits at the bottom of the oven
- Rotisserie Tool to remove rotisserie in and out of oven
- Rotisserie Rod and Prongs
- Tray Tool to remove the wire rack or the bake tray
HOW TO USE CONTROL PANEL

Temperature Dial for Upper Elements Only – Use this dial to set the temperature for Keep Warm, Bake, Broil, Toast or Rotisserie.

Function Dial – Use this dial to set Convection, Rotisserie or Convection Rotisserie. This knob does not need to be set for Bake, Broil, Keep Warm, or Toast.

Temperature Dial for Lower Elements Only – Use this dial to set the temperature for Keep Warm, Bake or Toast.
Both Temperature Dials for Upper and Lower Elements - Use both dials to set the temperature for Keep Warm, Bake or Toast.

Timer Dial – This dial must be set to a desired time to begin heating.
NOTE: If cook time is less than 20 minutes, you must turn Timer past the 20 minute mark to engage the timer then back to desired time.
BEFORE FIRST USE
- Before using your toaster oven for the first time, carefully remove all packaging materials and recycle appropriately.
- Remove the parts from the box and wash all removable parts with warm, soapy water and a non-abrasive sponge.
- Place the appliance on a flat, horizontal and stable surface (make sure surface is heat-resistant).
- Turn on the upper and lower heating elements at 450°F for 15 minutes (with the oven empty) to eliminate any factory residue. This may result in minimal smoke, that is normal and harmless.

- DO NOT IMMERSE THE BODY OF THE UNIT IN WATER.
- When oven is in use or cooling down, please be sure there is 6-inches of clearance between the oven and any other surface including cords. Be sure the cord is not resting against the back of the oven.
HOW TO USE
BROIL
- Set the upper heating element to desired temperature. We do not recommend using convection when broiling.
![]()
- Prepare the food per recipe instructions and place on the baking tray or another broiler-safe pan. Insert the baking tray (or removable rack) in the highest position possible (so the food is close to, but not touching the upper elements).
- Close glass doors completely.
- Turn the timer knob to 20.
![]()
![warning]() NOTE: If cook time is less than 20 minutes, you must turn Timer past the 20 minute mark to engage the timer then back to desired time.
NOTE: If cook time is less than 20 minutes, you must turn Timer past the 20 minute mark to engage the timer then back to desired time. - When cooking time has elapsed, bell indicator will sound. Turn the upper element to OFF. Remove food carefully.


 TIP: Timer Dial must always be set to a desired time to begin heating.
Cooked food and metal rack can be very hot, handle with care. Do not leave countertop oven unattended.
BROILING GUIDE:
Cooking results may vary. Adjust these times to your individual requirements.
Use of a meat thermostat is recommended.
| MEAT | OVEN TEMP. | TOTAL TIME W/O CONVECTION | INTERNAL TEMP. |
| Rib Steak | 450°F | 20 - 30 min | 135°F - 160°F |
| T-Bone Steak | 450°F | 20 - 30 min | 135°F - 160°F |
| Hamburger | 450°F | 15 - 20 min | 135°F - 160°F |
| Breaded Fish Filet | 375°F | 20 - 30 min | until flaky |
| Salmon Steak (1" thick) | 400°F | 20 - 25 min | 145°F |
| Pork Chops | 400°F | 40 - 45 min | 145°F |
| Lamb Chops | 400°F | 30 - 40 min | 145°F |
| Chicken Legs | 400°F | 30 - 35 min | 165°F |
BAKE
- Set the upper and lower heating elements to 350°F. Cooking with convection is not recommended when baking cakes or breads. We do recommend using convection when roasting meats or vegetables.
![]()
- Place a removable rack in the desired position.
- Insert your food on/in an oven-safe pan.
- Close glass doors completely.
- Turn the timer knob to the desired cooking time per your recipe.
![]()
![warning]() NOTE: If cook time is less than 20 minutes, you must turn Timer past the 20 minute mark to engage the timer then back to desired time.
NOTE: If cook time is less than 20 minutes, you must turn Timer past the 20 minute mark to engage the timer then back to desired time. - When cooking time has elapsed, bell indicator will sound.
Turn both elements OFF, turn function (if used) to OFF. Remove food carefully.


Suggested Position of the Baking Tray While Baking
- Cookies: Use bottom and middle support guides.
- Layer Cakes: Use bottom support guides only (bake one at a time).
- Pies: Use bottom or middle support guides.
For Cooking Two Pizzas
- Place the 2 pizzas on the wire racks.
- Cook the pizzas for about one-half the recommended time, and then switch the rack positions to allow the pizzas to uniformly cook top and bottom.
TOAST
- Set the upper and lower heating elements to 450°F. Use convection if desired.
![]()
- Place a removable rack into the desired position.
- Place food to be toasted on the rack.
- Close glass doors completely.
- Turn the timer knob to the desired cooking time.
![]()
![warning]() NOTE: If cook time is less than 20 minutes, you must turn Timer past the 20 minute mark to engage the timer then back to desired time.
NOTE: If cook time is less than 20 minutes, you must turn Timer past the 20 minute mark to engage the timer then back to desired time. - When cooking time has elapsed, bell indicator will sound. Turn both elements OFF, turn function (if used) to OFF. Remove food carefully.


Cooked food and metal rack can be very hot, handle with care. Do not leave countertop oven unattended.
TOASTING GUIDE:
| TOAST SHADE | OVEN TEMP. | TIME |
| Light | 450°F | 2 -3 min |
| Medium | 450°F | 4 - 5 min |
| Dark | 450°F | 6 - 7 min |
CONVECTION
- Set the function dial to convection.
- Use convection with the upper element, the lower element, or both.
- Set the desired temperature and timer per your recipe. The fan circulates the air in the oven, but it runs very quietly (you'll only hear a faint hum).
![]()
- When to use: convection will give you uniform browning, and will brown foods faster. We recommend using convection when roasting, toasting, or cooking anything with a cover.
- When not to use: convection should not be used when baking cakes, bread, or anything that needs to rise; do not use with foods that easily dry out.
![]()
- When cooking time has elapsed, bell indicator will sound. Turn the elements to OFF, turn function to OFF. Remove food carefully.


NOTE: Since convection will cook foods faster, remember to adjust your recipes (lower temperature or shorten the cooking time) and watch cooking closely.
ROTISSERIE OR CONVECTION ROTISSERIE
NOTE: We recommend tying the food with butcher's twine to keep it secure while on the rotisserie.
- Set the upper heating element to desired temperature. Set the function dial to rotisserie or convection rotisserie.
![]()
- Insert the bake tray in the lowest position in the oven to catch the drippings.
- Insert one prong onto the rod, pointing inward. Secure with thumbscrew.
- Load the food on the rod, ensuring it is centered, and secure the second prong with the thumbscrew. Maximum food weight is 7.0 lbs.
- Using the rotisserie tool, insert the pointed end of the rod into the drive socket on the right (you may have to twist the rod to align with the socket), then rest the square end of the rod on the support on the left.
- Close glass doors completely.
- Turn the timer knob to your desired cooking time per your recipe. If food does not rotate smoothly, stop, remove, and secure/balance the food. Restart.
![]()
![warning]() NOTE: If cook time is less than 20 minutes, you must turn Timer past the 20 minute mark to engage the timer then back to desired time.
NOTE: If cook time is less than 20 minutes, you must turn Timer past the 20 minute mark to engage the timer then back to desired time. - When cooking time has elapsed, bell indicator will sound. Turn the upper element to OFF, turn function to OFF.
- To remove the food, lift the food out with the rotisserie tool. Lift the left side up from the support first, then remove the right end from the socket.
- Place the food on a cutting board or plate and carefully remove the hot rotisserie prongs and rod. Let rest 5-10 minutes before serving.


Cooked food and metal rack can be very hot, handle with care. Do not leave countertop oven unattended.
ROTISSERIE GUIDE:
Cooking results may vary. Adjust these times to your individual requirements.
Use of a meat thermostat is recommended.
| MEAT | OVEN TEMP. | TIME PER POUND W/O CONVECTION | INTERNAL TEMP. |
| Beef Roast | 350°F | 30 - 35 min | 135°F - 160°F |
| Pork Roast | 350°F | 45 - 50 min | 160°F - 170°F |
| Ham | 350°F | 45 - 50 min | 140°F |
| Chicken | 450°F | 30 - 40 min | 165°F |
| Turkey | 450°F | 30 - 40 min | 165°F |
KEEP WARM
- Set the upper and lower heating elements to 150°F.
![]()
- Place food on the rack or bake tray.
- Close glass doors completely.
- Turn the timer knob to the desired cooking time.
![]()
![warning]() NOTE: If cook time is less than 20 minutes, you must turn Timer past the 20 minute mark to engage the timer then back to desired time.
NOTE: If cook time is less than 20 minutes, you must turn Timer past the 20 minute mark to engage the timer then back to desired time. - When cooking time has elapsed, bell indicator will sound. Turn both elements OFF, remove food carefully.


Cooked food and metal rack can be very hot, handle with care. Do not leave countertop oven unattended.
Positioning Rack
- To accommodate a wide variety of foods the oven has four rack positions. The rack can be inserted in the oven in one of the four positions.
- Before removing the rack allow the oven to cool.
- To remove the rack, open both oven doors and pull the rack outwards from the oven. The rack will slide out on the rack guides.
PLEASE NOTE: The oven rack may tilt down causing food to slide when the rack is pulled out, please use caution.
- Positioning of the rack will depend on the type and size of the food and desired browning. Move the rack to a lower rack position to prevent top browning and move the rack to an upper rack position to prevent bottom burning.
- For the best toasting results, position the rack in the upper rack guide.
Positioning Pan
- To accommodate a wide variety of foods the oven has four pan positions. The pan can be placed on top of a rack or inserted into the rails below a rack. (See Figure Below)
- Before removing the pan allow the oven to cool.
- Positioning of the oven pan will depend on the desired cooking method. For baking, place the pan on top of a rack. For grilling or broiling, insert the pan onto rails below the rack and place the food on top of the rack.
![warning]() NOTE: Do not to use the pan under the rack in the lowest position.
NOTE: Do not to use the pan under the rack in the lowest position.
CLEANING & MAINTENANCE
- Turn off and unplug the oven.
- Always allow the oven to cool completely before cleaning.
- Disassemble all parts.
- Do not use steel wool scouring pads, abrasive cleaners or scrape the walls with a metal utensil, as all of these methods may damage the interior oven coating. Use a soft cloth, sponge or rubber spatula to remove any stuck-on food or residue from the interior walls.
- Wipe the doors and exterior with a soft, damp cloth.
- All accessories should be washed in hot, soapy water, or they can be cleaned in a dishwasher.
- Ensure all parts are dried thoroughly before reassembling and using this appliance.
DO NOT immerse any electrical appliance, its cord, or its plug, into water or any other liquid.
Questions?
Elite's customer service team is ready to help.
Call us toll-free at 800-365-6133 ext. 120/105.
For more Elite products and for support on this product, visit us at shopelitegourmet.com.

Documents / Resources
References

Download manual
Here you can download full pdf version of manual, it may contain additional safety instructions, warranty information, FCC rules, etc.
Download Elite Gourmet ETO4510B - 45L French Door Convection Toaster Oven Manual
Advertisement


Need help?
Do you have a question about the ETO4510B and is the answer not in the manual?
Questions and answers