Advertisement
IMPORTANT SAFEGUARDS
READ ALL INSTRUCTIONS BEFORE USE AND SAVE FOR FUTURE REFERENCE

When using electrical appliances, basic safety precautions should always be followed as below:
- Do not touch hot surfaces. Use handles or knobs and oven mitts.
- To protect against risk of electrical shock, do not immerse cord, plug, or any non-removable parts of this oven in water or other liquid.
- Close supervision is necessary when any appliance is used by or near children.
- Unplug from outlet when not in use and before cleaning. Allow to cool before putting on or taking off parts.
- Do not use outdoors.
- Do not let cord hang over edge of table or counter, or touch hot surfaces.
- Extreme caution must be used when moving an appliance containing hot oil or other hot liquid.
- Do not place on or near a hot gas or electrical burner, or in a heated oven.
- Turn all controls to "OFF" before inserting or removing plug from wall outlet.
- Do not place any flammable materials in the oven: paper, cardboard, plastic, etc.
- To disconnect, grasp plug and remove from outlet. Do not pull by the cord.
- Do not use oven for other than intended use.
- Oversized foods or utensils must not be inserted in this appliance, as they may create a fire or risk of electric shock.
- A fire may occur if this appliance is covered by or touches flammable material including curtains, draperies, walls, etc. when in operation. Do not store any item on top of the appliance.
- Do not store any material, other than manufacturer's recommended accessories, in this oven when not in use.
- Do not clean with metal scouring pads. Pieces can break off the pad and touch electrical parts resulting in a risk of electric shock.
- Extreme caution should be used when using containers constructed of other than metal or oven safe glass.
- Do not cover crumb tray or any parts of the oven with metal foil. This will cause overheating of the oven.
- To reduce the risk of fire, do not place any heating or cooking appliance beneath the appliance.
- To reduce the risk of fire, do not mount unit over or near any portion of a heating or cooking appliance.
- To reduce the risk of electric shock, do not mount over a sink.
- Do not operate the appliance if the power cord or plug is damaged, it must be replaced by the manufacturer or its service agent before use.
- Some countertop and table surfaces, such as Corian®, wood and/or laminates, are not designed to withstand prolonged heat generated by certain appliances. It is recommended by countertop manufacturers that a hot pad or trivet be placed under your appliance to prevent possible damage to the surface.
- When operating the oven, keep at least four inches of space on all sides of the oven to allow for adequate air circulation.
SHORT CORD PURPOSE
Note: A short power cord is provided to reduce the risk of personal injury resulting from becoming entangled in or tripping over a long cord.
Longer power-supply cords or extension cords may be used if care is exercised in their use.
If the plug still does not fit, contact a qualified electrician. Never use the plug with an extension cord unless the plug can be fully inserted into the extension cord. Do not alter the plug of the product or any extension cord being used with this product. Do not attempt to defeat the safety purpose of the polarized plug.
POLARIZED PLUG
If this appliance is equipped with a polarized plug (one blade is wider than the other), please follow the below instructions:
To reduce the risk of electrical shock, this plug is intended to fit into a polarized outlet only one way. If you are unable to fit the plug into the electrical outlet, try reversing the plug.
If an extension cord is used: (1) the marked electrical rating of the extension cord should be at least as great as the electrical rating of the product; (2) the extension cord should be arranged so that it will not drape over the counter top or tabletop where it can unintentionally be pulled on or tripped over by children or pets.
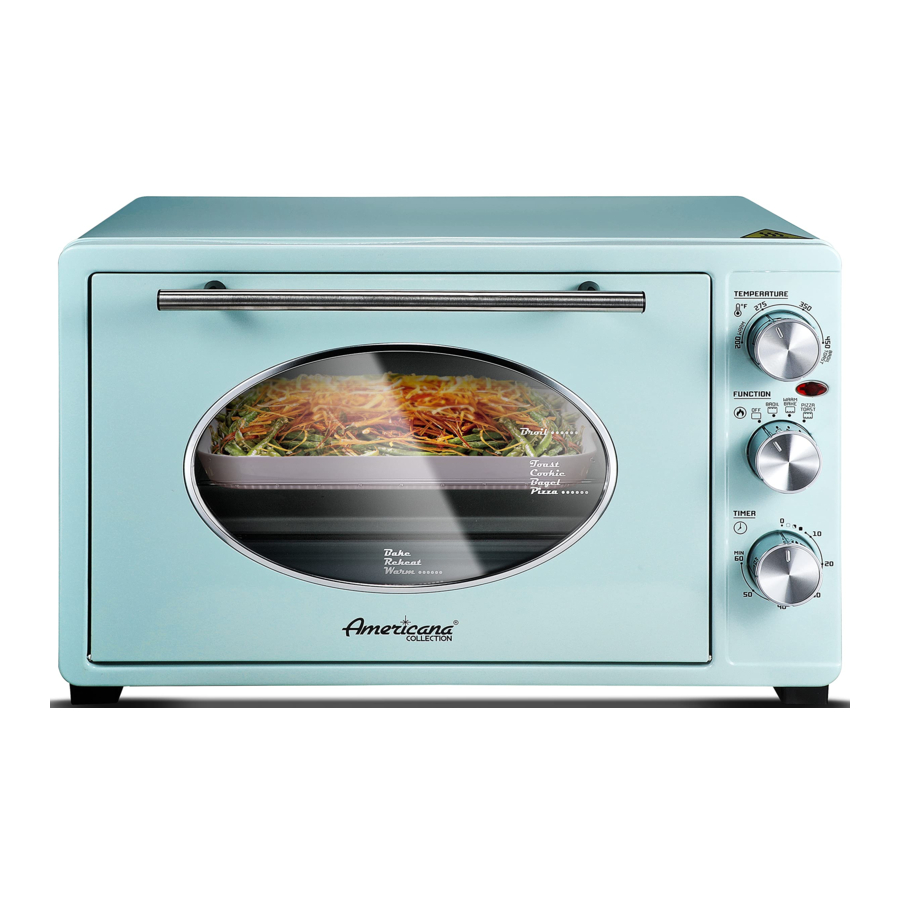
PARTS IDENTIFICATION

- Housing
- Temperature Control Knob
- Power Indicator Light
- Function Knob
- Timer Control Knob
- Front Panel
- Skid-free Feet
- Wire Rack
- Door Frame
- Glass Window
- Door Handle
- Slide-out Crumb Tray
- Bake Tray
BEFORE FIRST USE
Before using your appliance for the first time, be sure to:
- Read all the instructions included in this manual.
- Remove all packaging materials from the appliance and recycle appropriately.
- Make sure there is adequate ventilation around the oven.
- Make sure that the oven is unplugged and the Timer Control Knob is in the "0" position.
- Wash the accessories in hot, soapy water.
- Thoroughly dry all accessories and re-assemble inside the oven. Plug the oven into the wall outlet and you are ready to use your new Toaster Oven.
- After re-assembling your oven, we recommend that you run the oven at the highest temperature (450°F) for approximately 15-minutes to eliminate any manufacturing residue that may remain after shipping. This will remove all traces of odor or smoke that is initially present.
HOW TO USE
Familiarize yourself with the following oven functions and accessories prior to first use:
- TEMPERATURE CONTROL KNOB: Choose the desired temperature from 200°F to 450°F.
- FUNCTION CONTROL: There are 3 function selections and rack positions inside the oven for a variety of cooking needs.
Broil: Only upper heating elements work, suitable for broiling fish, steak, poultry, chops, etc.
Bake/Warm: Only lower heating elements work, suitable for baking cakes, pies, cookies etc food that don't need browning or crispy surface.
Toast/Pizza: Both upper and lower heating elements work together, suitable for toasting bread, muffins, frozen waffles, pizza, etc. - TIMER CONTROL KNOB: To activate the timer segment of the control, turn to the right (clockwise) to toast or use as a timer. This function also has a bell that rings at the end of the programmed time.
- POWER INDICATOR LIGHT: Illuminated whenever the oven is turned on.
- WIRE GRILL RACK: For toasting, baking and general cooking for casserole dishes and standard pans.
- BAKE TRAY: For use in broiling and baking.
NOTE:
The initial 15 minutes of use may result in minimal smell and smoke. This is normal and harmless and comes from the protective substance applied to the heating elements during manufacturing.

- To avoid risk of injury or burns, DO NOT touch hot surfaces when oven is in use. Always use oven mitts.
- Always use extreme care when removing bake tray, wire rack or any hot container from a hot oven. Always use an oven mitt when removing hot items from the oven.
BROILING IN YOUR OVEN
For best results, we recommend that you preheat the oven for 10-minutes on 450°F.
OPERATION
- Place food on the wire rack and slide into the top rack position. Food should be placed as close as possible to the top heating element without touching it.
- Put bake tray at the lowest rack position to catch possible food dripping.
- To prevent fire hazards, it is suggested to wrap food with aluminum foil.
- Set Temperature Knob to appropriate temperature.
- Brush food with sauces or oil, as desired.
- Set Function Knob to Broil Function.
- Turn Timer Knob to your desired cooking time.
- Turn food over midway through the prescribed cooking time.
- When broiling is complete, turn the Function Knob to "OFF" position.
BROILING GUIDE
Cooking results may vary. Adjust these times to your individual requirements.
Use of a meat thermostat is recommended.
| MEAT | OVEN TEMP. ( °F) | TIME PER LB. (MIN) |
| Rib Eye Steak | 400 | 25 - 30 |
| T-Bone Steak | 400 | 25 - 30 |
| Hamburger Patty | 400 | 25 - 28 |
| Pork Chops | 400 | 40 - 45 |
| Lamb Chops | 400 | 30 - 40 |
| Chicken Legs | 400 | 30 - 35 |
| Fish Filets | 350 | 20 - 25 |
| Salmon Steaks | 350 | 20 - 25 |
NOTE: All broiling times are based on meats at refrigerator temperature. Frozen meats may take considerably longer. Using a meat thermometer is highly recommended.
BAKING IN YOUR OVEN
Bake your favorite cookies, cakes, pies, brownies, etc. We do not recommend the use of oven roasting bags or glass containers inside the oven that are not heat resistant.
NEVER use plastic, cardboard, paper or anything flammable in the oven.
NOTE: When using a single Wire Rack, position the Wire Rack in the lowest support guide.
POSITIONING OF THE RACK WHEN BAKING
Cookies – Use bottom or middle support guides.
Layer Cakes – Use bottom support guide only. (Bake one at a time).
Pies – Use bottom or middle support guides.
OPERATION
- Place food on the wire rack or bake tray and slide into the lowest rack position. Food should be placed as close as possible to the lower heating element without touching it.
- To prevent fire hazards, it is suggested to wrap food with aluminum foil.
- Set Temperature Knob to appropriate temperature.
- Brush food with sauces or oil, as desired.
- Set Function Knob to Bake Function.
- Turn Timer Knob to your desired cooking time.
- Turn food over midway through the prescribed cooking time.
- When BAKE is complete, turn the function knob to "OFF" position.
TOASTING IN YOUR OVEN
Large capacity oven allows for toasting 4 slices of bread, muffins, frozen waffles or frozen pancakes. When toasting only 1 or 2 items, place food on the Wire Grill Rack in the center of the oven.
OPERATION
- Place food to be toasted on the Wire Grill Rack.
- Set the Temperature Knob to desired temperature.
- Ensure Crumb Tray is positioned at bottom of oven below the heating rods.
- Turn the Timer Knob to desired darkness. (2min - Light | 4min - Med | 6min - Dark).
- Bell will ring to signal the end of the toast cycle.
- When toasting is complete, open door fully, and remove food items carefully.
Cooked food and metal rack can be very hot, handle with care. Do not leave countertop oven unattended.
NOTE:
Wire Grill Rack should be positioned in the middle of the oven with the indentations pointing down.
KEEPING WARM
Keep cooked food warm for up to 30-minutes. Longer periods of time are not recommended as food will become dry or spoiled.
OPERATION
- Set the Temperature Knob to 200°F.
- Turn the Timer Knob to desired time.
- Place food to be kept warm onto the Wire Grill Rack or the Bake Tray.
- Bell will ring to signal the end of the KEEP WARM cycle.
- When warming is complete, open door fully, and remove Wire Grill Rack or the Bake Tray carefully.
CLEANING & MAINTENANCE
- Turn off and unplug the oven.
- Always allow the oven to cool completely before cleaning.
- Disassemble all parts.
- Do not use steel wool scouring pads, abrasive cleaners or scrape the walls with a metal utensil, as all of these methods may damage the interior oven coating. Use a soft cloth, sponge or rubber spatula to remove any stuckon food or residue from the interior walls.
- Wipe the doors and exterior with a soft, damp cloth and wiped dry with a paper or cloth towel.
- All accessories should be washed in hot, soapy water.
- Ensure all parts are dried thoroughly before reassembling and using this appliance.
When using the Wire Grill Rack and pulling it out of the oven, always support the rack. Do not release until you are sure the rack is securely supported.
NOTE: Exercise caution when cleaning your Toaster Oven. BE CERTAIN the Oven has cooled completely before cleaning. Wearing gloves is recommended to minimize risk of abrupt edges that may be present on the interior and the exterior of the oven due to the manufacturing process.

Documents / ResourcesDownload manual
Here you can download full pdf version of manual, it may contain additional safety instructions, warranty information, FCC rules, etc.
Download Elite Gourmet Americana ETO3300M - 8 Slice Toaster Oven Manual
Advertisement


Need help?
Do you have a question about the Americana ETO3300M and is the answer not in the manual?
Questions and answers