Sunbeam Mixmaster JM7000, JM7050 - HeatSoft Hand Mixer Manual
- User manual (9 pages) ,
- Quick start manual (2 pages)
Advertisement
Sunbeam's Safety Precautions
SAFETY PRECAUTIONS FOR YOUR SUNBEAM HEATSOFT TECHNOLOGY HAND MIXER.
- Never eject beaters, dough hooks or whisk when the appliance is in operation.
- Ensure fingers are kept well away from moving beater, whisk or dough hook.
- When mixing extremely heavy loads the appliance should not be operated for more than 1 minute 30 seconds or use the HeatSoft feature for longer than 5 minutes continuously.
![]()
In the case of the mixer overheating due to excessive load, the safety cutout will activate, preventing the mixer from operating. Should this occur, switch the mixer off at the power outlet and allow the mixer to cool for 10 minutes before switching back on.

Sunbeam are very safety conscious when designing and manufacturing consumer products, but it is essential that the product user also exercise care when using an electrical appliance. Listed below are precautions which are essential for the safe use of an electrical appliance:
- Read carefully and save all the instructions provided with an appliance.
- Always turn the power off at the power outlet before you insert or remove a plug. Remove by grasping the plug - do not pull on the cord.
- Turn the power off and remove the plug when the appliance is not in use and before cleaning.
- Do not use your appliance with an extension cord unless this cord has been checked and tested by a qualified technician or service person.
- Always use your appliance from a power outlet of the voltage (A.C. only) marked on the appliance.
- This appliance is not intended for use by young children or infirm persons unless they have been adequately supervised by a responsible adult to ensure that they can use the appliance safely.
- Young children should be supervised to ensure that they do not play with the appliance.
- Never leave an appliance unattended while in use.
- Appliances are not intended to be operated by means of an external timer or separate remote control system.
- Do not use an appliance for any purpose other than its intended use. Misuse can cause injuries.
- Do not place an appliance on or near a hot gas flame, electric element or on a heated oven. Do not place on top of any other appliance.
- Do not let the power cord of an appliance hang over the edge of a table or bench top or touch any hot surface.
- Do not operate any electrical appliance with a damaged cord or after the appliance has been damaged in any manner. If damage is suspected, return the appliance to the nearest Sunbeam Appointed Service Centre for examination, repair or adjustment to avoid a hazzard.
- For additional protection, the appliance should be supplied through a residual current device (RCD) with a tripping current not exceeding 30mA in the electrical circuit supplying power to your appliances.
- Do not immerse the appliance in water or any other liquid unless recommended.
- This appliance is intended to be used in household and similar applications such as: staff kitchen areas in shops, offices and other working environments; farm houses; by clients in hotels, motels and other residential type environments; bed and breakfast type environments.
If you have any concerns regarding the performance and use of your appliance, please visit www.sunbeam.com.au or contact the Sunbeam Consumer Service Line. Ensure the above safety precautions are understood.
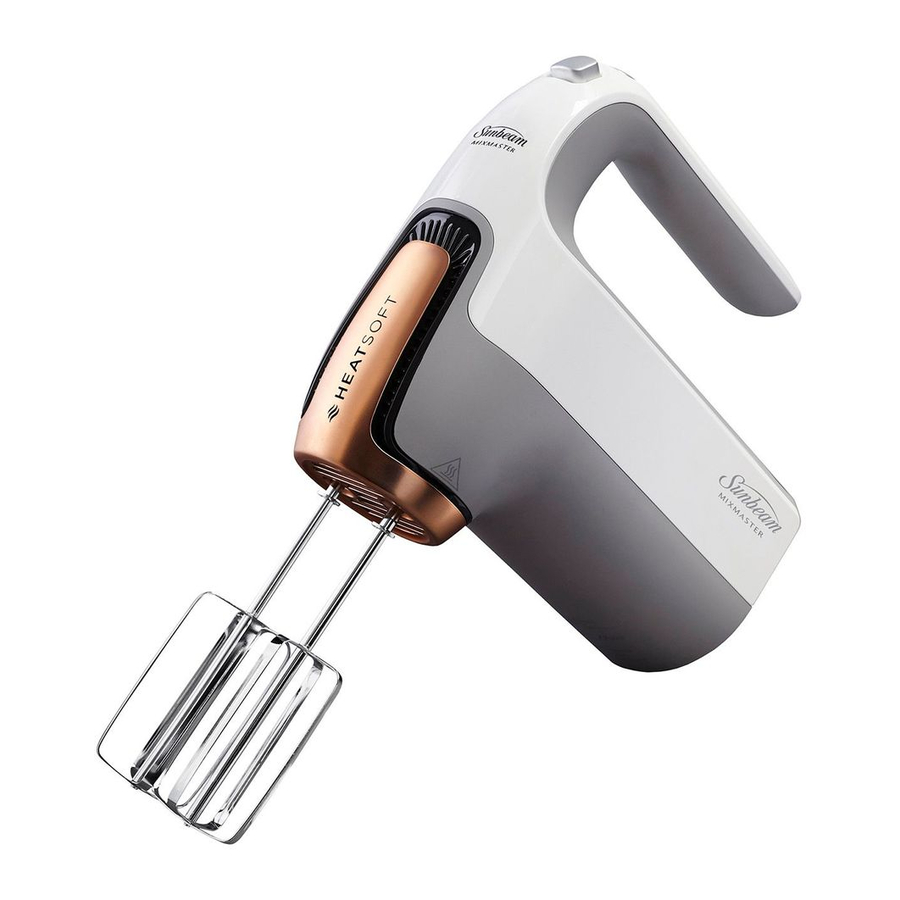
Features of your HeatSoft Technology Hand Mixer

NOTE: Not all accessories may be included and can vary depending on the unit purchased.
Learning About Your Hand Mixer
The Sunbeam® Hand Mixer with HeatSoft Technology has been designed to allow you to bake when inspired. No more waiting for ingredients like butter to reach room temperature! Now you can soften and mix in one step!
Did You Know?
Many recipes require ingredients like butter to be at room temperature. Butter will only reach room temperature after hours of sitting on the benchtop. If you use butter that's cold, straight from the refrigerator, it will result in heavy and dense baked goods. Butter that is microwaved or melted butter can create an oily batter resulting in soggy, unevenly risen baked goods. Using room temperature ingredients creates fluffier results and better baked goods.
HeatSoft Button:
The HeatSoft ![]() Button allows for butter to be softened while mixing. HeatSoft Technology uses gentle heat to bring cold ingredients to room temperature while mixing eliminating the need to plan ahead.
Button allows for butter to be softened while mixing. HeatSoft Technology uses gentle heat to bring cold ingredients to room temperature while mixing eliminating the need to plan ahead.
Note: Do not use the HeatSoft button for longer than 5 minutes each time.
Boost Button Power Feature
The Boost Button Power Feature allows for an added boost to the selected speed setting at the press of the button.
Beater Eject Button
This Hand Mixer features a convenient Beater Eject Button. The design allows for a separate push of the thumb to release the beaters, dough hooks or whisk.

Make sure hand mixer is unplugged before removing or inserting any attachments.
Power Cord Management
The power cord strap that comes attached to the power cord keeps it organised when wrapped.
Beaters
The beater design allows for thorough, fast mixing results for all types of batters. The stainless steel beaters are dishwasher safe.
Dough Hooks (JM7000 only)
Use these hooks (see Figure 1) to knead bread dough, pizza dough or other heavy batters and doughs. Use at lower speeds for best results.

Whisk (JM7000 only)
The whisk (see Figure 3) is used to beat air into mixtures such as egg whites, yolks or cream.

Storage Case (JM7000 only)
Lets you store your hand mixer, accessories, and power cord conveniently together for easy access and travel (see Figure 4).

Magnetic Nozzle
The magnetic nozzle is removable for easy cleaning. (see Figure 5).

Using your HeatSoft Technology Hand Mixer
Prepping your Mixer
Before using your mixer for the first time, wash the beaters, dough hooks and whisk. Rinse and dry.
To place the beaters in the unit first ensure speed control is "0 (OFF)" and unit is unplugged. Then ensure Magnetic Nozzle is in place. Insert beaters one at a time, by placing the stem end of beaters into the opening drive holes on the bottom of the mixer. Turn beater slightly and push in until beater clicks into position.
Note that the beaters are interchangeable but dough hooks are not. When using dough hooks, the dough hook with the collar on the stem (see Figure 2) fits into the large drive hole on the mixer. If dough hooks do not click into the drive holes, reverse and try again.
Plug cord into an appropriate outlet.
Softening Butter
- Cut cold butter into approx. 2.5cm cubes and place them into the mixing bowl with sugar.
- Press the HeatSoft button once, and then turn on the beaters. Start at speed setting 1 for approx. 45 seconds or until there are no more large chunks of butter. Then turn to speed 7 for the remainder of time recommended in the chart.
NOTE: When the HeatSoft button is functioning, a white light will illuminate and the heat fan will turn on.
![]()
Do not touch or hold your hand beneath the heat nozzle while the HeatSoft feature is ON.
NOTE: Turn off the HeatSoft feature after the amount of time listed in the chart above to avoid over creaming the batter. - Once the creaming is completed press the HeatSoft button again to turn off the heat and the white light will fade out and the fan will turn off.
Sugar Amount
(Cups)Butter Amount
(Grams)Softening Time 1/2 cup 110g 1 to 1 ½ minutes 1 cup 220g 2 to 2 ½ minutes - Continue mixing your batter with the rest of the ingredients following the recipe. Find more details in the Mixing Section.

Mixing
- Add in the rest of the ingredients into the mixing bowl.
NOTE: To avoid splatters start unit on lowest speed and slowly increase to the desired speed setting. - Slowly guide mixer around sides and through center of bowl, going in the same direction. Be careful not to overbeat the mixture. Overbeating tends to make some mixtures tough.
NOTE: Whenever scraping of the bowl is required, stop the mixer and scrape sides and bottom of bowl with a rubber spatula as needed. Turn speed control to "0 (OFF)" while adding ingredients. Be sure to position beaters over mixing bowl so any drippings will fall back into mixing bowl. - When mixing is complete, set speed control to "1" and raise beaters slowly from batter to clean off clinging food. Be sure to turn unit to "0 (OFF)" before raising beaters completely out of mixing bowl.
Ejecting Beaters, Dough Hooks, or Whisk

Turn off and unplug the appliance before ejecting any accessories.
Be sure speed control is at the "0 (OFF)" position and cord is removed from electrical outlet. Press the Beater Eject Button and accessories will release.
How To Adjust the Speed
- Move the speed selector from 1 to 7 and to turn off set to "0 (OFF)".
- To engage a higher speed immediately press and hold the Boost Button. The speed will go to 7 until released and will return to orginal setting.
NOTE: This feature is intended to be used for short bursts. For long mixing use select speed 7.
Mixing Guide
Please keep in mind that the various mixing tasks and related speeds, listed in the table below, may vary slightly from recipe to recipe. Please refer to it regularly as you develop your understanding of how different ingredients interact when mixing.
Hints & Tips
For most recipes, it is better to begin your mixing on a slower speed until the ingredients begin combining, then move to the appropriate speed range for the particular task.
Generally, there is not one set speed for an entire recipe. You will need to change the speed of the mixer depending on what stage of the recipe you are working on.
When mixing larger quantities you may need to increase the mixer speed due to the amount of mixing required and the larger load on the machine.
When building up a recipe that requires the addition of dry ingredients, such as flour, slow the speed down whilst these ingredients are being added to avoid a snow storm effect. Once the additional ingredients begin combining then slowly increase to the appropriate speed for the particular mixing task.
Speed Guide for Hand Mixer
| Speed | Mixing Tasks |
| 1 Stir | Use to start softening butter with the HeatSoft button. Also use when stirring liquid ingredients or when mixing dry and liquid ingredients together alternately in a recipe. Use when preparing any packet cake mixes or desserts. |
| 2 Mix | Use when a recipe calls for combining ingredients together. Use for quick breads or muffins that require a brisk action, just enough to blend. |
| 3 Blend | Use when preparing cake mixes or for directions calling for medium speed. Use to cream butter and sugar together. NOTE: This is the maximum recommended speed for dough hook usage. |
| 4-5 Beat | Use when preparing a frosting from a recipe or packet. Use when whipping cream for desserts. |
Care and Cleaning
Turn off and unplug appliance and eject any accessories before cleaning.
- Before cleaning any part of the mixer, set the speed control to the "0 (OFF)" position to turn off. Then unplug the cord from the outlet and eject the beaters.
- The beaters, dough hooks and whisk may be washed in hot, soapy water or in a dishwasher. This appliance features a magnetic nozzle designed to be removed for cleaning. It is dishwasher safe or it can be washed in soapy water. Do not use scouring pad to avoid scratching.
- For easy cleaning, press down the extended tab to pull off the Heater Vent Cover. Then remove the Heater Vent Filter. Wash with soapy water and dry before placing it back into the unit. The Filter should be cleaned every 3-6 months depending on usage.

![]()
Do not immerse mixer in water while cleaning. This may cause electric shock, injury, or damage to the product. - To remove stubborn spots on the hand mixer, wipe surfaces with a piece of cloth, slightly dampened in soapy water or a mild, non-abrasive cleaner.
- Do not use any abrasive cleaner or material to clean any part of the hand mixer, any part of the hand mixer or storage case as it can scratch the product.

Storage
- Do not store any materials, other than the mixer, its accessories, power cord and the user guide the Storage Case.
- Do not turn on the HeatSoft feature or power ON the appliance while stored in the storage case.
Using the Storage Case (JM7000 only)
The storage case is designed to help you store all accessories and unit in the same place. To remove the hand mixer from the storage case, push front tab away from the mixer and pull out the mixer. (see Figure 7)
To place it back on the storage case, have the magnetic nozzle facing the tab on the storage case. Push the mixer on and the tab will click onto the mixer.
NOTE: Allow for 20-25cm of uncoiled cord from the back of the unit in order to fit into the storage case. (see Figure 7)

Replacing Heater Vent Filter
The Heater Vent Filter should be replaced when it's worn out or damaged.
Troubleshooting Guide
| Problem | Possible Cause | What to do |
| Hand mixer will not start. | Motor is over-heated. | Unplug from power outlet and wait 10 minutes before next use. |
| Beaters, dough hooks or whisk won't insert into mixer. | Accessories aren't lined up with unit. | Rotate beaters or other accessories slightly clockwise until they snap into the unit. |
| Can't remove beaters, dough hooks or whisk. | Beater Eject Button not full pressed. | Unplug the mixer then press down the Beater Eject Button and gently pull accessories out. |
| HeatSoft continues to operate. | HeatSoft button not fully pressed. | Press the HeatSoft button once to turn off or unplug from the power outlet. |
| Heater fan cover cannot be reinstalled. | Locking tab may be broken. | Call customer care for replacement part. |

Documents / ResourcesDownload manual
Here you can download full pdf version of manual, it may contain additional safety instructions, warranty information, FCC rules, etc.
Download Sunbeam Mixmaster JM7000, JM7050 - HeatSoft Hand Mixer Manual
Advertisement


Need help?
Do you have a question about the Mixmaster JM7000 and is the answer not in the manual?
Questions and answers