Sign In
Upload
Download
Table of Contents
Contents
Add to my manuals
Delete from my manuals
Share
URL of this page:
HTML Link:
Bookmark this page
Add
Manual will be automatically added to "My Manuals"
Print this page
×
Bookmark added
×
Added to my manuals
Manuals
Brands
Teka Manuals
Refrigerator
FTM 240
Instruction manual
Teka FTM 240 Instruction Manual
Refrigerator-freezer
Hide thumbs
1
Table Of Contents
2
3
4
5
6
7
8
9
10
11
12
13
14
page
of
14
Go
/
14
Contents
Table of Contents
Troubleshooting
Bookmarks
Table of Contents
Table of Contents
Safety Warnings
Installtion
Location
Reversing the Door Swing
Door Space Requirements
Levelling the Unit
Cleaning before Use
Before Using Your Unit
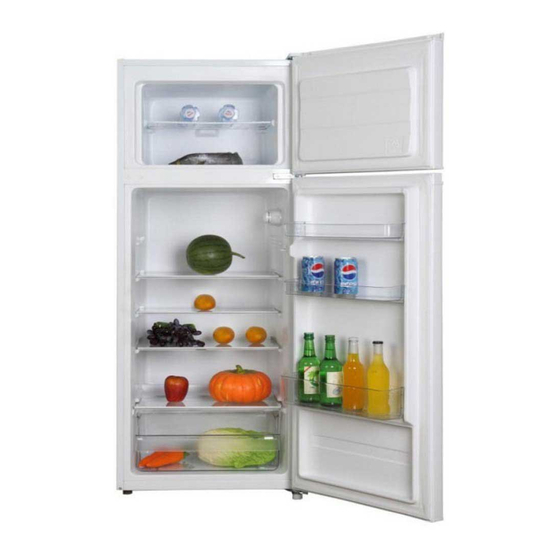
Interior Accessories
Product Overview
Operation
Switching on Your Unit
Noise Inside the Unit
Tips for Keeping Food in the Unit
Change the Light Bulb
Cleaning
Cleaning the Interior and the Exterior of the Unit
Cleaning Tips
Maintenance
Changing the Internal Light
Care When Handling / Moving Your Unit
Servicing
Switching of for Long Periods of Time
Trouble Shooting
Warm Tips
Tips for Energy Saving
Disposal
Advertisement
Quick Links
Download this manual
MODEL: FTM 240
FTM 310
FTM 410
Table of
Contents
Previous
Page
Next
Page
1
2
3
4
5
Advertisement
Table of Contents
Need help?
Do you have a question about the FTM 240 and is the answer not in the manual?
Ask a question
Questions and answers
Related Manuals for Teka FTM 240
Refrigerator Teka FT3 310 Instruction Manual
Double door refrigerator (112 pages)
Refrigerator Teka FTM 221 EU User Manual
(51 pages)
Refrigerator Teka FTM 310 Instruction Manual
Refrigerator-freezer (14 pages)
Refrigerator Teka FTM 410 Instruction Manual
Refrigerator-freezer (14 pages)
Refrigerator Teka FT2-410 VR01 Instruction Manual
Double door refrigerator (112 pages)
Refrigerator Teka NFE2 320 Instruction Manual
Combi (100 pages)
Refrigerator Teka Combi NFE1 320 Instruction Manual
(91 pages)
Refrigerator Teka TGF 270 Instruction Manual
(46 pages)
Refrigerator Teka NFE 900 X Instruction Manual
(260 pages)
Refrigerator Teka NF1-350 series Owner's Manual
(65 pages)
Refrigerator Teka RTF 2510 User Manual
(80 pages)
Refrigerator Teka CI3 350 NF Instruction Manual
(56 pages)
Refrigerator Teka RTF 3370 SS MY User Manual
(22 pages)
Refrigerator Teka RVU 10008 GBK User Manual
(61 pages)
Refrigerator Teka NFL 345 C WHITE Instruction Manual
(104 pages)
Refrigerator Teka NF1 650 Instruction Manual
(34 pages)
This manual is also suitable for:
Ftm 310
Ftm 410
Table of Contents
Print
Rename the bookmark
Delete bookmark?
Delete from my manuals?
Login
Sign In
OR
Sign in with Facebook
Sign in with Google
Upload manual
Upload from disk
Upload from URL


Need help?
Do you have a question about the FTM 240 and is the answer not in the manual?
Questions and answers