Sony FWD-32LX1 Installation Manual
Sony fwd-32lx1: install guide
Hide thumbs
Also See for FWD-32LX1:
- Operating instructions manual (28 pages) ,
- Protocol manual (24 pages) ,
- Dimensional drawing (4 pages)

Related Manuals for Sony FWD-32LX1


Summary of Contents for Sony FWD-32LX1
- Page 1 INSTALLATION MANUAL SFM2 Sony Electronics, Inc. 16540 West Bernardo Drive San Diego, CA 92127 www.sony.com IN-SFM2.R1...
-
Page 2: Table Of Contents
SFM2 Table of Contents WARNING STATEMENTS... - 3 - PARTS LIST ... - 4 - INSTALLATION TOOLS ... - 4 - INSTALLATION PROCEDURES ... - 5 - SINGLE STUD INSTALLATION ... - 5 - SOLID STRUCTURE INSTALLATION ... - 6 - ATTACHING THE ADAPTER PLATE AND THE BACKPLATE COVER ... -
Page 3: Warning Statements
Recommended mounting surfaces: wooden studs and solid-flat concrete. If the mount is to be installed on any surface other than wooden studs, use suitable hardware (which is commercially available). Installation Manual Warning Statements Contact questions. SFM2 Sony Electronics with Page - 3 -... -
Page 4: Parts List
This wall mount is shipped with all proper installation hardware and components. Make sure that none of these parts are missing and/or damaged before beginning installation. If there are parts missing and/or damaged, please stop the installation and contact Sony Electronics (877) 350-3477. -
Page 5: Installation Procedures
Check that you have all the hardware listed in the parts list (Page 5). If any of the hardware described is missing, do not continue. Contact Sony Electronics immediately at (877) 350-3477. Separate the plates and choose the location for the monitor and follow any precautions listed in the LCD owners’... -
Page 6: Solid Structure Installation
SFM2 Solid Structure Installation 1. Use the four mounting points on the back plate (Figure 2). 2. Choose the wall where the monitor will be located. 3. Level and mark with a pencil the four (4) mounting points found on the back plate. 4. -
Page 7: Attaching The Adapter Plate And The Backplate Cover
Attaching the Adapter Plate and the Backplate Cover 1. Line up the mounting points (Figure 3). 2. Attach the frontplate to the adapter plate using four (4) M4 x 10mm Phillips Head screws (Figure 4). 3. Do not tighten the screws until all four are inserted. 4. - Page 8 SFM2 M4 x 10mm Phillips Head Screws Frontplate Page - 8 - M6 x 12mm Phillips Head Security Screws Figure 4 Adapter Plate M4 x 10mm Phillips Head Screws Installation Instructions...
-
Page 9: Attaching The Adapter Plate /Backplate Cover To The Display
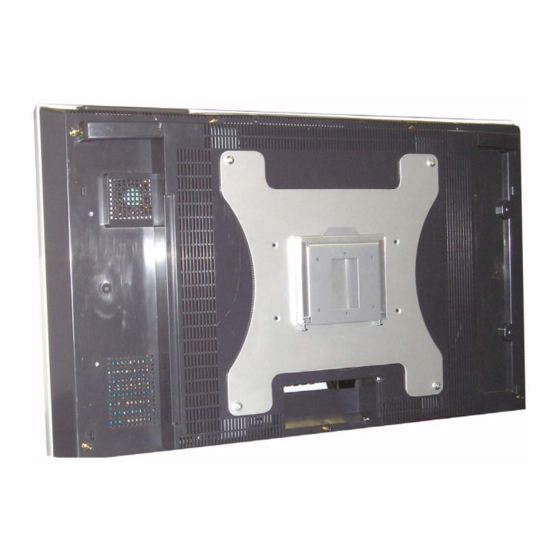
Attaching the Adapter Plate /Backplate Cover to the Display 1. Place the display on a flat and soft surface and locate the four mounting points (Figure 5). 2. Attach the Adapter Plate to the back of the display using four (4) M6 x 10mm Phillips Head screws (Figure 6). -
Page 10: Attaching The Display To The Backplate
SFM2 Attaching the Display to the Backplate NOTE: For clarity purposes, the following illustrations will be shown without the adapter plate and display attached. This must be done to show how the positioning of the backplate cover and the backplate relate to each other (connection-wise). -
Page 11: Technical Specifications
SFM2 Technical Specifications Figure 7. Adapter Plate .750" 4.750" 5.3125" 5.750" Figure 8. Ultra Flat Mount Installation Manual Page - 11 -... -
Page 12: Warranty
Limited Lifetime Warranty This product carries a limited lifetime warranty from ship date against defects in materials and workmanship. Sony Electronics is not liable for improper installation that results in damage to mounts, adapters, display equipment or personal injury. Customer Support In the event of missing and/or damaged equipment, or technical questions, the following information can help in the completion of the installation.
Need help?
Do you have a question about the FWD-32LX1 and is the answer not in the manual?
Questions and answers