
Related Manuals for Osram e:cue SYMPL dmx


Summary of Contents for Osram e:cue SYMPL dmx
- Page 1 Light is OSRAM Our Brand AB444180035 e:cue SYMPL dmx Node Setup Manual / Installationsanleitung...
- Page 2 AB444180035 e:cue SYMPL dmx Node Setup Manual (original issue) e:cue SYMPL dmx Node Installationsanleitung (Originalversion) Edition/Ausgabe: 01.08.22 [EN_DE_SYMPL_dmx_Node_Setup_v2p7] Published by / Herausgegeben von: OSRAM GmbH Karl-Schurz-Strasse 38 33100 Paderborn, Germany ©2022 OSRAM GmbH, BU Digital All rights reserved / Alle Rechte vorbehalten...
-
Page 3: Table Of Contents
Table of Contents / Inhalt Table of Contents / Inhalt English Security instructions Symbols General security instructions General device description Delivery content Connectors and interfaces User interface: LEDs Identify button: Identification & Reset & Testing General remarks Transport Unpacking Warranty regulations Maintenance and Repair Disposal Support... - Page 4 Table of Contents / Inhalt Dismounting Product specifications Certifications Deutsch Sicherheitshinweise 11.1 Symbole 11.2 Hinweise Gerätebeschreibung 12.1 Lieferumfang 12.2 Anschlüsse und Schnittstellen 12.3 Benutzeroberfläche: LEDs 12.4 Identify-Taster: Identifikation & Reset & Test Allgemeine Hinweise 13.1 Transport 13.2 Entpacken 13.3 Garantiebestimmungen 13.4 Reparatur und Wartung 13.5...
- Page 5 Table of Contents / Inhalt Demontage Produktdaten Zertifizierung Dimensions / Abmessungen...
-
Page 6: English
English... -
Page 7: Security Instructions
Connect cables and data only when the device is powered down. The device must be supplied by a separate certified SELV Class 2 power supply. The maximum length of each connected cable is 30 m. If safety instructions are missing, please contact OSRAM to receive a new copy. -
Page 8: General Device Description
Lighting Application Suite version 7.0 SR2 or higher is mandatory. e:cue SYMPL dmx Node is not hot-pluggable. Delivery content Delivery content for the e:cue SYMPL dmx Node (AB444180035): e:cue SYMPL dmx Node Safety instructions Welcome note (English) -
Page 9: Connectors And Interfaces
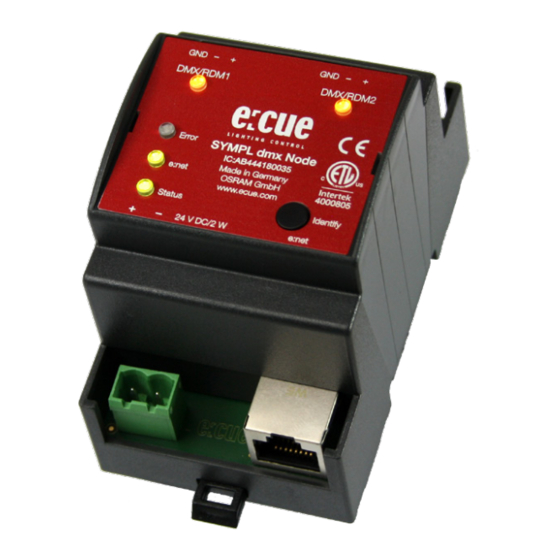
General device description Connectors and interfaces View from top DMX output 1 (GND, DMX–, DMX+ left to right) DMX output 2 (GND, DMX–, DMX+ left to right) DMX/RDM 1 status LED DMX/RDM 2 status LED Test / Error LED e:net LED (Ethernet, LAN activity) Status LED (Device status) Identify button Power supply... -
Page 10: Identify Button: Identification & Reset & Testing
Switch the device off and on. If the error persists, check the wiring or contact OSRAM Service. Status + The Status and Test / Error LED blink simultaneously to Test / Error identify the SYMPL Node (enabled “Identify Interface... - Page 11 General device description To exit the bootloader mode, short press the Identify button again. • Press the Identify button until Status and Test / Error LEDs blink alternating, then blink together. Releasing the button now resets the device to its factory settings. The password and other settings are reset to their default values.
-
Page 12: General Remarks
Only transport the device in its original packaging. This protects the device from damage. Unpacking Only unpack the e:cue SYMPL dmx Node at its installation location. To protect the device against condensation water, unpack it and wait until all moisture remaining in the device has evaporated. Condensation can occur when the device is moved from a cold to a warm location. -
Page 13: Disposal
Support In case of technical problems or questions regarding installation and repair please contact: OSRAM GmbH Customer Service Karl-Schurz-Str. 38 33100 Paderborn, Germany +49 (5251) 54648-0 support@ecue.com... -
Page 14: Installation Conditions
Installation Installation conditions Installation position: Terminals on top and bottom Horizontal spacing: No spacing necessary Minimum vertical rail grid spacing: 115 mm (90 + 25 mm) (excluding conduit) Recommended vertical rail grid spacing: 160 mm (with 40 mm conduit) Installation location Indoor Mounting process The e:cue SYMPL Node is designed to mount onto a 35 mm DIN rail... -
Page 15: Dmx Connection
From left to right: GND, DMX-, DMX+ It is recommended to use twisted pair cabling. Power supply The e:cue SYMPL dmx Node can be powered by an external power supply or via Power-over-Ethernet. PoE: For PoE, simply connect an Ethernet connection from a power sourcing device. -
Page 16: Network Configuration
24 V DC to the SYMPL dmx Node. Network configuration The configuration of the e:cue SYMPL dmx Node is completely done via e:cue SYMPHOLIGHT. See the SYMPHOLIGHT System Manual for details on configuration, available at www.ecue.com. -
Page 17: Network Configuration With Sympholight
Network configuration Network configuration with SYMPHOLIGHT Open the context menu of the SYMPL dmx Node in the Setup tab of SYMPHOLIGHT by a right-click on the device. Select “Configure Network”: Define the IP address, the subnet mask and the DHCP settings to your needs: Click “Apply”... - Page 18 Network configuration The web interface of the SYMPL dmx Node is displayed: On the left side, select “Settings” and enter the default password ecue: Click “Apply”. The Settings page is displayed: Define the network settings at “Device Basics” to your needs. You can also change the password for entry to the web interfaces of the SYMPL dmx Node here.
-
Page 19: Extended Dmx/Rdm Settings
Network configuration Click “Submit” to apply the settings. The network configuration of the SYMPL dmx Node is completed. The employment of a discrete network is recommended. Note down all employed and, if applicable, reserved IP addresses. Keep the information for future network configurations. - Page 20 Test mode To access the web interface, open a common web browser on a connected PC. Enter the device's IP address into the address bar: e.g. http://192.168.123.1. At Startup Setting and Offline Setting, the setting “send MARK” sends a MARK (a logical one) on the bus: no data are sent to the fixtures and the DMX port awaits further commands.
- Page 21 - SYMPHOLIGHT v5.0 or higher needed- patterns and allows to change their properties. To access the web interface, open a common web browser on a connected PC. Enter the SYMPL dmx Node‘s IP address into the address bar: e.g. http://192.168.123.1. Open the Test mode page by selecting “TestMode”...
-
Page 22: Firmware Update
SYMPL dmx Node or click the Update button in the head toolbar. Dismounting Disconnect all attached cables. Dismount the e:cue SYMPL dmx Node from the rail by pulling the black DIN rail handle and unhitching the SYMPL Node. The dismounting is completed. - Page 23 Product specifications Power supply input 24 V DC on screw terminal wire gauge: 0.21 ... 3.31 sqmm Power over Ethernet (PoE), IEEE 802.3af Power consumption 2 W incl. DMX bus termination Operating temperature 0 … 50 °C / 32 … 122 °F Storage temperature -10 ...
-
Page 24: Certifications
Certifications 10 Certifications Conforms to ANSI / UL Std. 62368-1 4000805 Certified to CSA Std. C22.2 NO. 62368-1... -
Page 25: Deutsch
Deutsch... -
Page 26: Sicherheitshinweise
Das Gerät muss durch ein separates Class 2-Netzteil versorgt werden. Die maximale Länge jedes angeschlossenen Kabels beträgt 30 m. Sollte das beigelegte Heft mit den Sicherheitshinweisen fehlen, wenden Sie sich bitte an den OSRAM-Service für ein zusätzliches Exemplar. -
Page 27: Gerätebeschreibung
Verbindungen zwischen Servern, Cores und Nodes erfolgen immer über e:net mittels Ethernet. Der e:cue SYMPL dmx Node ist ein zweikanaliges DMX512-Interface für die e:cue Steuerungslösung SYMPHOLIGHT. Er bietet ein DMX-Interface für bis zu 1024 DMX-Systeme in zwei DMX-Universen. Mit Spannung versorgt wird der SYMPL dmx Node von einem externen Netzteil oder über Power-over-... -
Page 28: Anschlüsse Und Schnittstellen
Gerätebeschreibung 12.2 Anschlüsse und Schnittstellen Sicht von oben auf das Gerät DMX-Ausgang 1 (GND, DMX–, DMX+ links nach rechts) DMX-Ausgang 2 (GND, DMX–, DMX+ links nach rechts) LED DMX/RDM 1-Status LED DMX/RDM 2-Status LED Test / Error (Test / Fehler) LED e:net (Ethernet, LAN-Aktivität) LED Status (Gerätestatus) Identifikationstaster... -
Page 29: Identify-Taster: Identifikation & Reset & Test
Fehler wie Kurzschluss der Datenanschlüsse. Schalten Sie das Gerät aus und wieder ein. Besteht der Fehler weiterhin, überprüfen Sie die Verdrahtung oder wenden Sie sich an den OSRAM Service. Status + Die Status- und die Test / Error-LED blinken simultan, Test / Error um den SYMPL Node zu identifizieren (aktiver “Identify... - Page 30 Gerätebeschreibung • Drücken Sie den Identify-Taster beim Einschalten bis Error und Status LED leuchten. Lassen Sie den Taster wieder los. Der Node bleibt nun im Bootloader-Modus und ist bereit für ein Herunterladen einer Firmware. Um den Bootloader-Modus zu beenden, drücken Sie den Identify-Taster.
-
Page 31: Allgemeine Hinweise
Bewahren Sie die Verpackung für einen späteren Transport auf. Überprüfen Sie die Vollständigkeit des Lieferumfanges nach Kapitel „12.1 Lieferumfang“ auf Seite 27. Sollten Komponenten beschädigt sein oder fehlen, wenden Sie sich an Ihren OSRAM Support Service. 13.3 Garantiebestimmungen Abhängig vom Produkt können Garantie und Gewährleistung zeitlich... -
Page 32: Reparatur Und Wartung
Allgemeine Hinweise Gewährleistungsbestimmungen finden sich in der Regel im Angebot und in der Auftragsbestätigung. Zusätzlich sind Informationen dazu auf der OSRAM- Website www.osram.de unter “Services” “OSRAM Garantien” aufgeführt. Gesetzlich geregelte Garantiebedingungen sind davon unberührt. 13.4 Reparatur und Wartung Dieses Gerät erfordert keine Wartung. -
Page 33: Technischer Support
33100 Paderborn, Deutschland +49 (5251) 54648-0 support@ecue.com 14 Installation Zur Installation vom e:cue SYMPL dmx Node montieren Sie diesen auf einer Hutschiene und schließen die Spannungsversorgung, eine e:net-Verbindung und DMX-Geräte an. Die Reihenfolge der Kabelanbindung ist beliebig. Schalten Sie die Stromversorgung erst an, wenn alle Kabel angeschlossen sind. -
Page 34: Montage
Installation Empfohlener vertikaler 160 mm Hutschienenabstand: (mit 40 mm-Kabelkanal) Installationsort Innen (im Gebäude) 14.2 Montage Der SYMPL Node wird auf einer 35 mm-DIN-Hutschiene vertikal montiert (EN 60715). 1. Hängen Sie das Gerät oben in die Hutschiene ein. 2. Drücken Sie leicht auf das Gehäuse, so dass die untere Verriegelung auf der Hutschiene einrastet. -
Page 35: Dmx-Verbindung
Schließen Sie bei der Verwendung von PoE nur einen Ethernet-Anschluss von einem PoE-Versorger (Midspan-/Endspan-Device) an. Externes Netzteil: Verbinden Sei den e:cue SYMPL dmx Node mit einem NEC Class 2 24 V DC Netzteil. Das Anliegen von Stromversorgung am Node entspricht einem Anschalten des Gerätes. -
Page 36: Netzwerk-Konfiguration
Class 2-Netzteil im Schaltschrank für die 24 V-Gleichspannungsversorgung. 15 Netzwerk-Konfiguration Die Konfiguration des e:cue SYMPL dmx Node erfolgt über e:cue SYMPHOLIGHT. Im SYMPHOLIGHT-Benutzerhandbuch finden Sie weitere Details. Das Benutzerhandbuch ist auf www.ecue.com verfügbar. Die Netzwerkeinstellungen des SYMPL dmx Nodes sind voreingestellt. Um Änderungen an den Netzwerkeinstellungen vornehmen zu können, ist die... -
Page 37: Netzwerkeinstellung Über Sympholight
Netzwerk-Konfiguration Änderungen der Netzwerkeinstellungen können entweder in SYMPHOLIGHT oder über die Webschnittstelle des SYMPL dmx Nodes vorgenommen werden: 15.2 Netzwerkeinstellung über SYMPHOLIGHT Öffnen Sie in dem Setup Tab von SYMPHOLIGHT das Kontextmenü von dem SYMPL dmx Node mit einem Rechtsklick auf das Gerät. -
Page 38: Netzwerkeinstellung Über Die Webschnittstelle
Netzwerk-Konfiguration 15.3 Netzwerkeinstellung über die Webschnittstelle Öffnen Sie auf einem verbundenen PC einen gewöhnlichen Webbrowser. Geben Sie in der Adressleiste die IP-Adresse des SYMPL dmx Nodes ein: z.B. http://192.168.123.1. Die Webschnittstelle des SYMPL dmx Nodes wird angezeigt: Auf der linken Seite wählen Sie “Settings” und geben das Standard-Passwort ecue ein:... - Page 39 Netzwerk-Konfiguration Klicken Sie “Apply”. Die Einstellungs-Seite wird angezeigt: Legen Sie die Netzwerkeinstellungen unter der Rubrik “Device Basics” nach Ihren Anforderungen fest. Sie können hier ebenfalls das Zugangspasswort zu den Webschnittstellen des SYMPL dmx Nodes ändern. Klicken Sie “Apply”, um die Änderungen zu übernehmen. Die Netzwerkeinstellung von dem SYMPL dmx Node ist abgeschlossen.
-
Page 40: Dmx/Rdm- Einstellungen
Netzwerk-Konfiguration Das Passwort zur Anmeldung auf der Webschnittstelle des SYMPL dmx Nodes und den Gerätename des Controllers können Sie ändern auf der “Settings”-Webschnittstelle. Vergessen Sie nicht das neue Passwort. 15.4 DMX/RDM- Einstellungen DMX/RDM-Einstellungen werden über e:cue SYMPHOLIGHT in den Eigenschaften des SYMPL dmx Nodes im Setup Tab konfiguriert. Ist der Node nicht mit SYMPHOLIGHT verbunden, treten erweiterte DMX/RDM- Einstellungen in Kraft. - Page 41 Testmodus Bei Startup Setting und Offline Setting sendet die Einstellung “send MARK” einen MARK (logisch 1) auf den Bus: es werden keine Daten an die DMX- Geräte gesendet und der DMX-Ausgang wartet auf weitere Befehle. Mit der Einstellung “High Impedance” wird das gleiche Verhalten ohne dem Senden eines MARKs konfiguriert.
- Page 42 - ab SYMPHOLIGHT v5.0 - Um auf die Webschnittstelle zu gelangen, öffnen Sie einen gewöhnlichen Webbrowser auf einem verbundenen PC. Geben Sie in der Adressleiste die IP-Adresse des SYMPL dmx Nodes ein: z.B. http://192.168.123.1. Öffnen Sie die Test Modus-Seite, indem Sie auf der linken Seite der Webschnittstelle des SYMPL dmx Nodes “TestMode”...
-
Page 43: Firmware-Update
Knopf in der oberen Werkzeugleiste. 18 Demontage Um den e:cue SYMPL dmx Node abzubauen, trennen Sie alle verbundenen Kabel und Anschlüsse von dem Gerät. Entfernen Sie den SYMPL dmx Node von der Hutschiene, indem Sie die schwarze Hutschienen-Entriegelung ziehen und das Gerät von der Hutschiene lösen. - Page 44 Produktdaten Vor der Demontage müssen geeignete Vorsichtsmaßnahmen ergriffen werden, um die entsprechenden Komponenten vor Schäden durch elektrostatische Entladung zu schützen (ESD-Schutz). 19 Produktdaten Bestellnummer AB444180035 Abmessungen (B x H x T) 53,5 x 90,5 x 62 mm (ohne Befestigungsclip) Gewicht 100 g Stromversorgung 24 V= auf Schraubanschluss...
- Page 45 Zertifizierung Schnittstellendaten Bedienerschnittstellen 5 LEDs (2 x DMX Status, Ethernet, Test / Error, Gerätestatus) 1 Taster Systemverbindung 1 x e:net / Ethernet, RJ45 CAT5 abgeschirmt DMX-Schnittstellen 2 x DMX512/RDM, max. 512 Kanäle einzeln isoliert, 1 kV 3-pol. Schraubstecker Drahtstärken: 0,08 ... 1,31 mm 4,8 V, V = 0,8 V DMXmax...
- Page 46 Dimensions / Abmessungen All dimensions in mm / Alle Abmessungen in mm 53.5 90.5...
- Page 47 Table of Contents / Inhalt...
- Page 48 OSRAM GmbH Sales Operations Head office / Zentrale: Karl-Schurz-Str. 38 Marcel-Breuer-Strasse 6 33100 Paderborn, Germany 80807 Munich, Germany +49 5251 54648-0 Phone +49 89 6213-0 support@ecue.com Fax +49 89 6213-2020 www.ecue.com www.osram.com Light is OSRAM Our Brand...
Need help?
Do you have a question about the e:cue SYMPL dmx and is the answer not in the manual?
Questions and answers