
Related Manuals for Osram e:cue SYMPL bridge Node


Summary of Contents for Osram e:cue SYMPL bridge Node
- Page 1 Light is OSRAM Our Brand AM356970031 e:cue SYMPL bridge Node Information for Use / Bedienungsanleitung...
- Page 2 AM356970031 e:cue SYMPL bridge Node Information for Use (original issue) e:cue SYMPL bridge Node Bedienungsanleitung (Originalversion) Edition / Ausgabe: 23.07.20 [EN_DE_SYMPL_bridge_Setup_v1p2] Published by / Herausgegeben von: OSRAM GmbH Karl-Schurz-Strasse 38 33100 Paderborn, Germany ©2020 OSRAM GmbH, BU Digital All rights reserved / Alle Rechte vorbehalten...
- Page 3 Read the Setup Manual and Lesen Sie die the Safety instructions carefully. Installationsanleitung und das Subject to modification without Heft "Sicherheitshinweise" prior notice. Typographical and sorgfältig durch. Alle Änderungen other errors do not justify any vorbehalten. Rechtschreibfehler claim for damages. All oder andere Fehler rechtfertigen dimensions should be verified keinen Anspruch bei Schäden.
- Page 4 Table of Contents / Inhalt Table of Contents / Inhalt English Security instructions Symbols General security instructions General device description Delivery content Connectors and Interfaces User interface: LEDs Identify button: Identification & Reset General remarks Transport Unpacking Warranty regulations Maintenance and Repair Disposal Support Installation...
- Page 5 Table of Contents / Inhalt Ports configuration Data mapping (Sources configuration) Source switch Test mode Test mode via Test button Test mode via web interface Firmware Update Dismounting Product specifications Certifications Deutsch Sicherheitshinweise 12.1 Symbole 12.2 Sicherheitshinweise Gerätebeschreibung 13.1 Lieferumfang 13.2 Anschlüsse und Schnittstellen 13.3...
- Page 6 Table of Contents / Inhalt 15.4 DMX-Verbindung 15.5 Spannungsversorgung 15.6 Erdung Netzwerk-Konfiguration 16.1 Standardeinstellungen vom Netzwerk 16.2 Netzwerkeinstellung über SYMPHOLIGHT 16.3 Netzwerkeinstellung über die Webschnittstelle Ausgabe-Konfiguration 17.1 Ausgangs-Konfiguration 17.2 Datenzuordnung (Quellen-Konfiguration) 17.3 Quellenwechsel Testmodus 18.1 Testmodus über Test-Taster 18.2 Testmodus über Webschnittstelle Firmware-Update Demontage Produktdaten...
- Page 7 English...
- Page 8 SYMPL bridge Node to Protective Earth when at least one connected cable runs outdoor. The device must be supplied by a separate certified SELV Class 2 power supply. If security instructions are missing, please contact the OSRAM support service to receive a new copy.
- Page 9 General device description General device description e:cue SYMPL Nodes are a system of interfaces for e:cue SYMPHOLIGHT only. They provide various connection types like DMX/RDM, DALI, digital inputs and outputs etc. SYMPL Nodes always operate in online mode, as a device interface for SYMPHOLIGHT.
- Page 10 SYMPL Nodes. SYMPL Nodes are not supported by the e:cue Lighting Application Suite. e:cue SYMPL Noes are not hot-pluggable. Delivery content Delivery content of the e:cue SYMPL bridge Node - Product number AM356970031 SYMPL bridge Node Safety instructions Installation guide.
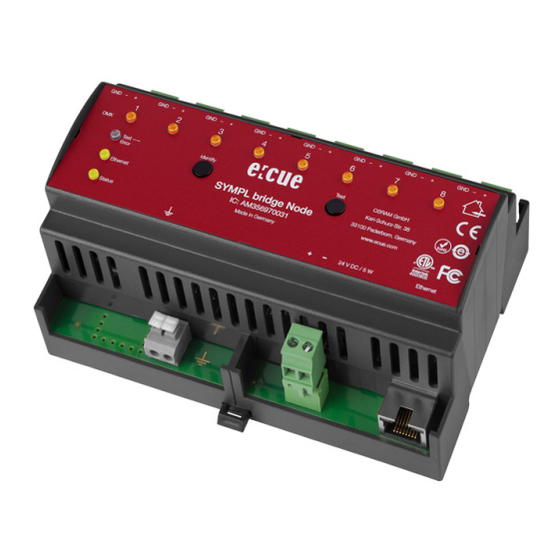
- Page 11 General device description Connectors and Interfaces View from top: DMX output 1 ... 8 (GND, DMX-, DMX+ left to right) DMX / e:pix status LEDs Test / Error LED Ethernet LED (LAN activity) Status LED (Device status) Identify button Test button Protective Earth Power supply (Vcc+, Vcc- left to right) Ethernet...
- Page 12 Switch the device off and on. If the error persists, check the wiring or contact OSRAM Service. Status + The Status and Test / Error LED blink simultaneously Test / Error to identify the SYMPL Node (enabled “Identify...
- Page 13 General device description Identify button: Identification & Reset The Identify button has four functions: to send an Identify message (A), to reset the Node (B), and to exit the error state (C). The Identify button additionally switches protocol during Test mode (D). (A) Only available with e:net: A short press during operation in online mode sends an Identify message to the server.
- Page 14 This device requires no maintenance. Before dismounting, appropriate measures must be taken to protect the respective components against damage caused by electrostatic discharge (ESD protection). Do not try to repair the device. Return it to your OSRAM distributor for replacement or repair.
- Page 15 Support In case of technical problems or questions regarding installation and repair please contact: OSRAM GmbH Customer Service Karl-Schurz-Str. 38 33100 Paderborn, Deutschland +49 (5251) 54648-0 support@ecue.com...
- Page 16 Installation Installation conditions Installation position Terminals on top and bottom Horizontal spacing On both sides 18 mm Minimum vertical rail grid spacing 115 mm (90 + 25 mm) (excluding conduit) Recommended vertical rail grid spacing 160 mm (with 40 mm conduit) Mounting process The SYMPL bridge Node is designed to mount onto a 35mm DIN rail (EN 60715) in a horizontal position.
- Page 17 Ground the DMX connection cable for outdoor installations (optional for indoor only). Ground each cable seperately. Power supply The e:cue SYMPL bridge Node can be powered by an external power supply or via Power-over-Ethernet. PoE: For PoE, simply connect an Ethernet connection from a power sourcing device.
- Page 18 Installation To connect the device to a power supply unit, use the provided 2-pole terminal and lay the wires as stated on the front label. The voltage assignment is left V+ and right V-. Turn the power on when all cables are connected to the SYMPL bridge Node.
- Page 19 Network configuration Network configuration The network properties of the device are preconfigured. The successful installation of the power supply is required for changing the network configuration. You can either adjust the network settings with SYMPHOLIGHT or using the web interface of the device. Default network properties The SYMPL bridge Node has as factory setting the default IP address 192.168.123.1.
- Page 20 Network configuration Select “Configure Network”: Define the IP address, the subnet mask and the DHCP settings to your needs: Click “Apply” to submit the changes. The network configuration of the device is completed. Network configuration with the web interface Open a common web browser on a connected PC. Enter the SYMPL bridge Node’s IP address into the address bar: e.g.
- Page 21 Network configuration On the left side, select “Settings” and enter the default password ecue: Click “Apply”. The Settings page is displayed: Define the network settings at “Device Basics” to your needs. You can also change the password for entry to the web interfaces of the device here.
- Page 22 Output configuration You can change the login password to the SYMPL bridge Node's configuration page and its device name at “Settings” page. Do not forget the new password. The SYMPL bridge Node should be only accessed from one browser tab at a time. In case there is no response please wait a while or reopen the browser to end pending connections.
- Page 23 Output configuration PC. Enter the SYMPL bridge Node's IP address into the address bar: e.g. http://192.168.123.1. Ports configuration The first step of the output configuration is to configure the channel size of the eight output ports. The channel size is equivalent to the channel count of the connected fixtures to each port: Port x Source 1...
- Page 24 Output configuration the connected fixture address consumption to get a seamless e:pix universe: for each port, take the amount of fixture consumed channels (length) of four DMX universes (1 ... 512 for part 1 to part 4). If not the full e:pix universe (the sum of all four parts is smaller than 2048) is used, remaining parts can be set to 0 in order to avoid possible waiting time for complete data input.
- Page 25 Output configuration Open the sources’ configuration pages by selecting “Input Source 1” and “Input Source 2” respectively on the left side of the web interface of the SYMPL bridge Node: Please note that the IP addresses of the two sources must be different if the same protocol is used for both sources.
- Page 26 Output configuration After configuring all ports, click the “submit” button to save the configuration. Source switch The third step of the output configuration is to configure the source that defines the switching between Source 1 and Source 2. The value of the switch source will be taken to do a fade out / fade in between the two input sources: Light intensity...
- Page 27 Test mode Source 1 and Source 2. For sACN you can chose between Multicast and Unicast transmission by selecting the “Multicast” checkbox. Click the “submit” button to save the configuration. For manual source switching, you can click on the buttons at the end of the page.
- Page 28 Test mode of 96 channels (pattern 2). • Short-press the Test button to switch all channels to 100% (pattern 3). • Short-press the Test button to switch all channels off (pattern 4). • Short-press the Test button to alternate between the individual DMX ports and the four test patterns.
- Page 29 Test mode Open the Test mode page by selecting “TestMode” on the left side of the web interface of the SYMPL bridge Node: Strobe: Const: fast flashing constant lighting Fade: Chase: dimming up and consecutive lighting down, alternating of blocks Click a button to choose a test pattern.
- Page 30 Firmware Update Exit the Test mode by leaving the Test mode page, e.g. go to “Dashboard” or double-pressing the Identify button. Firmware Update In case a new firmware version is available, you can either use SYMPHOLIGHT or the web interface of the SYMPL bridge Node to update the device.
- Page 31 To abort the firmware update, click “abort and restart”. Wait for the device to reboot. Dismounting Disconnect all attached cables. Dismount the e:cue SYMPL bridge Node from the rail by pulling the black DIN rail handle and unhitching the SYMPL Node. The dismounting is completed.
- Page 32 Product specifications 10 Product specifications Product Product number SYMPL bridge Node AM356970031 Dimensions 143 x 92 x 62 mm/ (W x H x D) 5.63 x 3.6 x 2.4 in (excl. fastening clip) Weight 250 g / 0.55 lb Power supply input 24 ...
- Page 33 Identify button, Test button 70 °C / 158 °F for max. 1 hour/day; continuous operation at max. 60 °C / 140 °F. 11 Certifications e:cue SYMPL bridge Node is certified according to EN 55024:2016-05, EN 55032:2016-02 Conforms to UL Std. 62368-1 4000805...
- Page 34 Deutsch...
- Page 35 Verbinden Sie den SYMPL bridge Node mit Schutzerdung, wenn mindestens ein angeschlossenes Kabel im Freien verläuft Das Gerät muss durch ein separates Class 2-Netzteil versorgt werden. Sollte das beigelegte Heft mit den Sicherheitshinweisen fehlen, wenden Sie sich bitte an den OSRAM Support Service für ein zusätzliches Exemplar.
- Page 36 Gerätebeschreibung 13 Gerätebeschreibung e:cue SYMPL Nodes sind dedizierte Schnittstellen für e:cue SYMPHOLIGHT. Sie stellen verschiedenste Verbindungen mit Protokollen wie DMX/RDM, DALI, digitale Eingänge oder Ausgänge bereit. e:cue SYMPL Nodes arbeiten immer im Online-Modus als Systemverbindung für SYMPHOLIGHT. Alle Aktivitäten werden von SYMPHOLIGHT gesteuert. Die Verbindung zwischen Servern, Cores und Nodes erfolgen immer über e:net über Ethernet.
- Page 37 SYMPHOLIGHT Version ab 2.0. Frühere Versionen oder die e:cue Lighting Application Suite unterstützen nicht die SYMPL Nodes. e:cue SYMPL Nodes nicht im Betrieb an- und abstecken. 13.1 Lieferumfang Der Lieferumfang vom e:cue SYMPL bridge Node - Produktnummer AM356970031 umfasst: SYMPL bridge Node Heft “Sicherheitshinweise” Installationsanleitung.
- Page 38 Gerätebeschreibung 13.2 Anschlüsse und Schnittstellen Sicht von oben: DMX-Ausgänge 1 ... 8 (GND, DMX-, DMX+ links nach rechts) DMX / e:pix Status LEDs LED Test / Error LED Ethernet (LAN-Aktivität) LED Status (Gerätestatus) Identify-Taster Test-Taster Erdung Spannungsversorgung (Vcc+, Vcc- links nach rechts) Ethernet-Anschluss Hutschienen-Griff...
- Page 39 Gerätebeschreibung 13.3 Benutzeroberfläche: LEDs Der e:cue SYMPL bridge Node hat 11 LEDs auf der Frontseite. Die 11 LEDs zeigen die Grundzustände des SYMPL bridge Nodes an. LEDs Status An: Im Online-Zustand leuchtet die LED konstant. Blinken: Blinkt die Status-LED im 1 s-Intervall, ist das System im Offline-Zustand und hat keine Verbindung zu einem SYMPHOLIGHT-Server.
- Page 40 Gerätebeschreibung 13.4 Identify-Taster: Identifizierung & Reset Der Identify-Taster besitzt vier Funktionen: eine Identifizierungsnachricht zu senden (A), das Node zurückzusetzen (B) und einen Fehlerzustand zu verlassen (C). Mit dem Identify-Taster im Testmodus das Protokoll gewechselt (D). (A) Ein kurzer Tastendruck im Online-Betrieb sendet eine Identifizierungsnachricht an den Server.
- Page 41 Bewahren Sie die Verpackung für einen späteren Transport auf. Überprüfen Sie die Vollständigkeit des Lieferumfanges nach Kapitel “13.1 Lieferumfang” auf Seite 37. Sollten Komponenten beschädigt sein oder fehlen, wenden Sie sich an Ihren OSRAM Support Service. 14.3 Garantiebestimmungen Abhängig vom Produkt können Garantie und Gewährleistung zeitlich...
- Page 42 Allgemeine Hinweise der Auftragsbestätigung. Zusätzlich sind Informationen dazu auf der OSRAM- Website www.osram.de unter “Services” “OSRAM Garantien” aufgeführt. Gesetzlich geregelte Garantiebedingungen sind davon unberührt. 14.4 Wartung und Reparatur Dieses Gerät erfordert keine Wartung. Vor Beginn von Demontage-Arbeiten am Geräte sind Massnahmen gegen Beschädigung durch elektrostatische...
- Page 43 33100 Paderborn, Deutschland +49 (5251) 54648-0 support@ecue.com 15 Installation Zur Installation vom e:cue SYMPL bridge Node montieren Sie diesen auf einer Hutschiene und schließen die Spannungsversorgung, eine Ethernet- Verbindung und DMX (e:pix)-Geräte an. Die Reihenfolge der Kabelanbindung ist beliebig. Schalten Sie die Stromversorgung erst an, wenn alle Kabel angeschlossen sind.
- Page 44 Installation 15.2 Montage Der e:cue SYMPL bridge Node wird auf einer 35 mm-DIN-Hutschiene (EN 60715) horizontal montiert. 1. Hängen Sie das Gerät oben in die Hutschiene ein. 2. Drücken Sie leicht auf das Gehäuse, so dass die untere Verriegelung auf der Hutschiene einrastet.
- Page 45 Schließen Sie bei der Verwendung von PoE nur einen Ethernet-Anschluss von einem PoE-Versorger (Midspan-/Endspan-Device) an. Externes Netzteil: Verbinden Sei den e:cue SYMPL bridge Node mit einem NEC Class 2 24 V DC Netzteil. Das Anliegen von Stromversorgung am Node entspricht einem Anschalten des Gerätes.
- Page 46 Installation angeschlossen sind. Liegt Spannung an, beginnt der SYMPL bridge Node sich hochzufahren. Während des Hochfahrens leuchten alle DMX-LEDs aufeinanderfolgend auf. Das Gerät ist betriebsbereit, wenn die LED Status blinkt. Der SYMPL bridge Node ist nicht für den Betrieb über ein Versorgungsnetz geeignet.
- Page 47 Netzwerkkonfiguration. Änderungen der Netzwerkeinstellungen können über SYMPHOLIGHT oder auf der Webschnittstelle des Geräts vorgenommen werden. 16.1 Standardeinstellungen vom Netzwerk Der e:cue SYMPL bridge Node hat als Werkseinstellung die Standard-IP- Adresse 192.168.123.1. Subnetz-Maske: 255.255.255.0. DHCP ist standardmäßig deaktiviert. Zugangsdaten für die SYMPL bridge Node-Webschnittstelle Das voreingestellte Passwort lautet: ecue Um Änderungen der Netzwerkeinstellungen vorzunehmen, können Sie...
- Page 48 Netzwerk-Konfiguration Wählen Sie “Configure Network” aus: Geben Sie die gewünschte IP-Adresse, die Subnetzmaske und die DHCP-Einstellungen ein: Klicken Sie auf “Apply”, um die Einstellungen zu übernehmen. Die Netzwerk-Konfiguration vom SYMPL Node ist abgeschlossen. 16.3 Netzwerkeinstellung über die Webschnittstelle Öffnen Sie auf einem angeschlossenen Computer einen gewöhnlichen Webbrowser.
- Page 49 Netzwerk-Konfiguration Die Webschnittstelle des Geräts wird angezeigt: Wählen Sie auf der linken Seite den Menüeintrag “Settings” aus und geben Sie das voreingestellte Passwort ecue ein: Klicken Sie “Apply” und die Settings-Seite wird angezeigt:...
- Page 50 Ausgabe-Konfiguration Nehmen Sie unter “Device Basics” die gewünschten Netzwerkeinstellungen vor. Hier können Sie ebenfalls das Zugangspasswort für die Webschnittstelle vom Gerät neu vergeben. Klicken Sie auf “Submit”, um die Einstellungen zu übernehmen. Die Netzwerk-Konfiguration vom SYMPL Node ist abgeschlossen. Es wird empfohlen, das System in einem separaten Netzwerk zu führen.
- Page 51 Ausgabe-Konfiguration anschließend die Dateneingänge aus zwei Quellen darauf abgebildet. Dann wird die eine dritte Quelle für das Umschalten zwischen den beiden Dateneingängen definiert. Alternativ zu einer dritten Quelle kann manuell umgeschaltet werden. Für jede der acht DMX-Schnittstellen setzt sich die Datenausgabe aus bis zu vier eingehenden Daten-Teilen aus bis zu vier Universen zusammen: Port x Source 1...
- Page 52 Ausgabe-Konfiguration Die Kanalgröße entspricht den Anzahl an Kanälen von den angeschlossenen Leuchten an jedem Ausgang: Port x Source 1 e:pix output for Source 1 Part 1 Part 2 Part 3 Part 4 take (len1) channels Universe a (len1) (len2) (len3) (len4) starting at offset1 take (len2) channels...
- Page 53 Ausgabe-Konfiguration verwendet (Summe aller vier Teile ist kleiner 2048), setzen Sie die nicht gebrauchten Teile auf 0, um mögliche interne Wartezeiten zu vermeiden. Klicken Sie auf “switch to DMX”, um das Ausgabeprotokoll von e:pix auf den DMX512-Standard zu ändern. Nur eine Kanallänge von maximal 512 ist nun für jeden Ausgang verfügbar.
- Page 54 Ausgabe-Konfiguration Öffnen Sie die Quellen-Konfigurationsseite mit der Auswahl von “Input Source 1” und “Input Source 2” auf der linken Seite der Webschnittstelle von dem SYMPL bridge Node: Bitte beachten Sie, dass die IP-Adressen der zwei Quellen unterschiedlich sein müssen, wenn dieselbe Protokollart bei beiden Quellen verwendet wird.
- Page 55 Ausgabe-Konfiguration Es ist möglich das gleiche Universum mehreren Ausgängen und Teilen zuzuweisen. Das bedeutet, dass Sie Inhalte mit Hilfe des SYMPL bridge Nodes duplizieren können. Nachdem alle Ausgänge konfiguriert sind, klicken Sie auf “submit”, um die Einstellungen zu speichern. 17.3 Quellenwechsel Der dritte Schritt der Ausgabe-Konfiguration ist die Konfiguration der dritten Quelle, die den Wechsel zwischen Quelle 1 und Quelle 2 bestimmt.
- Page 56 Testmodus Wählen Sie eine Protokollart (Art-Net, e:net, sACN oder keines) im Drop-down-Menü unter “Protocol” für die Quelle aus, die den Wechsel bestimmen soll. Geben Sie die IP-Adresse dieser Quelle ein. Definieren Sie das Universum inklusive den Kanal, der den Wechsel zwischen Quelle 1 und Quelle 2 bestimmt.
- Page 57 Testmodus 18.1 Testmodus über Test-Taster Der Test-Taster ermöglicht einen direkten Test angeschlossener DMX- Leuchten mit dem SYMPL bridge Node. • Halten Sie den Test-Taster für ca. 5 Sekunden gedrückt bis die DMX 1 LED zu blinken beginnt. Wird der Test-Taster nun los gelassen, startet der Testmodus an dem ersten DMX-Ausgang mit Blinken über alle Kanäle (Testbild 1).
- Page 58 Testmodus angeschlossenem PC. Geben Sie die IP-Adresse von dem Gerät in die Adressleiste ein: z.B. http://192.168.123.1. Öffnen Sie die Testmodus-Seite durch Anwahl von “TestMode” auf der linken Seite der Webschnittstelle des SYMPL bridge Nodes (e:pix) / SYMPL bridge Node. Strobe: Const: schnelles Dauerlicht...
- Page 59 Firmware-Update Value Helligkeit der Testwiedergabe (0 - 255). Step Time Verzögerung zwischen den einzelnen Sprüngen. Manual: Drücken Sie den Test-Taster, um den Test- Block weiterzubewegen. Geben Sie unter “Start Address” den Anfangskanal ein. Klicken Sie “set”, um den Test zu starten und um Einstellungsänderungen zu übernehmen.
- Page 60 Um das Firmware-Update abzubrechen, klicken Sie “abort and restart” (Abbruch und Neustart). Warten Sie auf das Ende des Reboot-Vorganges. 20 Demontage Um den e:cue SYMPL bridge Node abzubauen, trennen Sie alle verbundenen Kabel und Anschlüsse von dem Gerät. Entfernen Sie den...
- Page 61 Demontage SYMPL bridge Node von der Hutschiene, indem Sie die schwarze Hutschienen-Entriegelung ziehen und das Gerät von der Hutschiene lösen. Die Demontage ist abgeschlossen. Vor der Demontage müssen geeignete Vorsichtsmaßnahmen ergriffen werden, um die entsprechenden Komponenten vor Schäden durch elektrostatische Entladung zu schützen (ESD-Schutz).
- Page 62 Produktdaten 21 Produktdaten Produkt Produktnummer SYMPL bridge Node AM356970031 Abmessungen 143 x 92 x 62 mm (B x H x T) (ohne Befestigungsclip) Gewicht 250 g Stromversorgung 24 ... 48 V DC (Schraubanschlussstecker) oder PoE IEEE 802.3af über RJ45 Drahtstärken: 0,205 ... 3,31 mm Leistungsaufnahme Max.
- Page 63 Identify-Taster, Test-Taster *) 70 °C für max. 1 Std./Tag; Dauerbetrieb bei bis zu 60 °C. 22 Zertifizierung e:cue SYMPL bridge Node ist zertifiziert nach EN 55024:2016-05, EN 55032:2016-02 Entspricht UL Std. 62368-1 4000805 Zertifiziert nach CSA Std. C22.2 NO. 62368-1...
- Page 64 Dimensions / Abmessungen All dimensions in mm / Alle Abmessungen in mm...
- Page 65 OSRAM GmbH Sales Operations Head office / Zentrale: Karl-Schurz-Str. 38 Marcel-Breuer-Strasse 6 33100 Paderborn, Deutschland 80807 Munich, Germany +49 (5251) 54648-0 Phone +49 89 6213-0 support@ecue.com Fax +49 89 6213-2020 www.ecue.com www.osram.com Light is OSRAM Our Brand...
Need help?
Do you have a question about the e:cue SYMPL bridge Node and is the answer not in the manual?
Questions and answers