
Subscribe to Our Youtube Channel
Related Manuals for ETNA KCV282N Series


Summary of Contents for ETNA KCV282N Series
- Page 1 GEBRUIKSAANWIJZING INSTRUCTIONS FOR USE KOELVRIESCOMBINATIE REFRIGERATOR-FREEZER KCV282N ---...
-
Page 2: Table Of Contents
INHOUDSOPGAVE Uw koelkast Inleiding Link naar de EPREL-database van de EU Veiligheidsvoorschriften Voor het eerste gebruik Voordat u het toestel de eerste keer gebruikt Advies om energie te besparen Installeren en aansluiten De keuze van de ruimte Toestel aansluiten Draairichting deur wijzigen Toestelbeschrijving Toestel Bediening van het toestel... - Page 3 INHOUDSOPGAVE Onderhoud Het toestel ontdooien Het toestel reinigen Storingen Storingstabel Milieuaspecten Verpakking en toestel afdanken Gebruikte pictogrammen Belangrijk om te weten Waarschuwing; Brandgevaar / ontvlambare materialen NL 3...
-
Page 4: Uw Koelkast
UW KOELKAST Inleiding Gefeliciteerd met uw keuze voor deze koelkast van Etna. In het ontwerp van dit product heeft eenvoudige bediening en optimale gebruiksvriendelijkheid centraal gestaan. In deze handleiding leest u hoe u dit toestel het best kunt gebruiken. Naast informatie over de bediening, vindt u hier ook achtergrondinformatie die u tijdens het gebruik van het toestel van pas kan komen. -
Page 5: Veiligheidsvoorschriften
VEILIGHEIDSVOORSCHRIFTEN Lees zorgvuldig de meegeleverde instructies voor installatie en gebruik van het apparaat. De fabrikant is niet verantwoordelijk voor letsel en schade veroorzaakt door een foutieve installatie. Bewaar de instructies van het apparaat voor toekomstig gebruik. Veiligheid van kinderen en kwetsbare mensen •... - Page 6 VEILIGHEIDSVOORSCHRIFTEN Algemene veiligheid • De lamp in dit huishoudelijke apparaat is uitsluitend bedoeld voor verlichting van dit apparaat. De lamp is niet geschikt voor de verlichting van een huishoudelijke ruimte. • WAARSCHUWING! Dit apparaat is bestemd voor huishoudelijk of daarmee vergelijkbaar gebruik, zoals: –...
- Page 7 VEILIGHEIDSVOORSCHRIFTEN Installatie • WAARSCHUWING! Dit apparaat mag uitsluitend door een erkende monteur worden geïnstalleerd. • Verwijder alle verpakkingsmaterialen. • Controleer het apparaat op transportschade. Sluit het apparaat niet aan als het beschadigd is. • Volg altijd de installatie-instructies in de bijgeleverde installatiehandleiding.
- Page 8 VEILIGHEIDSVOORSCHRIFTEN • Controleer of de elektrische informatie op het typeplaatje overeenkomt met de stroomvoorziening. Zo niet, neem dan contact op met een elektromonteur. • Gebruik altijd een correct geïnstalleerd, schokbestendig stopcontact. • Gebruik niet meerdere stekkers of verlengsnoeren. • Zorg dat u de elektrische onderdelen (hoofdstekker, kabel, compressor) niet beschadigt.
- Page 9 VEILIGHEIDSVOORSCHRIFTEN Gebruik • WAARSCHUWING! Gevaar voor letsel, brandwonden, elektrische schokken of brand. • De specificatie van het apparaat mag niet worden veranderd. • Plaats geen elektrische apparaten (bijv. ijsmachines) in het apparaat tenzij uitdrukkelijk geschikt verklaard door de fabrikant. • Zorg ervoor dat u het koelcircuit niet beschadigt. Het bevat isobutaan (R600a), aardgas met een hoge ecologische compatibiliteit.
- Page 10 VEILIGHEIDSVOORSCHRIFTEN Verwijdering • WAARSCHUWING! Gevaar voor letsel of verstikking. • Haal de stekker uit het stopcontact. • Snij het netsnoer van het apparaat af en gooi dit weg. • Verwijder de deur om te voorkomen dat kinderen en huisdieren opgesloten raken in het apparaat. •...
-
Page 11: Voor Het Eerste Gebruik
VOOR HET EERSTE GEBRUIK Voordat u het toestel de eerste keer gebruikt Sluit het toestel pas aan op het elektriciteitsnet nadat u de aanwijzingen over een correct en veilig gebruik van het toestel zorgvuldig hebt doorgelezen. De aanwijzingen zijn van toepassing op verschillende types en modellen;... - Page 12 VOOR HET EERSTE GEBRUIK • Als het toestel is voorzien van een ventilator, zorg er dan voor dat de openingen niet geblokkeerd raken. • Hoe lager de temperatuur wordt ingesteld, hoe hoger het energieverbruik zal zijn. • Hoge omgevingstemperaturen beïnvloeden het energieverbruik nadelig. Ook direct zonlicht of andere warmtebronnen in de buurt van het toestel hebben een ongunstige invloed op het energieverbruik.
-
Page 13: Installeren En Aansluiten
INSTALLEREN EN AANSLUITEN De keuze van de ruimte • Dit koelapparaat is niet bedoeld om te worden gebruikt als inbouwapparaat. • Plaats het toestel niet in de buurt van warmtebronnen, bijvoorbeeld een gasfornuis, verwarming, boiler enz. en stel het niet bloot aan directe zonnestraling. •... -
Page 14: Toestel Aansluiten
INSTALLEREN EN AANSLUITEN • Het toestel moet tenminste 5 cm van het elektrisch of gasfornuis respectievelijk 30 cm van de verwarming of kachel worden geïnstalleerd. Bij kleinere afstanden moet er een isolatieplaat worden gebruikt. • De afstand tot de muur, achter en aan de zijkanten van de kast, moet ongeveer 5 cm te bedragen. -
Page 15: Draairichting Deur Wijzigen
INSTALLEREN EN AANSLUITEN Draairichting deur wijzigen Gereedschap Afdekkapje linker scharnier Haal eerst de stekker uit het stopcontact. 1. Verwijder alle deurvakken en sluit de deur. 2. Verwijder de afdekplaatjes en de schroeven. 3. Verwijder het bovenste scharnier, draai het scharnier om en leg het even apart. 4. - Page 16 INSTALLEREN EN AANSLUITEN 6. Verwijder de schroeven en het middelste scharnier. 7. Til de de onderste deur voorzichtig uit het onderste scharnier en plaats hem op een zachte ondergrond om krassen te voorkomen. 8. Schroef onderdeel ‘S’ los en bevestig het aan de andere kant met de schroeven (zie stap 5). 9.
- Page 17 INSTALLEREN EN AANSLUITEN 11. Plaats de onderste deur in het onderste scharnier, zodanig dat de pin van het onderste scharnier in het gat onderin de deur past. 12. Plaats het middelste scharnier in de deur. Let op eventueel terug te plaatsen afstelringen. 13.
-
Page 18: Toestelbeschrijving
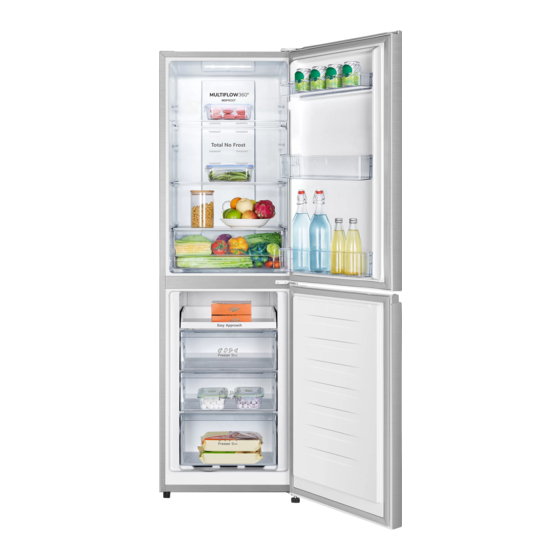
TOESTELBESCHRIJVING Toestel 1. Interieurverlichting 2. Draagplateau 3. Regelknop thermostaat 4. Groentelade 5. Vriesvak 6. Vrieslade 7. Stelvoeten 8. Deurvak ▷ Het onderste deurvak is geschikt voor flessen. Beste locatie voor het invriezen van vers voedsel. NL 18... -
Page 19: Bediening Van Het Toestel
BEDIENING VAN HET TOESTEL Instellen van de thermostaat De thermostaat regelt de temperatuur in beide compartimenten automatisch. 1. De normale temperatuurstand is stand ECO. 2. Stel een hogere binnentemperatuur in door de regelknop tussen de 0 en de stand ECO te draaien. -
Page 20: Voedsel Bewaren En Invriezen
VOEDSEL BEWAREN EN INVRIEZEN Aanbevolen indeling Delen van het koelcompartiment • Bovenste deel: voedsel in blik, brood, wijn, deegwaren etc. • Middelste deel: zuivel, kant-en-klaarmaaltijden, toetjes, frisdrank, bier, gekookt voedsel etc. • Onderste deel: vlees, vleeswaren, zuivel. • Groentelade: groenten en vers fruit Delen van de deur •... -
Page 21: Voorkom Het Bederven Van Voedsel
VOEDSEL BEWAREN EN INVRIEZEN Voorkom het bederven van voedsel Volg de onderstaande instructies om het bederven van voedsel te voorkomen: • Als u de deur gedurende lange tijd opent, kan de temperatuur in de compartimenten van het toestel aanzienlijk stijgen. •... -
Page 22: Invriezen En Bewaren Van Voedsel In Het Vriescompartiment
VOEDSEL BEWAREN EN INVRIEZEN Invriezen en bewaren van voedsel in het vriescompartiment Belangrijke aanwijzingen bij het invriezen van vers voedsel • De maximale hoeveelheid vers voedsel die u in een keer in het vriescompartiment kunt plaatsen, is op het typeplaatje aangegeven. Wanneer de hoeveelheid in te vriezen voedsel groter is dan de aangegeven hoeveelheid, neemt de kwaliteit van het invriezen af. -
Page 23: Bevroren Voedsel Ontdooien
VOEDSEL BEWAREN EN INVRIEZEN Aanbevolen bewaartijd van ingevroren voedsel in het vriescompartiment Soort voedsel Bewaartijd Fruit, rundvlees 10 tot 12 maanden Groenten, kalfsvlees, gevogelte 8 tot 10 maanden Hert 6 tot 8 maanden Varkensvlees 4 tot 6 maanden Fijngesneden of gemalen vlees 4 maanden Brood, deegwaren, gekookte gerechten, magere vis 3 maanden... - Page 24 ONDERHOUD Het toestel ontdooien Automatisch ontdooien van het koelcompartiment Het koelcompartiment ontdooit van tijd tot tijd geheel automatisch. Ontdooien van de NoFrost vriezer Ontdooien van de NoFrost vriezer gaat automatisch. Rijp dat zich af en toe afzet zal vanzelf verdwijnen. Als er toch ijs of rijpafzetting in de vriesruimte aanwezig is, kan dat het gevolg zijn van een ongewoon gebruik van het toestel (te vaak en te lang de deur openen, slechte sluiting van de deur, etc.).
- Page 25 ONDERHOUD • Droog het interieur van het toestel. Schakel het apparaat in en zet de thermostaatknop op de laagste temperatuurstand. Na 24 uur kunt u de thermostaat terug op de normale stand zetten. • Reinig de buitenkant met een zachte doek. •...
- Page 26 STORINGEN Storingstabel Wanneer u twijfelt over de goede werking van uw toestel betekent dit niet automatisch dat er een defect is. Controleer in elk geval de volgende punten in onderstaande tabel. Probleem Mogelijk oorzaak Oplossing Het toestel geeft een lichte Nieuw toestel.
- Page 27 STORINGEN Probleem Mogelijk oorzaak Oplossing De deur gaat moeilijk open. U probeert een deur van het Na een paar minuten is de toestel te openen nadat u de situatie weer normaal en gaat deur net hebt gesloten. Het de deur gemakkelijk open. openen gaat dan moeilijk.
- Page 28 MILIEUASPECTEN Verpakking en toestel afdanken Dit toestel is gemaakt van duurzame materialen. Het toestel moet aan het einde van zijn levensduur op verantwoorde wijze worden afgedankt. Informeer bij de plaatselijke autoriteiten hoe u dit kunt doen. Zie ook het hoofdstuk ‘Verwijdering’ in de veiligheidsvoorschriften. De verpakking van het toestel is recyclebaar.
- Page 29 NL 29...
- Page 30 CONTENTS Your refrigerator Introduction Link to the EU EPREL database Safety instructions Before using the appliance for the first time Before you use the appliance for the first time Energy-saving advice Installation and connection Selecting the location Connecting the appliance Changing the side on which the door opens Description of the appliance Appliance...
- Page 31 CONTENTS Maintenance Defrosting the appliance Cleaning the appliance Faults Faults table Environmental aspects Disposal of packaging and appliance Pictograms used Important information Warning; Risk of fire / flammable materials EN 3...
-
Page 32: Your Refrigerator
YOUR REFRIGERATOR Introduction Congratulations on choosing this Etna refrigerator with freezer. This product is designed with simple operation and optimum comfort in mind. These instructions for use explain how you can make best use of this appliance. These instructions contain information about the operation of the appliance and background information that may be of help to you during its use. -
Page 33: Safety Instructions
SAFETY INSTRUCTIONS Before the installation and use of the appliance, carefully read the supplied instructions. The manufacturer is not responsible if an incorrect installation and use causes injuries and damages. Always keep the instructions with the appliance for future reference. Safety of children and vulnerable people •... - Page 34 SAFETY INSTRUCTIONS General safety • The lamp in this household appliance is only suitable for illumination of this appliance. The lamp is not suitable for household room illumination. • WARNING! This appliance is intended to be used in household and similar applications such as –...
- Page 35 SAFETY INSTRUCTIONS Installation • WARNING! This appliance should only be connected by a registered installer. • Remove all the packaging. • Do not install or use a damaged appliance. • Obey the installation instruction supplied with the appliance. • Always be careful when you move the appliance because it is heavy.
- Page 36 SAFETY INSTRUCTIONS • Make sure that the electrical information on the rating plate agrees with the power supply. If not, contact an electrician. • Always use a correctly installed shockproof socket. • Do not use multi-plug adapters and extension cables. •...
- Page 37 SAFETY INSTRUCTIONS • WARNING! Risk of injury, burns, electrical shock or fire. • Do not change the specification of this appliance. • Do not put electrical appliances (e.g. ice cream makers) in the appliance unless they are stated applicable by the manufacturer.
- Page 38 SAFETY INSTRUCTIONS Disposal • WARNING! Risk of injury or suffocation • Disconnect the appliance from the mains supply. • Cut off the mains cable and discard it. • Remove the door to prevent children and pets to be closed inside of the appliance. •...
-
Page 39: Before Using The Appliance For The First Time
BEFORE USING THE APPLIANCE FOR THE FIRST TIME Before you use the appliance for the first time Do not connect the appliance to the mains until you have carefully read the instructions for the correct and safe use of the appliance. As these instructions are for various types and models, it is possible that the instructions for use refer to settings or parts that are not available on your appliance. - Page 40 BEFORE USING THE APPLIANCE FOR THE FIRST TIME • When the appliance is equipped with a fan then make sure that the ventilation openings are kept clear. • The lower the set temperature, the higher the power consumption. • High ambient temperatures have an adverse effect on the energy consumption. Direct sunlight or other heat sources in the vicinity of the appliance also have an adverse effect on the energy consumption.
-
Page 41: Installation And Connection
INSTALLATION AND CONNECTION Selecting the location • This refrigerating appliance is not intended to be used as a built-in appliance. • Do not place the appliance near a source of heat, such as a gas cooker, radiator or boiler, etc., and do not expose it to direct sunlight. •... -
Page 42: Connecting The Appliance
INSTALLATION AND CONNECTION • The appliance must be placed at a distance of at least 5 cm from an electric or gas cooker and at least 30 cm from a radiator or heater. An insulation panel must be fitted when these distances cannot be achieved. -
Page 43: Changing The Side On Which The Door Opens
INSTALLATION AND CONNECTION Changing the side on which the door opens Tools Left hinge cover Switch off the appliance and disconnect it from the mains. 1. Remove all door compartments and close the door. 2. Remove the cover plates and the screws. 3. - Page 44 INSTALLATION AND CONNECTION 6. Remove the screws and the middle hinge 7. Carefully lift the bottom door from the lower hinge and place it on a padded surface to prevent scratching. 8. Unscrew part ‘S’ and attach it to the other side with the screws. (see step 5). 9.
- Page 45 INSTALLATION AND CONNECTION 11. Slide the bottom door back on to the lower hinge, making sure that the lower hinge pin fits into the lower hole of the door. 12. Place the middle hinge in the door. Pay attention to the positioning of any adjustment washers.
-
Page 46: Description Of The Appliance
DESCRIPTION OF THE APPLIANCE Appliance 1. Interior lighting 2. Shelf 3. Thermostat dial 4. Vegetable drawer 5. Freezer compartment 6. Freezer drawer 7. Adjustable feet 8. Door compartment ▷ The bottom door compartment is suitable for bottles. Best location for freezing fresh food. EN 18... -
Page 47: Operating The Appliance
OPERATING THE APPLIANCE Setting the thermostat The thermostat automatically regulates the inside temperature of both compartments. 1. The normal temperature setting is position ECO. 2. Set a higher temperature by turning the thermostat dial between position ‘0’ and position ECO. 3. -
Page 48: Storing And Freezing Food
STORING AND FREEZING FOOD Recommended distribution Sections of the refrigeration compartment • Upper section: canned food, bread, wine, pastas etc. • Middle section: dairy products, ready-to-cook meals, desserts, soft drinks, beer, cooked food etc. • Lower section: meat, meat products, dairy. •... -
Page 49: Avoid Contamination Of Food
STORING AND FREEZING FOOD Avoid contamination of food To avoid contamination of food, please respect the following instructions: • Opening the door for long periods can cause a significant increase of the temperature in the compartments of the appliance. • Regularly clean surfaces that can come in contact with food and accessible drainage systems. -
Page 50: Freezing And Storing Foods In The Frozen Compartment
STORING AND FREEZING FOOD Freezing and storing foods in the frozen compartment Important recommendations for freezing fresh food • The maximum quantity of food that you can put in the frozen compartment in one go is stated on the type plate. Putting more than this maximum quantity of food into the frozen compartment will slow the freezing process and reduce the quality. -
Page 51: Defrosting Frozen Food
STORING AND FREEZING FOOD Recommended storage times of frozen food in the frozen compartment Type of food Storage life Fruit, beef 10 to 12 months Vegetables, veal, poultry 8 to 10 months Venison 6 to 8 months Pork 4 to 6 months Finely chopped or minced meat 4 months Bread, pastas, cooked dishes, whitefish... - Page 52 MAINTENANCE Defrosting the appliance Automatic defrost of the refrigeration compartment The refrigeration compartment defrosts automatically from time to time. Defrosting of the NoFrost freezer The NoFrost freezer defrosts automatically. Any frost deposits will then disappear. Any ice or frost deposits that nevertheless form in the freezer compartment can be caused by unusual use of the appliance (opening the door too often and too long or poorly sealing door, etc.).
- Page 53 MAINTENANCE When you are not going to use the appliance for a longer period then switch it off and disconnect it from the mains. Empty, defrost and clean the appliance, and leave the door ajar. EN 25...
- Page 54 FAULTS Faults table When you have any doubts about whether your appliance is working properly you should not immediately assume that it is defective. We recommend that you should in any case check the points in the following table. Symptom Possible cause Solution The appliance emits a slight...
- Page 55 FAULTS Symptom Possible cause Solution Door does not open easily. You are trying to open the The situation returns to appliance’s door just after normal after a few minutes, you have closed the door. and the door opens easily Then opening the door is again.
- Page 56 ENVIRONMENTAL ASPECTS Disposal of packaging and appliance This appliance is made from sustainable materials. This appliance must be disposed of in a responsible manner at the end of its service life. Contact the local authorities for information about the method. See also the ‘Disposal’...
- Page 57 EN 29...
- Page 58 EN 30...
- Page 59 EN 31...
- Page 60 902911...
Need help?
Do you have a question about the KCV282N Series and is the answer not in the manual?
Questions and answers