Table of Contents
Advertisement
Quick Links
MCO Home
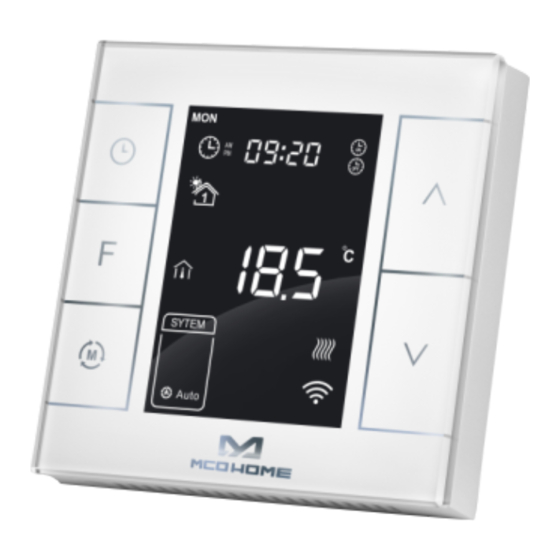
MCO Home - Electrical Heating Thermostat
with humidity sensor Version 2
SKU: MCOEMH7H-EH2
Quickstart
This is a Z-Wave Device for Europe. To run this device please connect it to your mains power supply. To add this device to your network execute
the following action:
In normal working interface, press & hold S4 to enter interface for inclusion of Z-Wave network. Before device included into network, "- - -" will
display on the screen. Then press S4 once, device will enter learning mode to get a node ID. If inclusion is success, a node ID will display on the
screen in a few seconds.
What is Z-Wave?
Create PDF in your applications with the Pdfcrowd
HTML to PDF API
PDFCROWD
Advertisement
Table of Contents

Related Manuals for MCO Home MCOEMH7H-EH2


Summary of Contents for MCO Home MCOEMH7H-EH2
- Page 1 MCO Home MCO Home - Electrical Heating Thermostat with humidity sensor Version 2 SKU: MCOEMH7H-EH2 Quickstart This is a Z-Wave Device for Europe. To run this device please connect it to your mains power supply. To add this device to your network execute the following action: In normal working interface, press &...
-
Page 2: Product Description
Z-Wave is the international wireless protocol for communication in the Smart Home. This device is suited for use in the region mentioned in the Quickstart section. (For more information about frequency regulations please refer to the frequency coverage overview at Sigma Designs Website Z-Wave ensures a reliable communication by reconfirming every message (two-way communication) and every mains powered node can act as a repeater for other nodes (meshed network) in case the receiver is not in direct wireless range of the transmitter. - Page 3 Step 1: Separate the device into two parts: the display panel and the bottom. Step 2: Insert all wires into the right terminals and tighten screws. Wiring diagrams are shown below. Step 3: Push the bottom into the junction box and secure it with two screws, and then mount the touch panel back. Step 4: Confirm the device is well mounted, power on and it is ready to operate.
- Page 4 Create PDF in your applications with the Pdfcrowd HTML to PDF API PDFCROWD...
- Page 5 Inclusion/Exclusion On factory default the device does not belong to any Z-Wave network. The device needs to be added to an existing wireless network to communicate with the devices of this network. This process is called Inclusion. Devices can also be removed from a network. This process is called Exclusion. Both processes are initiated by the primary controller of the Z-Wave network.
-
Page 6: Auto-Inclusion
In normal working interface, press & hold S4 to enter interface for exclusion of Z-Wave network. Before device excluded into network, a node id will display on the screen. Then press S4 once, device will enter learning mode to get a node ID. If inclusion is success, "- - -" will display on the screen in a few seconds. Auto-Inclusion Beside the standard inclusion this devices supports the so called auto inclusion. -
Page 7: Control Specifications
The setting range is 5-37 ℃ 4 1-99℉ . Then press S4 or S5 can adjust the value. Press S3 or wait 25 seconds without any key operation will save the ( ) setting and return back to the normal operation interface. Auto Mode: The changed value only valid in the current time period for this time, and the device will not effect the preset time period value . - Page 8 Auto Mode Time Periods Parameter Setting - In normal working interface, short press S1 to enter into time periods setting. Four time periods can be set for each day of the whole week. - Press S2 can switch among “Hours, Minutes, Temperature value”. Press S4 or S5 can change the value. - After finished the setting of 4 time periods on Monday, press S1 and follow the same way to set periods of next days.
- Page 9 In shutdown state, long press S3+S5 synchronically can enter into secret menu. Press S4 or S5 to enter code 1234. Touch S3 to enter setting interface. Following are parameters which can be set. Create PDF in your applications with the Pdfcrowd HTML to PDF API PDFCROWD...
- Page 10 Create PDF in your applications with the Pdfcrowd HTML to PDF API PDFCROWD...
-
Page 11: Quick Troubleshooting
* After power failure: 0 indicates device will be in shutdown state (“OFF”) when power on again; 1 indicates device will be in working interface when power on again; 2 (default) indicates device will stay the status before power failure when power on again. Quick trouble shooting Here are a few hints for network installation if things dont work as expected. -
Page 12: Association Groups
Association Groups: Group Number Maximum Nodes Description Lifeline Relay Switch Relay Switch Configuration Parameters Z-Wave products are supposed to work out of the box after inclusion, however certain configuration can adapt the function better to user needs or unlock further enhanced features. IMPORTANT: Controllers may only allow configuring signed values. -
Page 13: Technical Data
Timing upload mode only Upload the difference+timing upload mode Parameter 3: Upload temperature difference Size: 2 Byte, Default Value: 5 Setting Description 3 - 1000 5*0.1℃=0.5℃, steps 0,1 Parameter 4: Upload time interval regularly Size: 2 Byte, Default Value: 30 Setting Description 10 - 65535... -
Page 14: Supported Command Classes
Dimensions 85x85x45 mm Weight 192 gr Hardware Platform ZM5101 6928954201806 IP Class IP 20 Voltage 230 V Load Firmware Version 02.06 Z-Wave Version 04.21 Z-Wave Product Id 0x015f.0x0702.0x5102 Supported Command Classes Basic Sensor Multilevel Thermostat Mode Thermostat Operating State Thermostat Setpoint Association Grp Info Device Reset Locally Zwaveplus Info... -
Page 15: Explanation Of Z-Wave Specific Terms
Manufacturer Specific Powerlevel Firmware Update Md Association Version Time Time Parameters Explanation of Z-Wave specific terms Controller — is a Z-Wave device with capabilities to manage the network. Controllers are typically Gateways,Remote Controls or battery operated wall controllers. Slave — is a Z-Wave device without capabilities to manage the network. Slaves can be sensors, actuators and even remote controls. Primary Controller —...
Need help?
Do you have a question about the MCOEMH7H-EH2 and is the answer not in the manual?
Questions and answers