Advertisement
Quick Links
Advertisement

Related Manuals for Vine TJ-560


Summary of Contents for Vine TJ-560
- Page 1 TJ-560 Wi-Fi Thermostat User Manual Smart, yet Simple.
- Page 2 Electronic manual and installation video 1. This user manual only includes installation and simple setup instructions. For the more detailed operating instructions and user guide, scan the QR code. 2.Watch installation video by scanning the QR code. Electronic manual Installation Video WE ARE HERE TO HELP, 24/7 ! WEBSITE:...
- Page 3 App Download GET IT ON Google Play 2. Open the "Vine Thermostat" or "Smart Life" app. If you already have an account, tap Sign In. To create a new account, tap Sign Up. Note: You must create your own Vine account to use third-party services and products. These will not work with a guest account.
- Page 4 Vine Thermostat - A smart Choice for Smart Life! Items included in box: Wi-Fi Thermostat Wall Plate Large Trim Plate Screws Sets Wiring labels User Manual You may also need these tools: Phillips screwdriver Level Pencil Home Wi-Fi Password...
- Page 5 Compatibility Conventional (2H/2C) Heat Pump (4H/2C) include Auxiliary Heat or Emergency Heat Gas, Oil, Electric Dual Fuel Support * Require C-Wire to power the thermostat(24V-AC) Incompatible wiring and voltage Please check your old thermostat for compatibility to see if it: ·Does not work with electric baseboard heat (110VAC~240V AC) ·Does not work with millivolt systems ·Does not support S terminals for indoor and outdoor sensors.
-
Page 6: Installation
Installation Switch off the power Step 1 IMPORTANT as this protects you from blowing a fuse in your equipment. To make sure the power is off, change the temperature with your current thermostat and wait for Switch at least 5 minutes to be sure that the system is OFF. Breaker Box Check that your system is off... - Page 7 Remove your old thermostat from the wall-plate Step 3 Most thermostats allow you to remove the main unit and provide access to a wall plate which holds the wiring terminals, you can take off the thermostat by grasping and gently pulling. Some thermostats may have screws, buttons, or clasps.
-
Page 8: Mount The New Wall Plate
Disconnect the wires and remove the old wall plate Step 6 Disconnect the wires from the old thermostat one by one, you may need a screwdriver to release wires from terminals. Unscrew and take off the mounting plate of your old thermostat from the wall. Note: Wrap the wires around a pen or pencil so they don’... - Page 9 Use the picture you took before as reference to wire, the following chart is a wiring diagram for common systems, please make sure that a C -wire exists in our old thermostat system. Terminal Conventional System Heat Pump System Power for cooling, 24V Power for cooling, 24V Power for heating, 24V Power for heating, 24V...
- Page 10 Thermostat Combined Single Stage Heat and Single Stage Cool with C-Wire Furnace and Air Conditioner Thermostat Single Stage Heat/Two Stage Heat Pump with Emergency Heat and Auxiliary Heat with C-Wire Thermostat Dual Fuel System-Combined Single/ Two Stage Heat Pump and Single/ Two Stage Furnace with C-wire The switch is used to connect R/RC with RH.
- Page 11 If C- wire does not exist in your system, check the instruction below: Do you have a spare wire? Yes. Check for spare wire behind your wall plate of old thermostat, if you have a spare wire, connect it to the C terminal on the new wall plate. Remove cover from furnace or heating system, open the heating and cooling system to find the control board where you should find the same terminal labels as of the thermostat.
- Page 12 Install the thermostat to the wall plate Step 9 First aim the four clips of the back plate of the thermostat, the gently push and fit the wiring pole to the terminals on the wall plate. Power on and enjoy Step 10 Turn on the switch that controls your heating and cooling system, the thermostat will be powered on and prompt you to start the setup.
- Page 13 Congratulations, you did it! Say hi to your new thermostat ! To complete , follow the instruction on your thermostat screen.
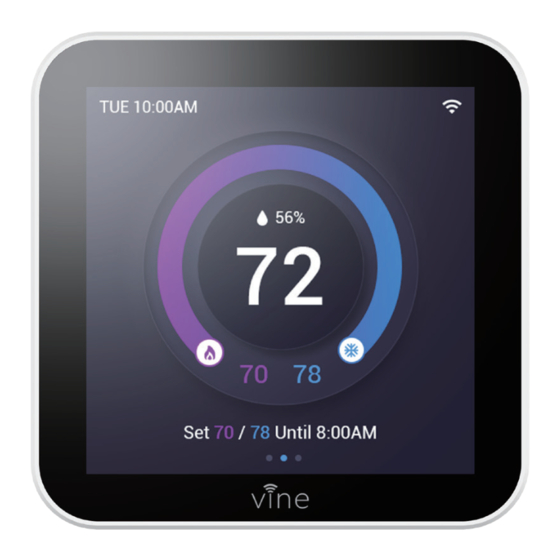
- Page 14 Device Main Screen Current Date & Time Wi-Fi State Indoor Humidity Indoor Temperature Heating Setpoint Cooling Setpoint Current Schedule Period...
-
Page 15: Device Initial Setup
Device Initial Setup For a quick and easy way to begin using your new smart thermostat, the device will automatically direct you to the Initialization Setup process once it’ s turned on for the first time. Heat Type Select your home’ s HVAC type from the options available: Gas /Oil /Furnace , Electric , Heat Pump, Dual Fuel or no Heating , select according to... - Page 16 If you have a electric system: 1. Select Electric and tap it. 2. Select Heat/Cool stage depending on your application. 3. Tap "Next" button to continue. If you have a heat pump: 1. Select Heat Pump and tap it. 2. Follow the on-screen instructions to configure. 3.
- Page 17 3. Tap "Next" button to continue. Create your Home After creating an account, signing in to the Vine App, the App will ask you to “Create My Home” or “Join a Home” , if you are owner of the thermostat, select “Create my Home” .
- Page 18 Please follow on-screen instructions to complete the Wi-Fi setup. If you have your Vine thermostat installed by a professional or if a Vine Thermostat is installed by yourself while it’ s not yet connected to Wi-Fi, choose “Yes, it is installed” , the App then will start right away to connect your thermostat to Wi-Fi.
- Page 19 APP Main Screen Setting Current Device Date& Time Indoor Temperature Indoor Humidity Heating Setpoint Cooling Setpoint Current Schedule Period Schedule Current Mode Current Fan...
-
Page 20: Additional Features
Additional Features Except from the above basic settings, Vine Smart Wi-Fi Thermostat also provides possibility to connect to the Alexa and Google Assistant, hence helps you to control your room temperature by voice control. Follow our instructions below to get connected with Alexa/Google: How to connect to Alexa? Download and register the thermostat as instructed in page 1~22. - Page 21 Tap the sidebar menu on the upper left corner of the main page of Google Home, select Home Control" . Tap the "+" button on the lower right corner and search for "Vine Thermostat" . Tap open "Vine Thermostat" and select country, then enter app account/password and tap "Link Now"...
-
Page 22: Limited Warranty
HOW TO RECEIVE SERVICE IF YOU WANT TO CLAIM UNDER THIS LIMITED WARRANTY Before making a claim under this Limited Warranty, the owner of the Product must (a) notify VINE CONNECTED of the intention to claim by visiting vineconnected.com/support during the Warranty Period and providing a description of the alleged failure, and (b) comply with VINE CONNECTED’... - Page 23 (b) handling, storage, installation, testing, or use not in accordance with the User’ s Guide or other instructions provided by VINE CONNECTED; (c) abuse or misuse of the Product; (d) breakdowns, fluctuations, or interruptions in electric power or the telecommunications network; or (e) Acts of God, including but not limited to lightning, flood, tornado, earthquake, or hurricane;...
- Page 24 HOME, PRODUCT, PRODUCT PERIPHERALS, COMPUTER, MOBILE DEVICE, AND ALL OTHER ITEMS AND PETS IN YOUR HOME, RESULTING FROM YOUR USE OF THE PRODUCT INFORMATION, SERVICES, OR PRODUCT. PRODUCT INFORMATION PROVIDED BY THE SERVICES IS NOT INTENDED AS A SUBSTITUTE FOR DIRECT MEANS OF OBTAINING THE INFORMATION.
- Page 28 www.vineconnected.com...
Need help?
Do you have a question about the TJ-560 and is the answer not in the manual?
Questions and answers