Advertisement
Table of Contents
- 1 Download the App
- 2 Create an Account
- 3 Installation
- 4 Mount the New Wall Plate
- 5 Device Initial Setup
- 6 Main Screen
- 7 Mode Setup
- 8 Fan Setup
- 9 Adjusting the Temperature
- 10 Advanced Setting
- 11 Copy a Schedule
- 12 Icon Reference
- 13 Device Settings
- 14 Advanced Features
- 15 Limited Warranty
- Download this manual
Advertisement
Table of Contents

Related Manuals for Vine TJ-225


Summary of Contents for Vine TJ-225
- Page 1 TJ - 225 Smart Wi-Fi Thermostat with Nightlight User Manual...
- Page 2 Installation Guide TJ-225 Smart Wi-Fi Thermostat with Nightlight First things first. Here ’ s what you ’ ll find in the box Wi-Fi Thermostat Two screws and anchors Flathead screwdriver Wire labels Jumper wire...
- Page 3 You may also need these tools: Phillips screwdriver Level Pencil Home Wi-Fi Password Compatibility Section For conventional ( gas / oil / propane / electric ) heat-pump and dual fuel systems. > 2-Heat & 2-Cool > 1-Heat & 1Cool > Heat Only > Cool Only >...
- Page 4 Incompatible wiring and voltage Please check your old thermostat’ s wall plate have any below indicators? • Does not work with electric baseboard heat ( 110VAC~240VAC ) • Does not work with millivolt systems • Does not support S terminals for indoors and outdoors sensors. 110 VAC 120 VAC 240 VAC...
-
Page 5: Download The App
There are three ways to download the Vine App for your smart device: iOS/Android 1. Search Vine Smart Control in the App Store or Google Play Store,then download; App Download 2. Use your smart device to scan the QR code on the left for an automatic download;... -
Page 6: Create An Account
Your Vine thermostat will be linked to this email address once it is registered. Installation This TJ-225 thermostat is designed to work on most 24V-AC low voltage heating and cooling systems such as gas and oil furnaces, heat pumps, and single or dual-stage systems. - Page 7 Switch off power Step 2 This protects you and avoids blowing a fuse in your equipment. To make sure the power is off, change the temperature with your current thermostat and wait at least Switch five minutes to be sure that Breaker Box your system doesn’...
- Page 8 Check that your system is off Step 3 Confirm your system is off by turning on your heat ( during winter ) or your AC ( during summer ). Wait a few minutes—you should not feel air coming from your vents. NOTE : If you have a digital thermostat that has a...
- Page 9 Take a picture of the wires Step 5 Take a picture of your existing wall plate’ s wiring and save it for reference. Make sure you can read the wire terminal labels. Label the wires Step 6 Use the wire label provided with your new thermostat to label each wire on your old wall plate.
-
Page 10: Mount The New Wall Plate
Disconnect the wires and remove the old wall plate Step 7 Disconnect the wires from the old thermostat one by one, you may need a screwdriver to release wires from terminals. NOTE : Wrap the wires around a pen or pencil so they don’... - Page 11 Look at the thermostat wiring photo you took. The following are wiring diagrams for common systems, please confirm you have a C connected to your old thermostat. Terminal Conventional System Heat Pump System Power for cooling, 24V Power for cooling, 24V Power for heating, 24V Power for heating, 24V Common wire, 24V...
- Page 12 Single Stage Heat / Two Stage Heat- Furnace / Boiler with C wire O/B/W2 Thermostat 1st Stage Heat 2nd Stage Heat Combined Single Stage Heat and Single Cool Stage with C wire ( Remove Pre-installed Jumper ) Cool Furnace and Air Conditioner O/B/W2 Thermostat...
- Page 13 Single Stage / Two Stage Heat Pump with Emergency Heat and Auxiliary Heat with C wire O/B/W2 Thermostat Emerg./AUX 1st Stage 2nd Stage Heating Heat Heat Single Stage Cool / Two Stage Cool‒Air conditioner O/B/W2 Thermostat 1st Stage Cool 2nd Stage Cool...
- Page 14 Dual Fuel System-Combined Single Stage Heat Pump and Single Stage Furnace with C wire O/B/W2 Thermostat...
- Page 15 If you do not have a C-wire connected to your old thermostat, please check below wiring diagram. Do you have a spare wire? Yes. Check for spare wire behind your wall plate or old thermostat, if you have a spare wire, connect it to the C terminal on the new wall plate.
- Page 16 Conventional system without the C wire ( also commonly called a 4-wire system ) Remove cover from furnace or heating system, open the heating and cooling system’ s cover to find the control board. You should see the same terminal labels that are on your thermostat, move the G wire to the C terminal, then use the included jumper wire to connect G with Y.
- Page 17 Heat only 3-Wire system Heating wiring terminal Move G wire to C terminal Thermostat Move G wire to C terminal...
- Page 18 Cool only 3-Wire system A/C wiring terminal Move G wire to C terminal Thermostat Move G wire to C terminal...
- Page 19 When all wire connections have been completed, place any excess wire back inside the wall. Attach Thermostat to the Wall Step 10 First align the two clips on the back of the TJ-225 into the corresponding slots on the top of the wall plate. push Firmly press...
- Page 20 Power on and Enjoy Step 11 Turn on the switch that controls your heating and cooling system, the thermostat will power on and prompt you to start the setup. If you are having trouble, please refer to our help guide. We are here to help.
-
Page 21: Device Initial Setup
User Manual TJ-225 Wi-Fi Thermostat with Nightlight Initial Setup Device Initial Setup Step 1 For a quick and easy way to begin using your new smart thermostat, the device will automatically direct you to the Initialization Setup process once it’ s turned on for the first time. - Page 22 If you have a heat pump installed : Select the heat pump menu. Specify what the heat pump runs when the O/B Reversing Valve is engaged: On Cool runs cooling when O/B engages (most cases), or On Heat runs heating when O/B engages. Touch OK to next step.
- Page 23 Schedule Select the schedule you would like to run in your thermostat.
- Page 24 Date & Time Follow the screen instruction to set date and time of Thermostat.
- Page 25 After signing into your account, click the b. On the next screen, click the device you plus sign (+) in the top right hand corner to would like to add, in this case the TJ-225. add a new device.
- Page 26 c. Return to your thermostat and click “Start” and select the “Set by your phone” to start Wi-Fi setup. Return to your app, and follow the on-screen instructions to connect the BCC50 Thermostat to your Home’ s Wi-Fi network. NOTE: If you skip this step, you will be required to have the Wi-Fi connection by steps: Menu->Wi-Fi->...
- Page 27 Add Device to your Account Step 2 After you have successfully connected to your home’ s Wi-Fi Network, follow the on-screen instructions to name your thermostat and add the device to Device list. NOTE : Where is the QR code? After thermostat connect to Wi-Fi, you can find the QR code by Menu->...
-
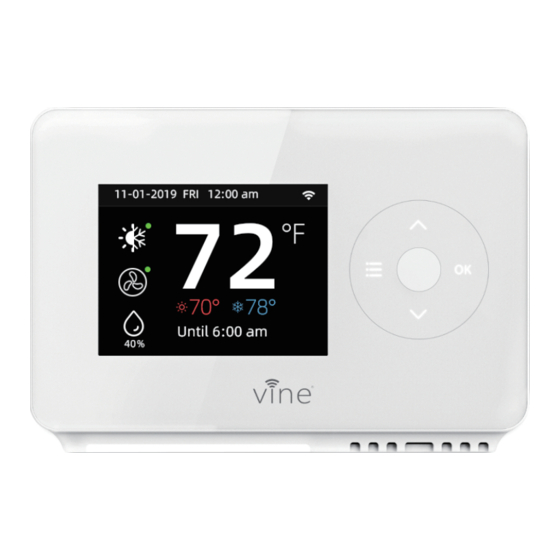
Page 28: Main Screen
User Manual How to use your TJ-225 Thermostat Main Screen Indoor Temperature Current Date & Time Current Mode Current Fan Mode Down Indoor Humidity Menu & Back button Heating Setpoint Cooling Setpoint Next Schedule Nightlight Period... -
Page 29: Mode Setup
Mode Setup The HVAC System settings depend on the type of system you have. Depending on your system, one or more the following options are shown: Turn on the air conditioner when the Turn on the heat when the current current temperature rises above the temperature drops below the setpoint. - Page 30 On Thermostat : Select Main Menu > System, use the “ ” and “ ” to change the system mode of your thermostat between : Cool, Heat, Auto, Emergency Heat or Off.
-
Page 31: Fan Setup
Fan Setup On Thermostat : The Fan menu displays the current furnace fan setting. Depending on your Select Main Menu > Fan, tap the “ ” and “ ” system, one or more of the following to change the fan mode of your thermostat options are shown: between: On, Auto or Circulation. -
Page 32: Adjusting The Temperature
Adjusting the Temperature : You can override the scheduled temperature by tapping the “ ” and “ ” to change the blue number represents the cool setpoint; the red number represents the heat setpoint. When the thermostat is in Auto mode, you must first select either your heating or cooling setpoint depending on which setpoint you would like to modify. - Page 33 Schedule : Tap the “ ” and “ ” . to change the active schedule or select No schedule. NOTE : There are only two default programs available for selection, please follow instructions on App to create new programs.
- Page 34 Wi-Fi Settings Your Thermostat supports 2.4G Wi-Fi 802.11 b/g/n. Wi-Fi is normally configured during initial setup. You may, however, be required to reconfigure the settings if your Wi-Fi network settings change. Wi-Fi Connect Select Enabled to use Wi-Fi. Network Follow the instruction to connect the Wi-Fi with your phone.
-
Page 35: Advanced Setting
Advanced Setting: Terminal Default Description A temperature range between the current Deadband 1° F 2° F 0.5° F temperature and the heating setpoint, where heating or cooling is not engaged. Fan Delay 120s The time fan continues after mode turn off. Min Run time 180s 300s... - Page 36 User Manual How to use App to control your TJ-225 Wi-Fi Thermstat Main Screen Key pad lock Menu Refresh Current Date & Time Heat Cool Indoor Temperature Heating Setpoint Next Schedule Period Cooling Setpoint Indoor Humidity Current Mode Current Fan Mode...
- Page 37 Programming your Schedule Adjusting Schedule To add a new Schedule, click the plus (+) in the top right-hand corner, name your schedule and click OK. To modify an existing Schedule, select a Schedule from the list it will change to programming screen.
- Page 38 Setting a period Touch the day of the week you want to adjust. Select an existing period activity to edit. You can also create a new activity by touching +. Select Start time, Heat setpoint and Cool setpoint. Swipe to select the new time value. Touch Save Note: You can only select time values that are at least 15 min after the previous activity to 15 min...
-
Page 39: Copy A Schedule
Copy a Schedule To copy the entire schedule from one day to another day ( for example, if all your week days follow the same schedule ) : Click Copy View Select the days that will use the copied schedule ( you can select more than one ). -
Page 40: Device Settings
Device Settings Follow the on-screen instructions to view and modify the thermostat settings for Nightlight, Brightness and run schedule, date & time, temperature units, safety functions regarding your thermostat. -
Page 41: Advanced Features
Please follow the below instruction to enjoy your smart home journey. How to connect to Alexa? Download the Vine Smart Control, create an account, and register your app to the TJ-225 thermostat. Download the Amazon Alexa app and set up your Alexa-enabled device. - Page 42 Common commands Control the device via voice commands Now you can control your thermostat with Echo. You can control your thermostat with the following commands: Alexa, turn (Device Name) on. Alexa, turn (Device Name) off. Alexa, Change (Device Name) Mode to Cool/Heat/Auto. Alexa, Increase (Device Name) by __ degrees.
- Page 43 “ Home Control ” . Then tap the plus sign in the lower right corner and search for “ Vine Control ” . Find Vine Control on the list and open it, select the country where your Vine Control app account is located, enter your app account and password, and tap “Link Now”...
- Page 44 5 . Control your smart device with Google Home Now you can control your thermostat with Google Home, the supported commands include ( Google Home currently only supports English commands ) : Hey Google, what’ s the __ temperature? Hey Google, make it warmer (or cooler) Ok Google, set the temperature to __ degrees Ok Google, raise (or lower) the temperature __ degrees “Ok Google, what is the current temperature in the Bedroom?
-
Page 45: Limited Warranty
1. WHAT THIS LIMITED WARRANTY ENTAILS; DURATION OF COVERAGE VINE CONNECTED, Pleasanton, California USA, warrants to the owner of the enclosed product that the product contained in this box will be free from defects in materials and workmanship for a period of two years from the date of delivery following the original retail purchase. If the Product fails to conform to this Limited Warranty during the Warranty Period, VINE CONNECTED will, at its sole discretion, either (a) repair or replace any defective Product or component;... - Page 46 HOW TO RECEIVE SERVICE IF YOU WANT TO CLAIM UNDER THIS LIMITED WARRANTY Before making a claim under this Limited Warranty, the owner of the Product must (a) notify VINE CONNECTED of the intention to claim by visiting vineconnected.com/support during the Warranty Period and providing a description of the alleged failure, and (b) comply with VINE CONNECTED’...
- Page 47 PERIPHERALS THAT MAY BE CONNECTED TO YOUR PRODUCT MAY CHANGE FROM TIME TO TIME. WITHOUT LIMITING THE GENERALITY OF THE DISCLAIMERS ABOVE, ALL PRODUCT INFORMATION IS PROVIDED FOR YOUR CONVENIENCE, “AS IS” , AND “AS AVAILABLE” . VINE CONNECTED DOES NOT REPRESENT, WARRANT, OR GUARANTEE THAT PRODUCT INFORMATION WILL BE AVAILABLE, ACCURATE, OR RELIABLE OR THAT PRODUCT INFORMATION OR USE OF THE SERVICES OR PRODUCT WILL PROVIDE SAFETY IN YOUR HOME.
- Page 48 www.vineconnected.com...
Need help?
Do you have a question about the TJ-225 and is the answer not in the manual?
Questions and answers