Table of Contents
Advertisement
Quick Links
Advertisement
Table of Contents

Related Manuals for Nilfisk-Advance 961-OL SD XC


Summary of Contents for Nilfisk-Advance 961-OL SD XC
- Page 1 IVB 961-0L 965-0L SD XC 107400434 G (04. 2019)
-
Page 2: Table Of Contents
IVB 9 L Contents Important safety instructions ....................3 Description Operating elements ..............7 Operating panel ..............8 Before starting the Assembling the vacuum cleaner...........9 cleaner Control / Operation Connections ...............12 Switching on the vacuum cleaner ........12 Cleaning the filter element ..........13 Applications and Techniques .................14 methods After using the cleaner... - Page 3 IVB 9 L 1 Important safety instructions Symbols used to mark Prior to using the appliance for the first time, be sure to read instructions this document through and keep it ready to hand. DANGER Danger that leads directly to serious or irreversible injuries, or even death.
- Page 4 IVB 9 L Any other use is considered as improper use. The manufacturer ac- cepts no liability for any damage resulting from such use. The risk for such use is borne solely by the user. Proper use also includes proper operation, servicing and repairs as specified by the manufacturer.
- Page 5 2. Regularly check whether the power cord is damaged or shows signs of ageing. 3. Have the faulty mains connecting lead replaced by your Nilfisk-Advance service representative or a qualified electrician prior to using the appliance again. DANGER The upper section of the vacuum cleaner contains live components.
- Page 6 IVB 9 L Hazardous materials WARNING Hazardous materials. Vacuuming up hazardous materials can lead to serious or even fatal injuries 1. The following materials must not be picked up by the vacuum cleaner: - hot materials (burning cigarettes, hot ash, etc.) - flammable, explosive, aggressive liquids (e.g.
-
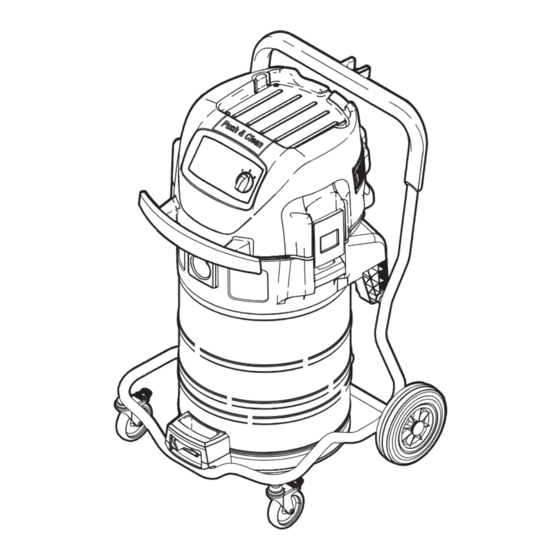
Page 7: Operating Elements
IVB 9 L 2 Description Operating elements IVB 961-0L IVB 965-0L SD XC Optional accessories / Option depending on model Original instruction... -
Page 8: Operating Panel
IVB 9 L 1 Handle 2 Applicance switch "I-0-II" 3 Receptacle for electrical lead 4 Inlet fitting 5 Dirt tank 6 Castor with brake 7 Swivel bar to remove dirt tank 8 Grip to empty tank 9 Handle to remove dirt tank 10 Retaining clamp 11 Suction pipe support 12 Bracket for floor nozzle... -
Page 9: Assembling The Vacuum Cleaner
IVB 9 L 3 Before starting the cleaner Assembling the 1. Take vacuum cleaner and vacuum cleaner accessories out of the pack- 3.1.1 Taking accessories out aging. of the packaging 2. The mains plug should not yet be inserted into a socket. 3. - Page 10 IVB 9 L 3.1.3 Inserting the filter bag 1. The mains plug should not (IVB 961-0L) yet be inserted into a socket. 2. Apply parking brakes (A) on both castors. 3. Open the retaining clamps (B) and remove the upper section of the vacuum clean- 4.
- Page 11 IVB 9 L 3.1.4 Inserting the disposal 1. The mains plug should not bag (IVB 965-0L SD XC) yet be inserted into a socket. 2. Apply parking brakes (A) on both castors. 3. Swing the bar (B) upwards. 4. Use the handle (C) to pull the dirt tank out of the vacuum cleaner.
-
Page 12: Connections
IVB 9 L 4 Operation Connections 1. Connect the suction hose. 4.1.1 Connecting the suction hose 4.1.2 Electrical connection 1. Ensure that the cleaner is switched off. 2. Insert the power cord into a The operating voltage shown on the properly installed and fused rating plate must corres pond to the socket with earthing contact. -
Page 13: Cleaning The Filter Element
IVB 9 L Cleaning the filter element 4.3.1 Cleaning the filter element " Push&Clean System " (IVB 961-0L) Only for vacuum cleaning without a filter bag and without a cloth insert filter. If suction performance drops: 1. Turn switch to position "II" (maximum suction power). 2. -
Page 14: Techniques
IVB 9 L 5 Applications and techniques Techniques If used correctly, additional accessories, suction nozzles and suc- tion hoses can enhance the cleaning action and reduce the cleaning effort. Effective cleaning is achieved if you follow just a few guidelines in combination with your own practical experience in special fields. -
Page 15: Switching The Vacuum Cleaner Off And Storage
IVB 9 L 6 After finishing work Switching the vacuum 1. Switch off the cleaner and cleaner off and storage pull the mains plug out of the socket. 2. Wind up the power cord and hang it on the handle (A). Begin winding up the cord at the cleaner end and not the plug end to prevent the pow-... -
Page 16: Maintenance Plan
IVB 9 L 7 Maintenance Maintenance plan IVB 961-0L: After finishing work When required 7.2.1 Emptying the dirt tank 7.2.3 Replacing the filter bag 7.2.5 Replacing filter element IVB 965-0L SD XC: After finishing work When required 7.2.2 Emptying the dirt tank 7.2.4 Replacing the disposal bag 7.2.5 Replacing filter element Optional accessories / Option depending on model... -
Page 17: Maintenance Work
IVB 9 L Maintenance work 1. Switch off the vacuum clean- 7.2.1 Emptying the dirt tank er and pull the mains plug (IVB 961-0L) out of the socket. 2. Apply parking brakes both castors. Only after picking up harmless dust. After emptying the tank: clean the rim of the tank and the seals in the intermediate ring and the upper sec-... - Page 18 IVB 9 L 7.2.2 Emptying the dirt tank 1. Switch off the vacuum clean- (IVB 965-0L SD XC) er and pull the mains plug out of the socket. 2. Apply parking brakes (A) on Only after picking up harmless both castors. dust.
- Page 19 IVB 9 L 7.2.3 Replacing the filter bag 1. Switch off the vacuum clean- (IVB 961-0L) er and pull the mains plug out of the socket. 2. Apply parking brakes (A) on During the following work, ensure both castors. that dust is not unnecessarily spread around.
- Page 20 IVB 9 L 7.2.4 Replacing the disposal 1. Switch off the vacuum clean- er and pull the mains plug (IVB 965-0L SD XC) out of the socket. 2. Apply parking brakes (A) on both castors. During the following work, ensure that dust is not unnecessarily spread around.
- Page 21 IVB 9 L 7.2.5 Replacing filter element 1. Switch off the vacuum clean- er and pull the mains plug out of the socket. During the following work, ensure 2. Apply parking brakes (A) on that dust is not unnecessarily spread both castors.
- Page 22 IVB 9 L 8 Troubleshooting Fault Cause Remedy ‡ Motor does not start > Fuse of the mains socket has • Connect mains fuse. blown. > Overload protection switch • Switch off the vacuum cleaner has tripped. and allow it to cool for approx. 5 minutes.
-
Page 23: Recycling The Cleaner
IVB 9 L 9 Further information Recycling the cleaner Make the old cleaner unusable immediately. 1. Unplug the cleaner. 2. Cut the power cord. 3. Do not discard of electrical appliances with household waste. As specified in European Directive 2012/19/EC on old elec- trical and electronic appliances, used electrical goods must be collected separately and recycled ecologically. -
Page 24: Technical Data
IVB 9 L Technical data 961-0L 965-0L SD XC 230 (EU,GB) Voltage 110 (GB) Mains frequency 50/60 13 (GB 230V) Fuse 16 (EU) 32 (GB 110 V) 2 x 1150 (GB 110 V) Power consumption 2 x 1500 (EU,GB) 2 x 1000 (GB 110 V) Power consumption 2 x 1200 (EU, GB) 2 x 216 (EU, GB) / 2 x 174 (GB 110 V) - Page 25 IVB 9 L...
- Page 26 HEAD QUARTER FRANCE MEXICO SPAIN DENMARK Nilfi sk SAS Nilfi sk de Mexico, S. de R.L. de C.V. Nilfi sk S.A. Pirineos #515 Int. Nilfi sk A/S 26 Avenue de la Baltique Torre d’Ara, 60-70 Microparque Kornmarksvej 1 Villebon sur Yvette Passeig del Rengle, 5 Plta.
Need help?
Do you have a question about the 961-OL SD XC and is the answer not in the manual?
Questions and answers