Huawei Smart String ESS LUNA2000-200KWH-2H1 User Manual
Hide thumbs
Also See for Smart String ESS LUNA2000-200KWH-2H1:
- User manual (241 pages) ,
- Maintenance manual (172 pages) ,
- Quick manual (62 pages)

Subscribe to Our Youtube Channel
Related Manuals for Huawei Smart String ESS LUNA2000-200KWH-2H1


Summary of Contents for Huawei Smart String ESS LUNA2000-200KWH-2H1
- Page 1 LUNA2000-200KWH-2H1 Smart String ESS User Manual Issue Draft Date 2022-10-30 HUAWEI TECHNOLOGIES CO., LTD.
- Page 2 Notice The purchased products, services and features are stipulated by the contract made between Huawei and the customer. All or part of the products, services and features described in this document may not be within the purchase scope or the usage scope. Unless otherwise specified in the contract, all statements, information, and recommendations in this document are provided "AS IS"...
-
Page 3: About This Document
NOTICE is used to address practices not related to personal injury. Supplements the important information in the main text. NOTE is used to address information not related to personal injury, equipment damage, and environment deterioration. Issue Draft (2022-10-30) Copyright © Huawei Technologies Co., Ltd. - Page 4 Change History Changes between document issues are cumulative. The latest document issue contains all the changes made in earlier issues. Issue Draft (2022-10-30) This issue is used for first office application (FOA). Issue Draft (2022-10-30) Copyright © Huawei Technologies Co., Ltd.
-
Page 5: Table Of Contents
2.4.3.2 T/H sensor ................................36 2.4.3.3 Door Status Sensor ............................... 38 2.4.3.4 Electrode Water Sensor ............................38 2.4.4 Fire Suppression System ............................39 2.4.4.1 Rack-mounted Integrated Gas Fire Extinguisher ....................39 Issue Draft (2022-10-30) Copyright © Huawei Technologies Co., Ltd. - Page 6 2.9.8.1 Installing a FE Communications Cable ........................ 91 2.9.8.2 Installing Fiber Ring Network Communications Cables ..................92 2.9.9 (Optional) Installing DDSU666-H Cables ....................... 94 2.9.10 (Optional) Installing Maintenance Socket Cables....................95 Issue Draft (2022-10-30) Copyright © Huawei Technologies Co., Ltd.
- Page 7 A Crimping an OT or DT Terminal ..................151 B Repainting the Equipment ..................... 155 C How Do I Recycle Used Batteries? ..................160 D CMU Commissioning ......................161 E Contact Information ......................... 174 F Acronym............................175 Issue Draft (2022-10-30) Copyright © Huawei Technologies Co., Ltd.
-
Page 8: Safety Information
Storage conditions that do not meet the requirements specified in this document Damage to the hardware or data of the equipment due to customer's negligence, incorrect operation, or intentional damage Issue Draft (2022-10-30) Copyright © Huawei Technologies Co., Ltd. - Page 9 If any liquid is detected inside the equipment, immediately press the emergency stop button and contact the onsite management personnel. Do not open the cabinet door when the system is running. Issue Draft (2022-10-30) Copyright © Huawei Technologies Co., Ltd.
-
Page 10: Personnel Requirements
(PPE) when operating the equipment. Operators must pass the Company's training and have professional knowledge of energy storage systems. For specific qualification requirements, see local laws, regulations, and industry standards. Issue Draft (2022-10-30) Copyright © Huawei Technologies Co., Ltd. -
Page 11: Storage And Installation Environment Requirements
The ESS cannot be tilted or placed upside down. If equipment except battery packs has been stored for more than two years, it must be checked and tested by professionals before use. Issue Draft (2022-10-30) Copyright © Huawei Technologies Co., Ltd. - Page 12 For example, it can be recharged every 8 months or every 12 months. Dispose of batteries if the maximum storage period and recharging times are exceeded. Issue Draft (2022-10-30) Copyright © Huawei Technologies Co., Ltd.
- Page 13 The site must be a class C or higher environment but not a class D or E environment. Issue Draft (2022-10-30) Copyright © Huawei Technologies Co., Ltd.
-
Page 14: Loading/Unloading And Transportation Requirements
The ESS must be loaded and unloaded in compliance with local laws, regulations, and industry standards. Reckless handling may cause short circuits or damage to battery packs in the container, which may result in electrolyte leakage, breakage, explosions, or fires. Issue Draft (2022-10-30) Copyright © Huawei Technologies Co., Ltd. - Page 15 During transportation, prevent the following situations: Falling into water Falling or mechanical impact Being upside-down or tilted If the preceding situation occurs, refer to the emergency handling plan. Issue Draft (2022-10-30) Copyright © Huawei Technologies Co., Ltd.
-
Page 16: Electrical Safety
Before connecting a power cable, check that the label on the power cable is correct. If the equipment has multiple inputs, disconnect all the inputs before operating the equipment. Issue Draft (2022-10-30) Copyright © Huawei Technologies Co., Ltd. -
Page 17: Mechanical Safety
Do not drag steel ropes and hoisting tools or bump the hoisted objects against hard objects during hoisting. During hoisting, do not stand or walk under the crane or the hoisted objects. Install temporary warning signs or fences to isolate the hoisting area. Issue Draft (2022-10-30) Copyright © Huawei Technologies Co., Ltd. - Page 18 When a step ladder is used, ensure that the pull ropes are secured and the ladder is held firm by a person. When climbing a ladder, take the following precautions to reduce risks and ensure safety: Issue Draft (2022-10-30) Copyright © Huawei Technologies Co., Ltd.
-
Page 19: Battery Safety
Battery packs are damaged because they are not accepted in time due to reasons attributed to the customer. Battery pack running parameters are incorrectly set. Issue Draft (2022-10-30) Copyright © Huawei Technologies Co., Ltd. - Page 20 In an outdoor scenario, you are advised to power on battery packs within 24 hours after unpacking. If the battery packs cannot be powered on in time, place them in a dry indoor environment without corrosive gases. Issue Draft (2022-10-30) Copyright © Huawei Technologies Co., Ltd.
- Page 21 During installation, ensure that the positive and negative electrodes of battery packs are not short-circuited. During installation, ensure that the terminals are tightened properly using a torque wrench and check them regularly. Battery Pack Short Circuit Protection Issue Draft (2022-10-30) Copyright © Huawei Technologies Co., Ltd.
- Page 22 10° C before handling. − ESS onsite: Evacuate personnel, close the doors of the ESS, transfer the battery pack to an open and safe place by professionals using mechanical tools, and contact Issue Draft (2022-10-30) Copyright © Huawei Technologies Co., Ltd.
-
Page 23: Maintenance And Replacement
Company's service engineers. Fire Alarm Horn/Strobe When the alarm indicator on the equipment blinks or buzzes: Stay away immediately. Do not approach. Do not open the door. Issue Draft (2022-10-30) Copyright © Huawei Technologies Co., Ltd. - Page 24 ESS capacity, battery pack location and distribution, and user manuals. 2. Do not open the doors of the ESS before it is deemed safe by professionals. 3. Follow local fire fighting regulations. Issue Draft (2022-10-30) Copyright © Huawei Technologies Co., Ltd.
-
Page 25: Product Description
The ESS consists of a power control module and lithium battery modules. It stores and releases electricity controlled by the Smart Rack Controller (also referred to as rack controller). The input and output ports of the ESS are high-voltage direct current (HVDC) ports. Issue Draft (2022-10-30) Copyright © Huawei Technologies Co., Ltd. -
Page 26: Appearance
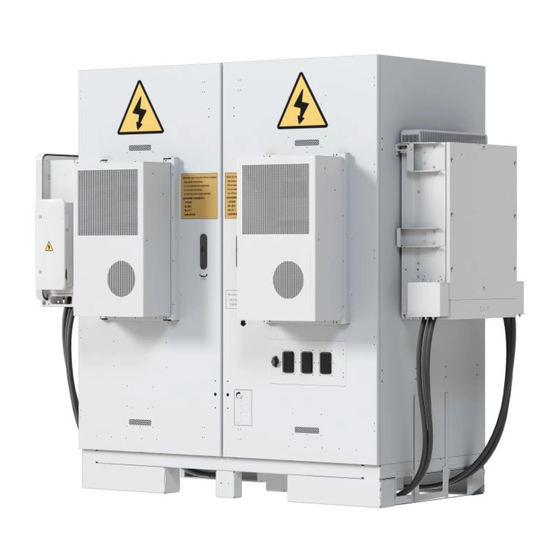
This design fully leverages the module capacity in the battery racks. Battery packs can be directly replaced by onsite personnel without the need for professional technicians or manual SOC calibration, reducing the replacement time. 2.3 Appearance Figure 2-2 Appearance and dimensions Issue Draft (2022-10-30) Copyright © Huawei Technologies Co., Ltd. -
Page 27: Components
ESS cabinet door Installation position of the rack Where the rack controller controller is installed. Emergency stop switch Used for emergency stop of the rack controller. Generates alarms for Fire alarm/horn strobe Issue Draft (2022-10-30) Copyright © Huawei Technologies Co., Ltd. - Page 28 (11) Embedded (12) CMU and installation rack-mounted integrated gas fire power subrack position of the extinguisher SmartModule (13) Power distribution area (14) Water sensor (15) Adjustable column (16) I/O expansion board Issue Draft (2022-10-30) Copyright © Huawei Technologies Co., Ltd.
- Page 29 Where the PSU is installed. The PSU position of the converts AC input power into stable DC power. SMU11B Collects PSU information and controls PSU output. Converges interfaces, converts protocols, collects and stores data, centrally monitors Issue Draft (2022-10-30) Copyright © Huawei Technologies Co., Ltd.
- Page 30 Figure 2-5 Components in the power distribution area (1) 12 V adapter (1TB1) (2) Installation position of the (3) Installation position of 220 V maintenance socket the Smart Power Sensor (1XD1) Issue Draft (2022-10-30) Copyright © Huawei Technologies Co., Ltd.
- Page 31 Fuse Provides short-circuit protection. Fiber adapter Used to connect optical fibers. Fiber Holds optical fibers. management tray DC switch Used to protect against short circuits and disconnect the DC bus. Issue Draft (2022-10-30) Copyright © Huawei Technologies Co., Ltd.
-
Page 32: Power Supply And Distribution System
2.4.1.1 Battery pack Table 2-5 Battery pack technical specifications Item Battery Pack Battery Pack (ESM51320AS1) (ESM57280AS1) Cell capacity 3.2 V/320 Ah 3.2 V/280 Ah Cell material Lithium iron phosphate Lithium iron phosphate Issue Draft (2022-10-30) Copyright © Huawei Technologies Co., Ltd. -
Page 33: Smart Rack Controller
Passive cell equalization Communications port CAN 2.0 CAN 2.0 2.4.1.2 Smart Rack Controller Figure 2-7 Rack controller Table 2-6 Efficiency Item Rack Controller ≥ 98.5% Maximum efficiency ≥ 98.5% Full-load efficiency Issue Draft (2022-10-30) Copyright © Huawei Technologies Co., Ltd. - Page 34 595–810 V Rated operating current of a single battery 76.3 A rack Maximum operating current of a single 92 A battery rack Table 2-9 Protection Item Rack Controller Reverse connection protection Supported Issue Draft (2022-10-30) Copyright © Huawei Technologies Co., Ltd.
- Page 35 7 W in shutdown mode, 48 V external power supply 30 W in shutdown mode, battery power supply, contactor not closed 70 W in standby mode, battery power supply, contactor closed Issue Draft (2022-10-30) Copyright © Huawei Technologies Co., Ltd.
-
Page 36: Embedded Power Subrack
Figure 2-9 SMU11B (1) Running indicator (2) Minor alarm indicator (3) Major alarm indicator (4) Wiring terminals (5) COM port (6) Handle (7) Position of the SN code (8) FE port Issue Draft (2022-10-30) Copyright © Huawei Technologies Co., Ltd. -
Page 37: Psu
2.4.1.5 PSU The PSU (R4830G) converts AC input power into stable DC power. Appearance Figure 2-10 PSU (1) Power indicator (2) Alarm indicator (3) Fault indicator (4) Locking latch (5) Handle Issue Draft (2022-10-30) Copyright © Huawei Technologies Co., Ltd. - Page 38 The communication between the PSU and an external device is interrupted. Fault The PSU is normal. indicator Steady on The module locks out due to output overvoltage. The PSU has no output due to internal faults. Issue Draft (2022-10-30) Copyright © Huawei Technologies Co., Ltd.
-
Page 39: Monitoring System
LUNA2000-200KWH-2H1 Smart String ESS User Manual 2 Product Description 2.4.2 Monitoring System Figure 2-11 Position of the monitoring system Issue Draft (2022-10-30) Copyright © Huawei Technologies Co., Ltd. -
Page 40: Cmu
Table 2-13 Indicators Indicator Status Description Running Green off Not powered on indicator Blinking green slowly (on for 1s and The communication with the (RUN) then off for 1s) management system is normal. Issue Draft (2022-10-30) Copyright © Huawei Technologies Co., Ltd. -
Page 41: I/O Expansion Board
≤ 1 A Operating Current –30° C to +55° C Operating temperature ≤ 95% RH (non-condensing) Humidity Dimensions (H x W x D) 113.7 mm x 251 mm x 54.5 mm Issue Draft (2022-10-30) Copyright © Huawei Technologies Co., Ltd. -
Page 42: Environment Control System
LUNA2000-200KWH-2H1 Smart String ESS User Manual 2 Product Description 2.4.3 Environment Control System Figure 2-13 Position of the environment control system 2.4.3.1 Air Conditioner Figure 2-14 Appearance Item Air Conditioner Issue Draft (2022-10-30) Copyright © Huawei Technologies Co., Ltd. -
Page 43: T/H Sensor
–30° C to 55° C Operating temperature range Refrigerant R134a Variable-frequency or not Variable-frequency air conditioner 2.4.3.2 T/H sensor Figure 2-15 Appearance The appearance of the T/H sensor depends on the actual delivery. Issue Draft (2022-10-30) Copyright © Huawei Technologies Co., Ltd. - Page 44 Figure 2-16 Pins of an RJ45 connector Table 2-15 Pin definitions of an RJ45 connector Description Pin 1 or Pin 4 Pin 2 or Pin 5 Pin 3 Pin 6 Reserved Pin 7 Reserved Pin 8 Issue Draft (2022-10-30) Copyright © Huawei Technologies Co., Ltd.
-
Page 45: Door Status Sensor
2.4.3.4 Electrode Water Sensor The water sensor detects water based on the resistance change between both electrodes. When the electrodes detect water, they are short-circuited and the CMU reports an alarm. Issue Draft (2022-10-30) Copyright © Huawei Technologies Co., Ltd. -
Page 46: Fire Suppression System
Storage temperature 2.4.4 Fire Suppression System Figure 2-19 Position of the fire suppression system 2.4.4.1 Rack-mounted Integrated Gas Fire Extinguisher The rack-mounted integrated gas fire extinguisher is pre-integrated in the cabinet. Issue Draft (2022-10-30) Copyright © Huawei Technologies Co., Ltd. - Page 47 Startup at a constant temperature: 79° C± 3° C Startup mode (electric) 12 V external power supply, started by a solenoid valve Alarming mode Dry contact signal feedback –30° C to 55° C Operating Safe Issue Draft (2022-10-30) Copyright © Huawei Technologies Co., Ltd.
-
Page 48: T/H Sensor
≤ ±1°C (full measuring range) –20° C to +80° C Operating temperature Operating voltage 9–16 V DC –40° C to +80° C Storage temperature Signal output Two RJ45 ports, bidirectional cascading Issue Draft (2022-10-30) Copyright © Huawei Technologies Co., Ltd. -
Page 49: Co Sensor
Table 2-19 Technical specifications of the CO sensor Technical Specifications CO Sensor Dimensions (H x W x D) 40 mm x 97 mm x 25 mm Operating voltage 8–30 V DC ≤ ±3% FS/year Stability Issue Draft (2022-10-30) Copyright © Huawei Technologies Co., Ltd. -
Page 50: Smoke Detector
Pin 1 or Pin 4 Pin 2 or Pin 5 Pin 3 Pin 6 Reserved Pin 7 Reserved Pin 8 2.4.4.4 Smoke Detector The smoke detector can detect the smoke concentration in the environment. Issue Draft (2022-10-30) Copyright © Huawei Technologies Co., Ltd. - Page 51 Output mode Relay output Polarity None Output contact capacity 3 A/120 V AC or 3 A/24 V AC –10° C to +50° C Operating temperature ≤ 95% RH (non-condensing) Ambient humidity Issue Draft (2022-10-30) Copyright © Huawei Technologies Co., Ltd.
-
Page 52: Exhaust System
Figure 2-28 Appearance Technical Specifications Air Exhaust Module Dimensions (H x W x D) 38 mm x 194 mm x 99 mm Operating voltage 36–72 V DC Issue Draft (2022-10-30) Copyright © Huawei Technologies Co., Ltd. -
Page 53: Air Exhaust Controller
Blinking at 0.5 Hz The system is running properly. Blinking at 4 Hz Serial port communication is interrupted or the board is not registered. The system is not powered on. Issue Draft (2022-10-30) Copyright © Huawei Technologies Co., Ltd. -
Page 54: Working Principle
The ESS is charging from an external DC source or discharging for external devices. The ESS stops charging and discharging and shuts down the rack Hibernating controllers. In the running state, if the ESS receives a hibernation command, it Issue Draft (2022-10-30) Copyright © Huawei Technologies Co., Ltd. -
Page 55: Typical Application Scenario
2.6 Typical Application Scenario Figure 2-31 Electrical connection diagram (components in the dotted box are optional) Table 2-25 0.8 MWh/400 kW standard configurations Item Recommended Quantity Source Model/Specifications LUNA2000-200KWH-2H1 Purchased Issue Draft (2022-10-30) Copyright © Huawei Technologies Co., Ltd. - Page 56 Configured Prepared by Inverter Medium three-phase and V5 based on the the customer capacity requirement Issue Draft (2022-10-30) Copyright © Huawei Technologies Co., Ltd.
-
Page 57: Site Requirements
LUNA2000-200KWH-2H1 Smart String ESS User Manual 2 Product Description Figure 2-32 Communication networking diagram (FE) Figure 2-33 Communication networking diagram (fiber ring network) 2.7 Site Requirements 2.7.1 Site Selection Requirements Issue Draft (2022-10-30) Copyright © Huawei Technologies Co., Ltd. - Page 58 A salt-affected area refers to the region within 2 km from the coast or prone to sea breeze. The regions prone to sea breeze vary with weather conditions (such as typhoons and monsoons) or terrains (such as dams and hills). Issue Draft (2022-10-30) Copyright © Huawei Technologies Co., Ltd.
- Page 59 For energy storage plants prone to wind and waves from rivers, lakes, and seas, the elevation of flood prevention facilities should consider the wind and wave height with a probability of 2% and an additional safety height of 0.5 m. Issue Draft (2022-10-30) Copyright © Huawei Technologies Co., Ltd.
-
Page 60: Forklift Requirements
5 degrees. Ensure that the angle between two ropes is less than or equal to 90 degrees. Lift and land the container slowly to prevent shock to equipment inside it. Issue Draft (2022-10-30) Copyright © Huawei Technologies Co., Ltd. -
Page 61: Installation
(including an torque screwdriver extension bar) Socket specifications: 7–19 Socket depth ≥ 32 The socket connector matches the torque wrench. Torque range: 1.2–45 N· m Issue Draft (2022-10-30) Copyright © Huawei Technologies Co., Ltd. - Page 62 Level Vacuum cleaner Hammer drill tape Hammer drill bit Heat-shrink tubing Heat gun Cable tie Ф16 mm Insulated ladder Crane Lifting rope Electric forklift Rope length ≥ 1845 mm x 4 Issue Draft (2022-10-30) Copyright © Huawei Technologies Co., Ltd.
-
Page 63: Pre-Installation Check
For details about the number of accessories delivered with the equipment, see the Packing List in the packing case. 2.8.2 Installing the ESS Step 1 Remove the baffle plate from the bottom of the ESS. Issue Draft (2022-10-30) Copyright © Huawei Technologies Co., Ltd. - Page 64 2 Product Description Figure 2-34 Removing the bottom baffle Step 2 Remove the pallets. Figure 2-35 Removing the pallets Step 3 Install the baffle plate at the bottom of the ESS. Issue Draft (2022-10-30) Copyright © Huawei Technologies Co., Ltd.
- Page 65 LUNA2000-200KWH-2H1 Smart String ESS User Manual 2 Product Description Figure 2-36 Installing the baffle plate Step 4 Open the cabinet door. Keep the keys properly after use. Issue Draft (2022-10-30) Copyright © Huawei Technologies Co., Ltd.
- Page 66 LUNA2000-200KWH-2H1 Smart String ESS User Manual 2 Product Description Figure 2-37 Opening the door Step 5 Take out the delivered documents, such as the packing list. Issue Draft (2022-10-30) Copyright © Huawei Technologies Co., Ltd.
- Page 67 Step 7 After closing the cabinet door, move the ESS to the specified position. If a forklift cannot be used on the transport route (for example, there is a slope), use a crane to move the ESS. Issue Draft (2022-10-30) Copyright © Huawei Technologies Co., Ltd.
- Page 68 Figure 2-39 Using a crane Figure 2-40 Using a forklift When a forklift is used, bind and secure the ESS based on the site requirements to ensure there is no risk of falling. Issue Draft (2022-10-30) Copyright © Huawei Technologies Co., Ltd.
-
Page 69: Connecting A Pe Cable For The Ess
For details about how to crimp OT/DT terminals, see Crimping an OT or DT Terminal. Name Type Conductor Outer Terminal Source Cross-Sectional Diameter Area Ground Single-core outdoor 25–50 mm 15–17.6 mm M8 OT/DT Prepared by cable copper/copper-clad terminal the customer aluminum/aluminum alloy cable Issue Draft (2022-10-30) Copyright © Huawei Technologies Co., Ltd. -
Page 70: Optional) Outside The Cabinet
The hot-dip zinc-coated flat steel sheet needs to be prepared by the customer. The recommended specification is ≥ –40 x 4. The specific dimensions depend on the onsite fault current and are subject to the design of the design institute. Issue Draft (2022-10-30) Copyright © Huawei Technologies Co., Ltd. - Page 71 Prepared by copper/copper-clad terminal the customer aluminum/aluminum alloy cable The specifications of the PE cable are subject to this table or calculated according to IEC 60364-5-54. Figure 2-44 Connecting a PE cable Issue Draft (2022-10-30) Copyright © Huawei Technologies Co., Ltd.
-
Page 72: Installing Components
Ensure that the rack-mounted integrated gas fire extinguisher is intact. Before installation, read the documents delivered with the rack-mounted integrated gas fire extinguisher to understand the installation requirements and precautions. Procedure Install the rack-mounted integrated gas fire extinguisher. Issue Draft (2022-10-30) Copyright © Huawei Technologies Co., Ltd. -
Page 73: Installing Battery Packs
The installation kit is not delivered with the product and needs to be purchased separately from the Company. The appearance of the battery pack installation kit in this document is for reference only. Issue Draft (2022-10-30) Copyright © Huawei Technologies Co., Ltd. - Page 74 Do not install battery packs on rainy, snowy, or foggy days. Otherwise, the battery packs may be eroded by water vapor or rain. Step 1 Remove the column in the middle. Figure 2-46 Removing the column Issue Draft (2022-10-30) Copyright © Huawei Technologies Co., Ltd.
- Page 75 Figure 2-47 Taking out the installation kit Step 4 Insert, assemble, and secure the installation kit onto the forklift. Figure 2-48 Assembling the installation kit Step 5 Take out a battery pack. Issue Draft (2022-10-30) Copyright © Huawei Technologies Co., Ltd.
- Page 76 When using the lifting handles, hold the end closer to the device. Figure 2-49 Taking out the battery pack Step 6 Install the operating handle on the battery pack, place the battery pack on the installation kit, and secure the battery pack. Issue Draft (2022-10-30) Copyright © Huawei Technologies Co., Ltd.
- Page 77 2 Product Description Figure 2-50 Securing the battery pack Step 7 Install the battery pack in the ESS. Figure 2-51 Installing the battery pack in the ESS Step 8 Secure the battery pack. Issue Draft (2022-10-30) Copyright © Huawei Technologies Co., Ltd.
- Page 78 Figure 2-52 Securing the battery pack Step 9 Install air channel plates between battery packs based on the label on the air channel plates. The air channel plates are delivered with the container. Issue Draft (2022-10-30) Copyright © Huawei Technologies Co., Ltd.
- Page 79 LUNA2000-200KWH-2H1 Smart String ESS User Manual 2 Product Description Figure 2-53 Installing air channel plates Step 10 Install the column to the ESS. Figure 2-54 Installing the column ----End Issue Draft (2022-10-30) Copyright © Huawei Technologies Co., Ltd.
-
Page 80: Installing The Smart Rack Controller
Step 2 Install short-circuiting copper bars that are delivered with the product. Figure 2-56 Installing short-circuiting copper bars Step 3 Install the maintenance compartment cover and the decorative cover to the rack controller. Issue Draft (2022-10-30) Copyright © Huawei Technologies Co., Ltd. - Page 81 The screws for securing the rainproof canopy are preinstalled on the upper bracket. Remove the screws before installing the rainproof canopy. Issue Draft (2022-10-30) Copyright © Huawei Technologies Co., Ltd.
- Page 82 Step 6 Install the rack controller to the mounting bracket on the ESS. The M8 screws are used to secure the rack controller. Keep them properly after removing them. At least three persons are required to install the rack controller. Issue Draft (2022-10-30) Copyright © Huawei Technologies Co., Ltd.
-
Page 83: Installing The Smart Pcs
Unpack and check the Smart PCS delivered to the site to ensure that the Smart PCS is complete and intact. Procedure Step 1 Install the mounting bracket. The mounting bracket is delivered with the Smart PCS. Issue Draft (2022-10-30) Copyright © Huawei Technologies Co., Ltd. - Page 84 At least four persons are required to install the Smart PCS. When using the lifting handles, hold the handle end closer to the device. Figure 2-62 Installing mounting ears and lifting handles Step 3 Secure the Smart PCS. Issue Draft (2022-10-30) Copyright © Huawei Technologies Co., Ltd.
-
Page 85: Optional) Installing A Maintenance Socket
The maintenance socket needs to be prepared by the customer. Procedure Step 1 Remove the baffle plate in front of the power distribution area. Step 2 Install the maintenance socket. Figure 2-64 Installing the socket Issue Draft (2022-10-30) Copyright © Huawei Technologies Co., Ltd. -
Page 86: Optional) Ddsu666-H
The DDSU666-H meter is purchased from the Company. Procedure Step 1 Remove the baffle plate in front of the power distribution area. Step 2 Install the DDSU666-H. Figure 2-65 Installing the DDSU666-H ----End 2.9 Installing Cables Precautions Issue Draft (2022-10-30) Copyright © Huawei Technologies Co., Ltd. -
Page 87: Preparing Cables
Single-phase AC input Two-core/Three 6–25 mm² 12.7–27 mm Pin cord end Prepared by power cable (without -core outdoor terminal with external grid power supply) copper/copper-c an insertion customer depth of 12 Issue Draft (2022-10-30) Copyright © Huawei Technologies Co., Ltd. -
Page 88: Installing Cables For The Rack-Mounted Integrated Gas Fire Extinguisher
2.9.2 Installing Cables for the Rack-mounted Integrated Gas Fire Extinguisher Step 1 Take out the reserved cables and install them to the rack-mounted integrated gas fire extinguisher. Issue Draft (2022-10-30) Copyright © Huawei Technologies Co., Ltd. -
Page 89: Installing Battery Pack Cables
When installing a nut, manually insert the nut into the screw plate, and then use a socket wrench to completely secure the nut in place. This prevents the screw thread from being stuck or stripped due to the deviation of the nut position. Issue Draft (2022-10-30) Copyright © Huawei Technologies Co., Ltd. - Page 90 Other 48 V cables are delivered with the product. The cable between Pack10 and Pack11 is 04097837-10, and the other cables are 04097837-07. The cable sequence is as follows: 2FCB6-Pack1-2-3-4-5, 2FCB7-Pack12-11-10-9-8-7-6. Issue Draft (2022-10-30) Copyright © Huawei Technologies Co., Ltd.
- Page 91 The cable sequence is as follows: Pack1-2-3-4-5-6-7-8-9-10-11-12. The cable between Pack5 and Pack6 is 04097837-08, the cable between Pack10 and Pack11 is 04097837-09, and the other cables are 04097837-06. Issue Draft (2022-10-30) Copyright © Huawei Technologies Co., Ltd.
-
Page 92: Installing Rack Controller Cables
Figure 2-69 Connecting cables to the COM ports on the battery packs Step 4 Close the terminal covers of the battery packs. ----End 2.9.4 Installing Rack Controller Cables Step 1 Remove the decorative cover and maintenance compartment cover from the rack controller. Issue Draft (2022-10-30) Copyright © Huawei Technologies Co., Ltd. - Page 93 Do not remove the cover from an unused pagoda connector. Figure 2-71 Connecting cables Cable Label Wiring Terminal 107-1F1:2>TA1:2BAT+ 2BAT+ 108-1Q2:1>TA1:1BUS+ 1BUS+ Issue Draft (2022-10-30) Copyright © Huawei Technologies Co., Ltd.
- Page 94 After the network cable is installed, gently pull it down to check that it is properly installed. Step 4 Install the maintenance compartment cover and decorative cover of the rack controller, and place the magnetic rings. Figure 2-73 Installing covers Issue Draft (2022-10-30) Copyright © Huawei Technologies Co., Ltd.
-
Page 95: Installing Dc Power Cables
Step 1 Remove the baffle plate in front of the power distribution area. Step 2 Route the DC power cables through the cable hole at the bottom and connect the cables to the DC circuit breaker. Issue Draft (2022-10-30) Copyright © Huawei Technologies Co., Ltd. -
Page 96: Auxiliary An Ac Power Cable (With External Grid Power Supply)
Supply) Prerequisites The AC power cables have been pre-buried. Procedure Step 1 Route the AC power cables through the cable hole at the bottom and connect the cables to the MCB. Issue Draft (2022-10-30) Copyright © Huawei Technologies Co., Ltd. -
Page 97: Installing A Single-Phase Ac Input Power Cable (Without External Grid Power Supply)
Step 1 Remove the short-circuiting bar from 1–2 and insert it to 2–3 on the XU terminal block. Step 2 Remove the short-circuiting bar from 4–5 and insert it to 5–6 on the XU terminal block. Step 3 Connect the cable. Issue Draft (2022-10-30) Copyright © Huawei Technologies Co., Ltd. -
Page 98: Installing Communications Cables
2.9.8.1 Installing a FE Communications Cable Step 1 Connect the FE communications cable to the WAN port on the CMU. Figure 2-78 Connecting a FE communications cable (1) White-and-orange (2) Orange (3) White-and-green (4) Blue Issue Draft (2022-10-30) Copyright © Huawei Technologies Co., Ltd. -
Page 99: Installing Fiber Ring Network Communications Cables
Figure 2-79 Access terminal box (ATB) interior (1) Fiber spool (2) Fixing points for internal steel wires of optical cables (3) Cable clip Step 1 Remove the external mechanical parts from the ATB. Issue Draft (2022-10-30) Copyright © Huawei Technologies Co., Ltd. - Page 100 Step 5 Connect the peripheral optical cable to the ATB, splice the optical cable and the optical jumper, and then wind the spliced cable around the fiber spool on the ATB. Issue Draft (2022-10-30) Copyright © Huawei Technologies Co., Ltd.
-
Page 101: Optional) Installing Ddsu666-H Cables
Step 6 Check that the cables are connected correctly and securely. Then reinstall the optical cable fastener and external mechanical parts. ----End 2.9.9 (Optional) Installing DDSU666-H Cables Figure 2-83 Connecting cables Issue Draft (2022-10-30) Copyright © Huawei Technologies Co., Ltd. -
Page 102: Optional) Installing Maintenance Socket Cables
2.9.10 (Optional) Installing Maintenance Socket Cables Figure 2-84 Connecting cables 2.9.11 Sealing Cable Holes After cables are installed, seal the cable holes using the delivered sealing putty. Figure 2-85 Sealing putty Issue Draft (2022-10-30) Copyright © Huawei Technologies Co., Ltd. -
Page 103: System Power-On
The copper bar is not deformed, and the plastic dip coating is copper bar not damaged. Switch The DC LV Panel switch is set to OFF. The battery rack switch is set to OFF. Issue Draft (2022-10-30) Copyright © Huawei Technologies Co., Ltd. -
Page 104: Ess Installation Check
The baffle plates in the power distribution area power distribution area are free from cracks, dents, scratches, cracks, and looseness. The SPD indicator is green. Subcomponent (CMU, All components are intact. adapter, and rack-mounted integrated gas fire extinguisher) Issue Draft (2022-10-30) Copyright © Huawei Technologies Co., Ltd. -
Page 105: Smart Pcs Installation Check
The waterproof plugs on the unused USB and COM ports are secured. 3.1.4 SACU Installation Check For details, see the SmartACU2000D Smart Array Controller User Manual (with No PID Module). Expected Result Issue Draft (2022-10-30) Copyright © Huawei Technologies Co., Ltd. -
Page 106: Installing The Psu
Step 2 Pull out the handle. Step 3 Gently push the PSU into its slot along the guide rails. Step 4 Push the handle upwards. Step 5 Push the locking latch rightwards to lock the handle. Issue Draft (2022-10-30) Copyright © Huawei Technologies Co., Ltd. -
Page 107: Power-On Process
Smart Note a: Before turning on the internal switch of the ESS auxiliary power supply, check that the AC auxiliary power supply voltage is within the normal range (220 V± 10%). Issue Draft (2022-10-30) Copyright © Huawei Technologies Co., Ltd. -
Page 108: Powering On The Sacu
If the SACU supports the access of one MBUS route, turn on the corresponding three-phase power switch. If the SACU supports the access of two MBUS routes, turn on the corresponding three-phase power switches. Issue Draft (2022-10-30) Copyright © Huawei Technologies Co., Ltd. -
Page 109: Powering On The Power Supply Loop Of The Ac Power Distribution Cabinet
----End 3.6 Powering On the ESS If the ESS has not been used for six months or longer after being installed, it must be checked and tested by professionals before operation. Issue Draft (2022-10-30) Copyright © Huawei Technologies Co., Ltd. - Page 110 On the embedded power subrack (SK1), turn on the DC/DC switch 2FCB1, DC light power switch 2FCB2, TCUE power switch 2FCB3, fan 1 switch 2FCB6, and fan 2 switch 2FCB7, air conditioner 1 switch 2FCB8, and air conditioner 2 switch 2FCB9 in sequence. Issue Draft (2022-10-30) Copyright © Huawei Technologies Co., Ltd.
- Page 111 Use a multimeter to check that the output voltage at position 1 in the preceding figure is 53 V± 5 V. Step 5 Turn on the DC switch 1Q2. (As shown by 8 in Figure 3-3) ----End Issue Draft (2022-10-30) Copyright © Huawei Technologies Co., Ltd.
-
Page 112: Smartlogger Web-Based Deployment
Port Default Value LAN port IP address 192.168.8.10 192.168.8.11 Subnet mask 255.255.255.0 255.255.255.0 Default gateway 192.168.8.1 192.168.8.1 WAN port IP address 192.168.0.10 192.168.0.11 Subnet mask 255.255.255.0 255.255.255.0 Default gateway 192.168.0.1 192.168.0.1 Issue Draft (2022-10-30) Copyright © Huawei Technologies Co., Ltd. - Page 113 Step 4 Log in to the SmartLogger WebUI. In the address box of a browser, enter https://XX.XX.XX.XX (XX.XX.XX.XX is the IP address of the SmartLogger) and press Enter. The login page is displayed. If you log in Issue Draft (2022-10-30) Copyright © Huawei Technologies Co., Ltd.
- Page 114 Figure 4-3 Login page (Initial login when the user name is displayed as admin) In this scenario, you need to update the software version to V800R021C10SPC020 or later. Parameter Description Language Set this parameter as required. Issue Draft (2022-10-30) Copyright © Huawei Technologies Co., Ltd.
- Page 115 In this scenario, the software version is V800R021C10SPC020 or later. Parameter Description Language Set this parameter as required. User Name Log in as installer. Password Set the login password as prompted. Issue Draft (2022-10-30) Copyright © Huawei Technologies Co., Ltd.
-
Page 116: Checking The Smartlogger Software Version
Protect the password by changing it periodically, and keep it secure. If you lose the password, the device must be restored to its factory settings. Huawei will not be held liable for any losses resulting from improper password management. -
Page 117: Deployment Wizard
Set basic parameters. After setting the parameters, select a communication mode based on the site requirements. After Huawei devices are connected, click Search for Device to check the cable connections and allocate addresses. During the process of Search for Device, do not perform upgrade operations (such as upgrading through the app, management system, or WebUI). - Page 118 PV power is sufficient, the system outputs at the target value and the excess PV power is used to charge the batteries. In scheduled charge, the AC output aims to reach the Issue Draft (2022-10-30) Copyright © Huawei Technologies Co., Ltd.
- Page 119 Set the maximum power of the grid during battery charging. power of grid Maximum grid Control the maximum target grid power when the grid-connection power during battery point has zero power. discharge Issue Draft (2022-10-30) Copyright © Huawei Technologies Co., Ltd.
-
Page 120: System Setup
After you click it, Charge/Discharge the button turns gray. Repeated Connect to a Huawei network management system (NMS.) Connect to a third-party management system. Select IEC104. Connect to third-party devices. The settings are complete. -
Page 121: View Alarm
WebUI or CMU WebUI. If an alarm is generated, handle the alarm by referring to the handling suggestions in the alarm reference section. ----End 4.8 Setting Capacity Limit Context Peak-valley arbitrage with capacity limit: Issue Draft (2022-10-30) Copyright © Huawei Technologies Co., Ltd. - Page 122 Specifies the active power limit of the PCS when the feed-in meter limit when communication is abnormal. You can manually change the active power electricity percentage of the PCS as required. meter fails Issue Draft (2022-10-30) Copyright © Huawei Technologies Co., Ltd.
- Page 123 Specifies the active power limit of the PCS when the feed-in meter limit when communication is abnormal. You can manually change the active power electricity percentage of the PCS as required. meter fails Issue Draft (2022-10-30) Copyright © Huawei Technologies Co., Ltd.
-
Page 124: Closing The Cabinet Door
User Manual 5 Closing the Cabinet Door Closing the Cabinet Door After the deployment commissioning is complete, close the cabinet door and secure the safety rope. Figure 5-1 Closing the cabinet door Issue Draft (2022-10-30) Copyright © Huawei Technologies Co., Ltd. -
Page 125: Delivering A Shutdown Command On The Smartlogger
WH-2H1 Smart String ESS-2 Smart PCS Powering Powering off the output DC As shown by (2) in Figure off the ESS circuit breakers 20221030LUNA2000-200K WH-2H1 Smart String ESS-2 Issue Draft (2022-10-30) Copyright © Huawei Technologies Co., Ltd. - Page 126 As shown by (10) and (11) .2 Power-Off Process Powering off the AC power distribution cabinet As shown by (9) in Figure connected to the grid 20221030LUNA2000-200K WH-2H1 Smart String ESS-2 Figure 5-3 Power-off process Issue Draft (2022-10-30) Copyright © Huawei Technologies Co., Ltd.
-
Page 127: Powering Off Ess Devices
Step 1 Turn off the switches between the AC power distribution cabinet and the ESS. Step 2 Turn off the switches between the AC power distribution cabinet and the SACU. ----End Issue Draft (2022-10-30) Copyright © Huawei Technologies Co., Ltd. -
Page 128: Alarm Reference
If yes, contact your technical support. 1. Shut down the system at a proper time and 3810 Cause ID = 1–13 take security protection measures. Conditio 1. [HVAC-No] The cable Issue Draft (2022-10-30) Copyright © Huawei Technologies Co., Ltd. - Page 129 2. If the voltage is lower than 150 V, check board is faulty. whether the cable is loose. 4. The undervoltage 3. If the voltage is approximately 220 V, alarm threshold is contact your technical support. improper. Issue Draft (2022-10-30) Copyright © Huawei Technologies Co., Ltd.
- Page 130 3. Check whether the air intake or exhaust faulty. Pressure vent of the outdoor fan is blocked. If yes, 3. The external air flow Alarm clean the air intake or exhaust vent. is short-circuited or Issue Draft (2022-10-30) Copyright © Huawei Technologies Co., Ltd.
- Page 131 3. If no exception is found during remote monitoring and onsite observation, manually clear the alarm. If the alarm clearance fails, contact your technical support. Issue Draft (2022-10-30) Copyright © Huawei Technologies Co., Ltd.
- Page 132 2. If no exception is found during the remote monitoring, send trained personnel to the site and observe the system for 30 minutes from a safe distance. If there is smoke or fire, remotely power off the system, Issue Draft (2022-10-30) Copyright © Huawei Technologies Co., Ltd.
- Page 133 1. Turn off the AC input switch of the PSU. Rectifier 3837 Cause ID = 1–6 Output 2. Remove the rectifier [Number] and insert it The PSU locks out due to Overvolt again. output overvoltage. Issue Draft (2022-10-30) Copyright © Huawei Technologies Co., Ltd.
- Page 134 If not, contact your technical support. 1. Check whether the communication cable is 3844 Minor Cause ID = 1 correctly connected to the device. If not, Commun SMU communication Issue Draft (2022-10-30) Copyright © Huawei Technologies Co., Ltd.
- Page 135 Cause ID = 1 the fault alarm. ble Gas There are too many faulty Detection 2. On the maintenance screen, check that the combustible gas sensors. Malfunct combustible gas sensor is correctly connected. Issue Draft (2022-10-30) Copyright © Huawei Technologies Co., Ltd.
- Page 136 Status Description Suggestion The PSU has an AC Power indicator Green Steady on Normal. input. The PSU has no AC Check whether the input. input is normal. If yes, replace the Issue Draft (2022-10-30) Copyright © Huawei Technologies Co., Ltd.
- Page 137 The PSU is normal. Normal. Steady on The PSU locks out Remove the PSU due to output and then insert it 1 overvoltage or it is minute later. not properly inserted. Issue Draft (2022-10-30) Copyright © Huawei Technologies Co., Ltd.
- Page 138 4. If the alarm persists, contact your dealer or technical support. 1. Check whether a battery pack 3015 Battery Major Cause ID: 1–3 overvoltage alarm is generated in the Side Issue Draft (2022-10-30) Copyright © Huawei Technologies Co., Ltd.
- Page 139 5. After checking that the battery power cable is correctly connected, turn on the switch on the battery side and then Issue Draft (2022-10-30) Copyright © Huawei Technologies Co., Ltd.
- Page 140 5 minutes. 3. Check whether the cable between the copper bar on the bus side of the power control module and the DC LV Panel is connected in reverse polarity Issue Draft (2022-10-30) Copyright © Huawei Technologies Co., Ltd.
- Page 141 4. If the ventilation and ambient 4. The fan of the battery temperature meet requirements, power control module is contact your dealer or technical Issue Draft (2022-10-30) Copyright © Huawei Technologies Co., Ltd.
- Page 142 Cause ID = 1, 2 1. Version mismatch on [ESC-No]. Please Controller update. The update failed. Version 2. If the update fails multiple times, Mismatch contact your dealer or technical support. Issue Draft (2022-10-30) Copyright © Huawei Technologies Co., Ltd.
- Page 143 [ESR-CabinetNo] is normal and whether the auxiliary power supply switch is turned on by referring to the product maintenance manual. 5. Check that the power cable is securely connected. Turn on the AC power Issue Draft (2022-10-30) Copyright © Huawei Technologies Co., Ltd.
- Page 144 3. Check whether the cable connection to the bus side of the power control module meets the 1C requirement by referring to the quick installation guide. 4. After checking that the battery power Issue Draft (2022-10-30) Copyright © Huawei Technologies Co., Ltd.
- Page 145 4. Check that the power cable is securely connected. Turn on the AC power supply switch, the switch on the battery side, and the switch on the bus Issue Draft (2022-10-30) Copyright © Huawei Technologies Co., Ltd.
- Page 146 The NTC is Temperatur 2. Issue a shutdown command, turn off short-circuited, e Abnormal the switch on the battery side and then open-circuited, or not the switch on the bus side, and wait Issue Draft (2022-10-30) Copyright © Huawei Technologies Co., Ltd.
- Page 147 PCS and the SmartLogger is normal. If the link is normal: a. Determine the positions of the input and output circuit breakers associated with [ESC-No] and the AC input power Issue Draft (2022-10-30) Copyright © Huawei Technologies Co., Ltd.
- Page 148 The BMU is incompatible replacement of the original model. with the battery pack. 1. Determine the positions of the input Battery 3028 Major Cause ID = 1–8 Issue Draft (2022-10-30) Copyright © Huawei Technologies Co., Ltd.
- Page 149 3. The fan is damaged. switch on the bus side, and the AC 4. The fan is stuck. power supply switch, and wait for 5 minutes. 3. Replace the fan if it is damaged, clear Issue Draft (2022-10-30) Copyright © Huawei Technologies Co., Ltd.
- Page 150 2. Issue a shutdown command, turn off battery pack. the switch on the battery side, the switch on the bus side, and the AC power supply switch, and wait for 5 minutes. Issue Draft (2022-10-30) Copyright © Huawei Technologies Co., Ltd.
- Page 151 Cause ID = 1, 2 [ESR-CabinetNo ESM-SlotNo] do Pack The update failed. not match. Please update. Optimizatio n Unit 2. If the update fails multiple times, Version contact your dealer or technical Mismatch support. Issue Draft (2022-10-30) Copyright © Huawei Technologies Co., Ltd.
- Page 152 [ESR-CabinetNo ESM-SlotNo]. maximum operating 2. Issue a shutdown command, turn off current for a long time. the switch on the battery side, the switch on the bus side, and the AC Issue Draft (2022-10-30) Copyright © Huawei Technologies Co., Ltd.
- Page 153 5. Turn on the AC power supply switch, the switch on the battery side, and the switch on the bus side in sequence, and issue a startup command. 6. If the alarm persists, contact your Issue Draft (2022-10-30) Copyright © Huawei Technologies Co., Ltd.
- Page 154 5. If the alarm persists, contact your dealer or technical support. Cause ID = 4 The black start function cannot be enabled. Cause ID = 5 The primary and secondary sources disabling function is faulty. Issue Draft (2022-10-30) Copyright © Huawei Technologies Co., Ltd.
- Page 155 Cause ID = 1 running properly. rature on The ambient temperature is Optimizatio 2. If the alarm persists, contact your excessively low. n Unit of dealer or technical support. Battery Pack Issue Draft (2022-10-30) Copyright © Huawei Technologies Co., Ltd.
-
Page 156: Technical Specifications
Industrial air conditioning Fire extinguishing system 1 U fire suppression module (perfluorohexanone) Auxiliary power supply 220 V AC, ≤ 4.2 kVA System communications port Ethernet/Optical fiber System communications protocol Modbus TCP Issue Draft (2022-10-30) Copyright © Huawei Technologies Co., Ltd. - Page 157 LUNA2000-200KWH-2H1 Smart String ESS User Manual 7 Technical Specifications Environmental protection RoHS6 requirements Issue Draft (2022-10-30) Copyright © Huawei Technologies Co., Ltd.
-
Page 158: A Crimping An Ot Or Dt Terminal
If a copper-clad aluminum cable is used, use copper wiring terminals. If an aluminum alloy cable is used, use copper-to-aluminum wiring terminals, or aluminum wiring terminals with copper-to-aluminum washers. Issue Draft (2022-10-30) Copyright © Huawei Technologies Co., Ltd. - Page 159 Ensure that the aluminum side of the washer contacts the aluminum wiring terminal, and the copper side contacts the terminal block. Figure A-1 Requirements for OT/DT terminals Crimping an OT or DT Terminal Issue Draft (2022-10-30) Copyright © Huawei Technologies Co., Ltd.
- Page 160 Use a heat gun carefully to avoid heat damage to the equipment. Figure A-2 Crimping an OT terminal (1) Cable (2) Core (3) Heat-shrink tubing (4) OT terminal (5) Hydraulic pliers (6) Heat gun Issue Draft (2022-10-30) Copyright © Huawei Technologies Co., Ltd.
- Page 161 User Manual A Crimping an OT or DT Terminal Figure A-3 Crimping a DT terminal (1) Cable (2) Core (3) Heat-shrink tubing (4) DT terminal (5) Hydraulic pliers (6) Heat gun Issue Draft (2022-10-30) Copyright © Huawei Technologies Co., Ltd.
-
Page 162: B Repainting The Equipment
3. For many cotton cloth, and scratches or brush (required for large-area repainting a small smudges and area) or paint gun rust, use a paint (required for gun to spray repainting a large Issue Draft (2022-10-30) Copyright © Huawei Technologies Co., Ltd. - Page 163 Step 2 Dip a piece of cotton cloth into anhydrous alcohol and wipe the polished or damaged area to remove dirt or dust. Then wipe off the alcohol with a clean and dry cotton cloth. Issue Draft (2022-10-30) Copyright © Huawei Technologies Co., Ltd.
- Page 164 Select an epoxy zinc-rich primer or acrylic acid top coating with the same color as that of the equipment's surface coating. Step 4 Apply paint evenly to the damaged area based on the damage degree until all damage traces are no longer visible. Issue Draft (2022-10-30) Copyright © Huawei Technologies Co., Ltd.
- Page 165 Top coat thickness Primer type Epoxy zinc rich paint Intermediate coat type Zinc-rich paint Color number of the top coat Obtain the color number based on the color palette included with the equipment. Issue Draft (2022-10-30) Copyright © Huawei Technologies Co., Ltd.
- Page 166 LUNA2000-200KWH-2H1 Smart String ESS User Manual B Repainting the Equipment The following paint model list provided by Huawei is subject to change and for reference only. The price of paint and technical services are subject to local pricing. Supplier Location...
-
Page 167: C How Do I Recycle Used Batteries
You need to cover the related transportation expenses. Step 4 Recycling companies handle recycling. The recycled lithium batteries are at the disposal of the recycling companies. ----End Issue Draft (2022-10-30) Copyright © Huawei Technologies Co., Ltd. -
Page 168: D Cmu Commissioning
After choosing a second-level menu, choose a third-level menu to access the query or setting page. Details page Displays details of the queried information or parameter setting. System time Displays the current system time. Issue Draft (2022-10-30) Copyright © Huawei Technologies Co., Ltd. - Page 169 Idle or other state in Click the icon to sort which the device is not parameters in ascending feeding power into the or descending order for grid. the corresponding column. Issue Draft (2022-10-30) Copyright © Huawei Technologies Co., Ltd.
- Page 170 Sets the automatic logout time. Upload a network security certificate. Updates the key. Sets web TLS1.0. Sets digital signature verification. System Maint. Resets the system. Issue Draft (2022-10-30) Copyright © Huawei Technologies Co., Ltd.
- Page 171 Example PC Setting Port Value LAN port IP address 192.168.8.10 192.168.8.11 Subnet mask 255.255.255.0 255.255.255.0 Default gateway 192.168.8.1 192.168.8.1 WAN port IP address 192.168.0.10 192.168.0.11 Subnet mask 255.255.255.0 255.255.255.0 Default gateway 192.168.0.1 192.168.0.1 Issue Draft (2022-10-30) Copyright © Huawei Technologies Co., Ltd.
- Page 172 CMU) and press Enter. The login page is displayed. If you log in to the WebUI for the first time, a security risk warning is displayed. Click Continue to this website to log in to the WebUI. Issue Draft (2022-10-30) Copyright © Huawei Technologies Co., Ltd.
- Page 173 Figure D-4 Login page (Initial login when the user name is displayed as admin) In this scenario, you need to update the software version to V800R021C10SPC020 or later. Parameter Description Language Set this parameter as required. User Name Default value: admin Issue Draft (2022-10-30) Copyright © Huawei Technologies Co., Ltd.
- Page 174 Protect the password by changing it periodically, and keep it secure. If you lose the password, the device must be restored to its factory settings. Huawei will not be held liable for any losses resulting from improper password management.
- Page 175 If the system displays a message indicating that the loading is successful instead of the upgrade, the delayed upgrade function is triggered. The system automatically performs the upgrade when the conditions are met. If the upgrade fails, contact Huawei technical support. D.1.2.3 Exporting Device Logs Step 1 Access the device log page. Issue Draft (2022-10-30)
- Page 176 ----End D.1.2.5 Clearing Alarms You can clear all active and historical alarms for the selected device and re-collect alarm data. Procedure Step 1 Choose Maintenance > Device Mgmt. > Clear Alarm. Issue Draft (2022-10-30) Copyright © Huawei Technologies Co., Ltd.
- Page 177 SmartLogger cannot obtain the alarm information collected by the CMU after the alarms are cleared. D.2 App Operations D.2.1 Downloading and Installing the App SUN2000 app: Access Huawei AppGallery and search for SUN2000, or scan the following QR code (or directly visit https://appgallery.cloud.huawei.com/appdl/C10279542) to download and install the app.
- Page 178 If Changeme cannot be used for the first login, obtain the initial password from the QR code on the CMU. Figure D-10 Manual connection Tap Connect and scan the QR code on the CMU. Issue Draft (2022-10-30) Copyright © Huawei Technologies Co., Ltd.
- Page 179 For the same username, the password for logging in to the app is the same as that for logging in to the CMU WebUI. You will be locked out for 10 minutes after five failed password attempts in 5 minutes. Figure D-11 Login ----End Issue Draft (2022-10-30) Copyright © Huawei Technologies Co., Ltd.
- Page 180 Changing the Login Password of a User After logging in to the app, tap in the upper right corner of the screen, and choose Change password to change the login password. Issue Draft (2022-10-30) Copyright © Huawei Technologies Co., Ltd.
-
Page 181: E Contact Information
LUNA2000-200KWH-2H1 Smart String ESS User Manual E Contact Information Contact Information If you have any questions about this product, please contact us. Table E-1 Customer Service Contact Information Country Email China solarservice@huawei.com 400-822-9999 Issue Draft (2022-10-30) Copyright © Huawei Technologies Co., Ltd. -
Page 182: F Acronym
User Manual F Acronym Acronym application Battery Monitoring Unit control area network Central Monitoring Unit cluster communication port Smart Rack Controller Battery Pack Battery Rack energy storage unit direct current fast Ethernet Issue Draft (2022-10-30) Copyright © Huawei Technologies Co., Ltd. - Page 183 LUNA2000-200KWH-2H1 Smart String ESS User Manual F Acronym local area network Power Supply Unit Site monitoring unit state of capacity uninterruptible power system Issue Draft (2022-10-30) Copyright © Huawei Technologies Co., Ltd.
Need help?
Do you have a question about the Smart String ESS LUNA2000-200KWH-2H1 and is the answer not in the manual?
Questions and answers