Table of Contents
Advertisement
Quick Links
*51-3004*
51-3004
This playset is intended for residential use only. it is not intended nor warranted for either public or commercial use.
Play Zee Bo
Product Code: 02-3004
Copyright © 2023 Gorilla Playsets
All Rights Reserved
166 Etowah Industrial Court
Canton, GA 30114
www.gorillaplaysets.com
-NOTICE-
™
™
playsets
playsets
REV B: 4.14.2023
Advertisement
Table of Contents

Related Manuals for Gorilla Playsets Play Zee Bo 02-3004


Summary of Contents for Gorilla Playsets Play Zee Bo 02-3004
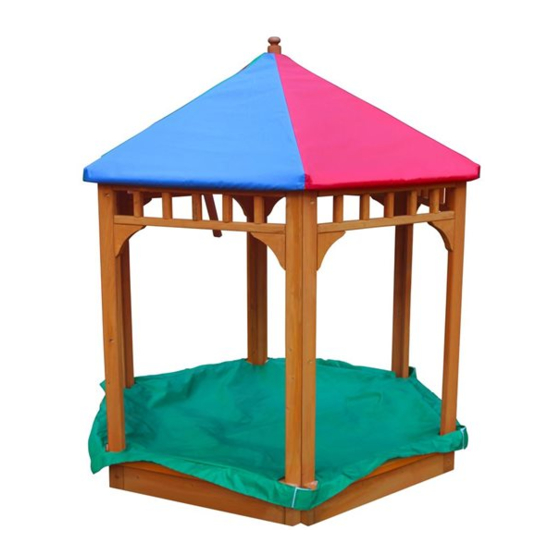
- Page 1 ™ ™ playsets playsets Play Zee Bo Product Code: 02-3004 Copyright © 2023 Gorilla Playsets All Rights Reserved *51-3004* 166 Etowah Industrial Court Canton, GA 30114 www.gorillaplaysets.com 51-3004 REV B: 4.14.2023 -NOTICE- This playset is intended for residential use only. it is not intended nor warranted for either public or commercial use.
-
Page 2: Table Of Contents
TABLE OF CONTENTS Warranty and Safety Guidelines………………………………………..……...Pages 4-9 Leveling play set, General Information and Site Plan…………………....Pages 9-11 Tool List, Kit Contents, Hardware, Lumber and Accessory Checklist.....Pages 12-16 Side Panels………………………..………...…............Step 1 Gussets………………………..…………………………..……........Step 2 Attaching Seat…………………………..……………….…………...…...... Step 3 Connecting Side Panels………………………...…..……..……...….….....…..Step 4 Roof Top Gusset…………………..…….............. - Page 3 We appreciate your purchase and know that you will enjoy your Play Zee Bo for many years to come. IF YOU HAVE MISSING OR DAMAGED PARTS OR NEED ASSISTANCE ASSEMBLING, PLEASE CALL Gorilla Playsets MANUFACTURING DIRECT. 770-704-9300 FACTORY HOURS – MON.–FRI., 8AM-5PM EST DO NOT RETURN THIS PRODUCT TO THE RETAILER OR CONTACT THE RETAILER DIRECTLY.
- Page 4 Quality Lumber At Gorilla Playsets, we use only the finest, hand selected lumber available. You can be assured that our lumber is strong, durable, and conforms to the national standards for use in children’s play equipment. It’s this quality that allows us to offer a 1 year warranty on the lumber used in this product.
- Page 5 Gorilla’s discretion, may be accomplished by submitting photographs or by delivery of the defective part to Gorilla Playsets • 166 Etowah Industrial Ct. • Canton, GA 30114 • 1-800-882-0272 Monday to Friday 9AM- 5PM EST. Any warranty claim must include proof of purchase, including the date of purchase. In addition, within the first 30 days from the date of purchase, Gorilla will replace any parts discovered to be missing from or damaged in the original packaging.
- Page 6 Safety and Maintenance Tips for Your New Play Set: NOTE: Your children’s safety is our #1 concern. Observing the following statements and warnings reduces the likelihood of serious or fatal injury. Please review these safety rules regularly with your children. •...
- Page 7 Safety and Maintenance Tips for Your New Play Set: (continued) Playgrounds should be inspected on a regular basis. If any of the following conditions are noted, they should be removed, corrected, or repaired immediately to prevent injuries. • Hardware that is loose, worn or that has protrusions or projections. •...
- Page 8 Play Set Surfacing Recommendations: Below are some of the recommendations that the U.S. Consumer Product Safety Commission (CPSC) offers from its Handbook for Public Playground Safety. The guide can be downloaded in full at www.cpsc.gov/cpscpub/pubs/325.pdf 1. Protective Surfacing - Since almost 60% of all injuries are caused by falls to the ground, protective surfacing under and around all playground equipment is the most critical safety factor on playgrounds.
- Page 9 2. Fall Zones - A fall zone, covered with a protective surfacing material, is essential under and around equipment where a child might fall. This area should be free of other equipment and obstacles onto which a child might fall. Stationary climbing equipment and slides should have a fall zone extending a Minimum of 6’...
- Page 10 General Info to Review Before Installation • Depending on your experience, assembly of the Play Zee Bo can take as little as 1 hour up to 3 hours, depending on your prior construction experience. • Identify all of the parts for your play set. Empty the box and lay out boards so you can see each part.
- Page 11 Please familiarize yourself with the manual, parts/components and general construction process of your new playset before getting started. SITE PLAN: 65 1/4" 16 " NOTE: TO FILL THE SANDBOX TO THE BOTTOM OF THE SEAT BOARDS REQUIRES ABOUT 550 LBS OF SAND. 16 "...
- Page 12 REQUIRED TOOL LIST: ___ Standard or Cordless Drill ___ Stubby Phillips head screwdriver ___ 1/8” Drill Bit is only required if drilling new holes in your ground stakes. ___ Level ___ Tape Measure ___ Extension Cord (if using standard drill) ___ Hammer ___ Pencil ___ Shovel...
- Page 13 Use the ruler to the right to measure your bolts and screws. Picture views shown PLAY ZEE BO HARDWARE - SUPPLIER USE ONLY below are 1:1 scale and can be used to match bolt and screw sizes. 4/14/20230 J.H. REV: E NOTE: ALL WOOD SCREW HEADS HAVE PHILLIPS OR SQUARE DRIVE RECESS.
- Page 14 Picture Description Qty. 1-1/4” X 4-1/2” X 25-5/8” Bottom Panel Board A 1-3/16” X 3-1/2” X 30” Seat B 1-1/4” X 2-5/16” X 45-1/8” Corner Post CP1 (4 holes) 1-1/4” X 2-5/16” X 45-1/8” Corner Post CP2 (7 holes) 1-1/4” X 5-7/8” X 25-5/8”...
- Page 15 Picture Description Qty. 1-1/4” X 4-3/4” x 4-3/4” Gusset F 1-1/4” X 1-15/16” X 35-1/4” Roof Support H 5/8” X 3-1/8” X 32” Roof Top Gusset 2” X 2” X 3” Roof Finial K (Threaded insert is attached inside hole.) ®...
- Page 16 Picture Description Qty. Apex Bracket L 11-5109 Multicolored Tarp-M (Note exact tarp colors may vary.) 05-3001 Sandbox Cover-N 06-2005 ® Page 16...
-
Page 17: Side Panels
Step 1: Side Panels 1: Locate one Bottom Panel Board A, one Corner Post CP-1 (4 holes), one Corner Post CP-2 (7 holes) and one Spindle Assembly D. 2: Lay out the parts on a “flat surface” as shown. The angled sides of the Corner Posts face away from the inside. -
Page 18: Gussets
Step 2: Gussets 1: Attach two Gusset F under the Spindle Assembly to the corner posts. 2: Attach each Gusset to the Spindle Assembly and the corner post with two #8 x 1-1/2” wood screws. 3: Repeat substeps 1-2 for the other five side panels. 1-1/4”... -
Page 19: Attaching Seat
Step 3: Attaching Seat 1: Place Seat B on top of the Bottom Panel Board with the three countersunk holes on top pointing up. Note that the Seat is attached on the outside of the Side Panel to the large flat face of the corner posts. 2: Attach the Seat to the Bottom Panel Board with three 2”... -
Page 20: Warranty And Safety Guidelines
Step 4: Connecting Side Panels 1: Make the tops of the corner posts flush to one another. Line up inside corners of side panels as shown in top left detail picture below. 2: Attach the Side Panel Assemblies together in a hexagonal pattern as shown using three #8 x 1-3/4”... -
Page 21: Roof Top Gusset
Step 5: Roof Top Gusset 1: Locate six 5/8” x 3-1/8” x 32” Roof Top Gussets J. 2: Place each Roof Top Gusset on top of the wall panels as shown. The end with two holes should be on the left for each Roof Top Gusset. Line up the corners of the Roof Top Gusset with the seam where the corner posts meet as shown in the TOP picture below. -
Page 22: Roof Supports
Step 6: Roof Supports 1: Locate six of the 1-15/16” x 1-1/4” x 35-1/4” Roof Support H pieces, one Apex Bracket L, six 6mm x 45mm Phillips Truss head machine screws and six 6mm Flanged Hex Nuts. 2: Place one Roof Support H with the hole closest to the top inside the upside down “U” shaped flange of the Apex Bracket. -
Page 23: Roof Support Assembly Installation
Step 7: Attaching Roof Support Assembly 1: Place the Roof Support assembly from Step 6 on top of the Roof Top Gussets as shown below. 2: The free end of each Roof Support should be centered directly over the two holes at the left end of each Roof Top Gusset. -
Page 24: Ground Stakes
Step 8: Attaching Ground Stakes 1: Locate six 11/16” x 1-3/8” x 9-3/8” Ground Stake E and twelve #8 x 1-1/2” wood screws. 2: Place a Ground Stake on the inside of the Play Zee Bo base at each corner post joint as shown in Detail B below. -
Page 25: Leveling Play Set, General Information And Site Plan
Step 9: Multicolored Tarp Installation 1: Place the multicolored Tarp M over the Roof Support Assembly as shown below. Each seam between colors will fall over the top of a Roof Support board. Stretch the outer Tarp edge over the outer edges of the Roof Top Gussets. 2: Make sure the hole in the Tarp is aligned with the hole in the Apex Bracket. -
Page 26: Roof Finial
Step 10: Attaching Roof Finial 1: Locate Roof Finial K with the threaded insert in the bottom. 2: Thread a 6mm x 55mm Phillips Truss head screw through the bottom of the Apex bracket and the tarp. 3: Screw Roof Final K onto the end of the Phillips Truss head screw until it just barely contacts the Tarp. -
Page 27: Sandbox Cover
Step 11: Sandbox Cover 1: Place the notches in the Sandbox Cover N around the corner posts. 2: Wrap the tabs around the corner posts and secure them together with the hook and loop strips attached. Sandbox Cover N Wrap tabs around corner posts and secure ends together with the hook and loop strips attached. -
Page 28: Tool List, Kit Contents, Hardware, Lumber And Accessory Checklist
Step 12: Safety Warnings Observe all safety warnings printed on the Tarp and Sandbox Cover. Teach your children that they should not play with the Tarp or Sandbox Cover. These items are not toys. If your area experiences high wind conditions then follow the instructions below during storms and other high wind events.
Need help?
Do you have a question about the Play Zee Bo 02-3004 and is the answer not in the manual?
Questions and answers