Advertisement
1
2
3
4
5
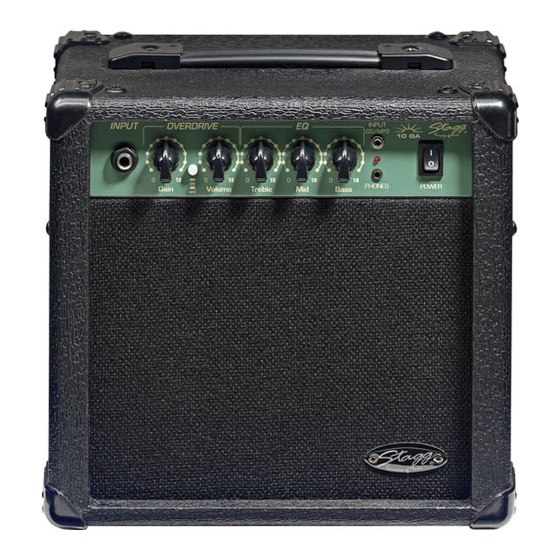
FRONT PANEL:
1. INPUT: Plug your guitar in here. We recommend that you always use a high-quality shielded guitar
cable to prevent any background noise interference or unwanted feedback.
2. GAIN: This control determines the distortion intensity of the amplifier's overdrive setting. Adding GAIN
will make your guitar sound more distorted.
3. OVERDRIVE: This switch activates the amplifier's built-in overdrive function, which adds distortion to
the signal.
4. VOLUME: This control determines the output volume of the amplifier.
5. TREBLE: This control determines the level of high frequencies in the output signal. Adding TREBLE will
make your guitar sound brighter and sharper.
6. MID: This PARAMETRIC control determines the level of middle frequencies in the output signal. Adding
MID will make your guitar sound rounder and fuller.
7. BASS: This control determines the level of low frequencies in the output signal. Adding BASS will make
your guitar sound warmer and heavier.
8. HEADPHONES: This is a 1/8" (Ø 3.5 mm) mini-jack ( 10 GA model) or a 1/4" (Ø 6.3 mm) standard
jack ( 10 GA P model) output to connect the headphones. When headphones are connected, no sound is
produced from the speaker.
9. CD/MP3 INPUT: For 10 GA model only, this is a line level 1/8" (Ø 3,5 mm) stereo mini jack into which
an MP3/CD/Tape player may be connected.
10. POWER LED: When this red LED is lit, the amplifier is ready to work. When it is off, it means the
amplifier is powered off.
11. POWER: This switch turns the amplifier on or off.
2
USER'S MANUAL
6
7
8
9
10
1 1
10 GA & 10 GA P
1
BACK PANEL:
WARNING:
This amplifier must be earthed. Please check that the supply voltage details given on the
rating label (located on the rear panel) are in accordance with your electricity supply.
1 MAINS CABLE: This amplifier features a power cable with a moulded-on plug. If the socket outlets
in the home are not suitable for the plug supplied with this amplifier, use an appropriate plug adapter that
can handle the power required for this amplifier.
In case the power cable or plug is damaged, unplug it in a safe way from the mains outlet and go to a
suitable service centre for replacement.
2 POWER FUSE: In case the power fuse has to be replaced, first unplug the power cable from the mains
outlet. Then remove the fuse cover and replace the power fuse with one of the same type and value. Never
plug the power cable back into the mains outlet without the fuse cover. When powering on the amplifier,
if the power fuse blows up again, go to a suitable service centre for repair.
TECHNICAL SPECIFICATIONS
Max. Rated Power / Loudspeaker
10 Watts RMS @ 8 Ohms load / 6.5" Speaker
Frequency Response
70 Hz to 10 kHz
Total Harmonic Distortion
0.8% (Clean Mode)
Signal to Noise Ratio
- 60 dB @ max Rated Power
Input Impedance
470k Ohms
Power Consumption
20 Watts max
Maximum Input Level
40 mV (RMS)
Maximum Gain
44 dB (@ 1kHz)
Dimensions (H x W x D)
29 x 28 x 18 cm / 11.4 x 11 x 7.1 in
Weight
4.3 kg / 9.5 lb
Features and Specifications are subject to change without notice.
10 GA & 10 GA P
2
3
USER'S MANUAL
Advertisement
Table of Contents

Related Manuals for Stagg 10 GA


Summary of Contents for Stagg 10 GA
-
Page 1: Front Panel
( 10 GA P model) output to connect the headphones. When headphones are connected, no sound is produced from the speaker. 9. CD/MP3 INPUT: For 10 GA model only, this is a line level 1/8” (Ø 3,5 mm) stereo mini jack into which an MP3/CD/Tape player may be connected. -
Page 2: Guitar Amplifier
1. The CE mark on this product means it conforms to the EMC Directive (89/69/EEC), CE marking Directive (93/68/EEC) and Low Voltage Directive (72/23/EEC). 2. The «Crossed-out Wheeled Bin» is to draw your attention to the WEEE (Waste Electric & Electronic Equipment) Directive (2002/96/EC). It means this apparatus must be collected separately for recycling.
Need help?
Do you have a question about the 10 GA and is the answer not in the manual?
Questions and answers