Table of Contents
Advertisement
Quick Links
Advertisement
Table of Contents

Related Manuals for Opentrons Temperature Module GEN2


Summary of Contents for Opentrons Temperature Module GEN2
- Page 1 Temperature Module GEN2 Quickstart Guide Opentrons Labworks Inc. October 2023...
-
Page 2: Table Of Contents
Product Description The Opentrons Temperature Module GEN2 is a hot and cold plate module. It can reach and maintain temperatures ranging from 4 °C to 95 °C. The module is compatible with the Opentrons Flex and Opentrons OT-2 liquid handling robots. -
Page 3: Product Elements
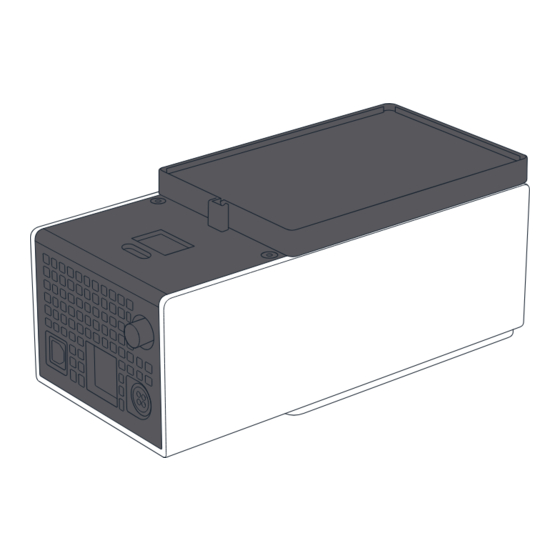
LCD Temperature Display Power Button USB Port Power Port Exhaust Serial Number BOX CONTENTS (1) Power Supply (1) Power Cable (1) USB Cable (1) 24-Well (1) 96-Well (1) Flat Bottom Thermal Block PCR Thermal Block Plate for OT-2 TEMPERATURE MODULE GEN2... -
Page 4: Thermal Blocks
✓ 96-well PCR ✓ ✗ Deep well ✓ ✗ Flat bottom for Flex ✗ ✓ Flat bottom for OT-2 Youcantellwhichflatbottomthermalblockyouhavebecausetheone for Flex has the words “Opentrons Flex” on its top surface. The one for OT-2 does not. TEMPERATURE MODULE GEN2... -
Page 5: Flex Caddies
See the Modules chapter in the Flex Instruction Manual more information. Handles On/Off Switch Exhaust Duct Handle Cable Management Bracket Anchors The OT-2 does not use caddies. Modules clip directly to the deck. Module caddies are available for purchase at shop.opentrons.com. TEMPERATURE MODULE GEN2... -
Page 6: Before You Begin
Review this section for important information about Temperature Module GEN2 deck placement, alignment, and anchor adjustments before installing the module. DECK PLACEMENT AND CABLE ALIGNMENT The supported deck slot positions for the Temperature Module GEN2 depend on the robot you’re using. Robot model Deck placement Flex In any deck slot in column 1 or 3. - Page 7 Facing right in slot 3, 6, or 9. ◾ Warning: Do not install the Temperature Module GEN2 with the ports facing in, towards the middle of the deck. This alignment vents air onto the deck and makescableroutingandaccessdifficult. TEMPERATURE MODULE GEN2...
-
Page 8: Anchor Adjustments
ANCHOR ADJUSTMENTS Anchors are screw-adjustable panels on the Temperature Module GEN2 caddy. They provide the clamping force that secures the module to its caddy. Use the 2.5 mm screwdriver to adjust the anchors. To loosen/extend the anchors, turn the screws counter-clockwise. -
Page 9: Flex Attachment Steps
Flex Attachment Steps To attach the Temperature Module GEN2 to your Flex: Choose the supported slot you want to use for the module. Use the 2.5 mm screwdriver to remove the deck slot plate. Insert the module into its caddy by aligning the power button on the module with the on/off switch on the caddy. -
Page 10: Ot-2 Attachment Steps
OT-2 Attachment Steps To attach the Temperature Module GEN2 to your OT-2: Choose the supported slot you want to use for the module and press it gently into place. Connect the USB cable to the module and to a USB port on the OT-2. - Page 11 can fi nd t he s erial n umber o n t he b ottom o f the module or in the Opentrons App. On the Temperature Module card in the Pipettes and Modules section of your robot’s device detail page, click the three-dot menu (⋮) and then About.
- Page 12 Post-sales service & contacting Opentrons If you have any questions about the use of the system, abnormal phenomena, or special needs, please contact: support@opentrons.com. Also visit www.opentrons.com.
Need help?
Do you have a question about the Temperature Module GEN2 and is the answer not in the manual?
Questions and answers